Monday, 21 May 2018
The Ultimate How-To Guide for Chromebook Beginners
Chromebooks have deservedly earned a reputation for being easy-to-use, even for people who aren’t technologically savvy. Chromebooks aren’t just perfect for students, they’re also solid options for seniors.
But just because the operating system is straightforward, it doesn’t mean there aren’t some parts of it that require further explanation. Without further ado, here’s an ultimate how-to guide for your Chromebook.
How to Take a Screenshot on a Chromebook
Chromebooks offer two ways to take screenshots natively. You can either capture the full screen or a part of a screen.
To capture the entire screen on your Chromebook, hold down Control and press the Switch Window key. It’s on the top row of your keyboard in what would be the F5 position on a non-Chromebook device.
Note: If you own a Chromebook with a 360-degree hinge, you can also press Power + Volume Down, just like an Android device.
To capture part of your screen, press Control + Shift + Switch Window. The mouse cursor will change into a crosshair. Just click and drag the crosshair over the part of the screen you want to save.
If your screengrab was successful, you will see a notification pop up in the lower right-hand corner.
You can find all your screenshots in the Download folder. They are not automatically saved into Google Drive.
How to Right-Click on a Chromebook
As with screenshots, there are two ways to perform the right-click action on your Chromebook.
The most common method is to use the trackpad. Move the mouse to whatever item you want to right-click on, then tap the trackpad with two fingers at the same time.
The lesser-known method uses the keyboard. Press and hold the Alt key then tap one finger on the trackpad instead of two.
Of course, technically, there’s a third way—use a USB mouse!
How to Rotate the Screen on a Chromebook
Depending on the model of Chromebook you own, there might be times when it’s more practical to use your machine in portrait rather than landscape view.
It’s also a useful trick to know in case you ever need to flip your screen 180-degrees, for example, if you are trying to show something to someone sat on the opposite side of the table.
Rotating the screen is easy. You can move through four 90-degree turns by pressing Control + Shift + Refresh.
You can only rotate in a clockwise motion.
How to Copy and Paste on a Chromebook
We won’t dwell on this one for too long. Most users will already know how to copy and paste, but it still perplexes new Chromebook users who expect the process to be widely different to what they are used to.
In practice, the process is exactly the same as the method you’d use on Windows. Use Control + C to copy, Control + V to paste, and Control + X to cut. You can also use the right-click context menu.
How to Print on a Chromebook
Printing has always been the Chromebook’s Achilles heel. It’s never been a straightforward process.
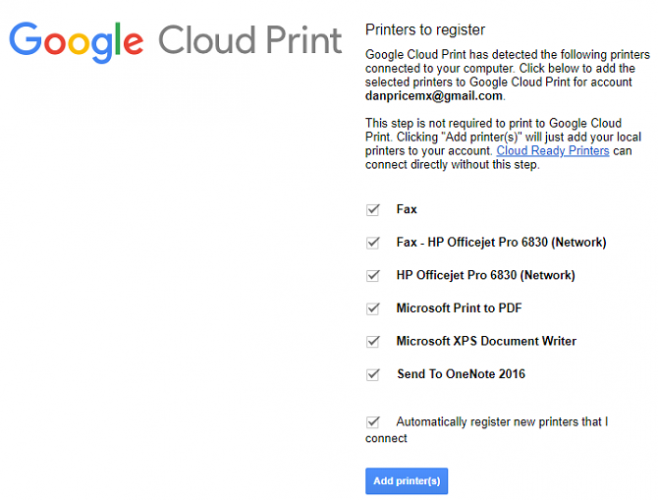
Before beginning, you need to know if your printer is “Cloud Ready.” Check Google’s list of compatible printers if you’re not sure.
If it is Cloud Ready, follow the instructions below:
- Open Chrome and type chrome://devices in the address bar.
- Locate your printer in the New Device section of the page.
- Click on Register.
If it’s not Cloud Ready but has Wi-Fi capabilities, follow these instructions instead:
- Open Chrome on a Windows or Mac operating system.
- Type chrome://devices in the address bar.
- Click Add Printer in the Classic Printers section of the page.
- Mark the checkbox next to the printer you want to add.
- Select Add Printer.
After completing either of the above processes, you can go to your Cloud Print portal to ensure setup was successful.
Lastly, if you want to add a local printer without using the Cloud Print app, use these guidelines:
- Open the Chromebook’s Settings menu (accessible through the system tray).
- Scroll down and click on Advanced.
- Go to Printers > Add Printer.
- Give the printer a name and enter its IP address.
- Click on Add.
Note: You cannot add a non-Wi-Fi-enabled printer to your Chromebook.
How to Zoom Out on a Chromebook
Chromebooks offer two ways to zoom in and out. It depends whether you want to increase the size of a single page/app, or of your whole screen.
To zoom in and out on a single app, press Control + Plus or Control + Minus accordingly. You can reset your screen’s zoom by pressing Control + 0.
If you’d rather change the zoom level across the entire operating system, press Control + Shift + Plus or Control + Shift + Minus. This shortcut will also change the size of your app dock, thus letting you fit more apps on it if you’re running out of space.
How to Change a Chromebook’s Owner
If you’re planning to sell your Chromebook, or even just give it to another family member, you will need to change the device’s owner.
The only safe and secure way to accomplish this is to do a factory reset AKA Powerwash. Performing a Powerwash will delete all data from the computer, including the users and any data in the download folder. Therefore, ensure you make a backup before proceeding.
To Powerwash your machine, open the Chromebook’s Settings menu and navigate to Advanced > Powerwash > Powerwash.
When it becomes available, click on the Restart button. You will be taken through the device setup screens. The Google Account you enter when prompted will automatically become the Chromebook owner.
How to Invert Colors on a Chromebook
Like almost all operating systems, Chromebooks come with a broad range of accessibility tools. One of them allows you to invert the colors on your screen. In Chromebook-speak, the feature is called “High Contrast Mode,” but the end product is the same.
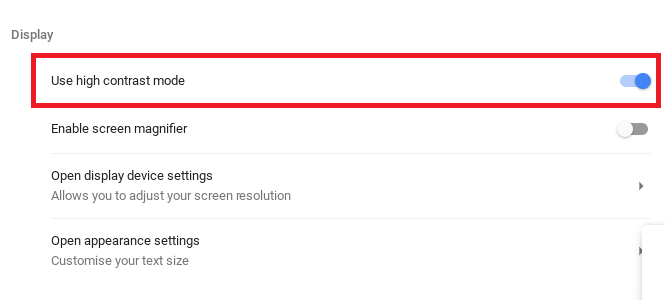
There are two ways to invert the colors. The simplest method is to use the keyboard shortcut; press Search + Shift + H. However, this shortcut will only work if the Search key is still mapped to the search function; if you’ve assigned it to caps lock, it won’t work.
The alternative approach requires you to dive into the Settings menu. Open the menu and go to Advanced > Manage Accessibility Features. In the display section, slide the toggle next to Use high contrast mode into the On position.
How to Connect to Wi-Fi on a Chromebook
How you connect to Wi-Fi depends on the type of network you want to connect to. Firstly, make sure Wi-Fi is turned on. Click on your profile photo and select No network. Make sure the toggle at the top of the popup window is in the On position.
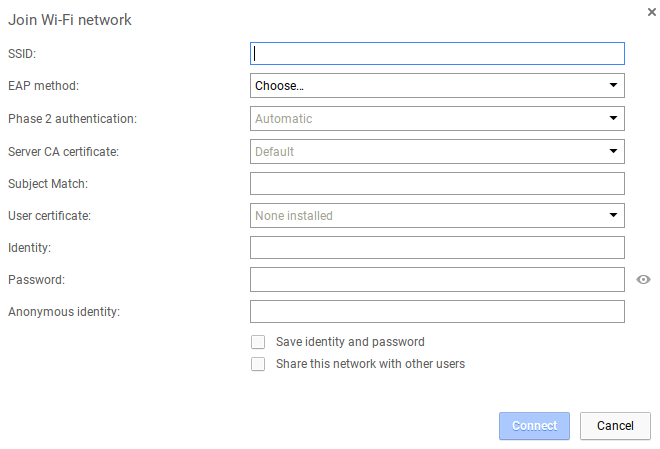
To connect to a visible network that’s within range, click on the network’s name and enter the password if needed. Meanwhile, to connect to a hidden, unlisted network, repeat the above steps but instead choose Join other network. Enter the network information and hit Connect.
What Else Do You Need to Know About Chromebooks?
The nine queries we’ve covered in this article are some of the web’s most searched Chromebook questions.
However, it’s not an exhaustive guide, so if you still have questions, feel free to reach out in the comments below.
Alternatively, you can keep reading more Chromebook content elsewhere on the site. We’ve covered everything from the most useful Chromebook shortcuts to fixing common Chromebook errors.
from MakeUseOf https://ift.tt/2IxzfSN
via IFTTT
4 Key Google Slides Tips and Tricks to Know
Google Slides is arguably the leading free slideshow presentation app. Microsoft PowerPoint is more feature-rich, but the excessive cost of an Office 365 subscription means many people have converted to Google’s product. So, if Google Slides forms an important part of your daily workflow, keep reading. We’re going to introduce you to four quick tricks that’ll instantly turn you into a power user.
1. Zoom In and Out
If you like to create beautiful, artistic slides, you might need to focus on one part of a slide in more detail.
It’s easy to do. To zoom in, press Control + Shift + Plus. To zoom out, press Control + Shift + Minus.
2. Dictate Your Slides With Voice
Are you working on a long presentation? It’s no fun to spend all day typing. Why not try dictating your slides instead?
To dictate a slide, go to Tools > Voice type speaker notes. It will bring up a small microphone icon on your screen. Click on it and start talking.
3. Add Sound to Your Presentations
It’s relatively straightforward to add images and videos to one of your slides, but what about audio? There’s no “Insert” button for audio in the same way as there is for other media.
The solution? Just copy and paste the URL of a YouTube video, Spotify song, or other online audio track. The sound will start playing when the slide in question pops up.
4. Present via Chromecast
Who needs HDMI cables these days? As long as you take a Chromecast with you, you present directly from your computer to the screen without a cable in sight.
Go to Present > Present on another screen to get started.
If you’d like to learn more, we’ve got you covered. We’ve given you tips on how to use videos in the Google Slides app, explained how to auto-loop presentations, and a whole lot more.
from MakeUseOf https://ift.tt/2ke57xb
via IFTTT
Explore the World’s Natural Wonders With Google Earth’s Geography Quiz
Remember when Google Earth Pro used to cost a mind-boggling $400? Google now offers it for free, turning an already beloved product into our go-to method for learning more about Earth and its geographic treasures.
If you love geography and the wonders of the world, then take this opportunity to explore the world from your armchair. Tucked away inside Google Earth is a wonderful little geography quiz in partnership with Atlas Obscura.
Google Earth’s Geography Quiz
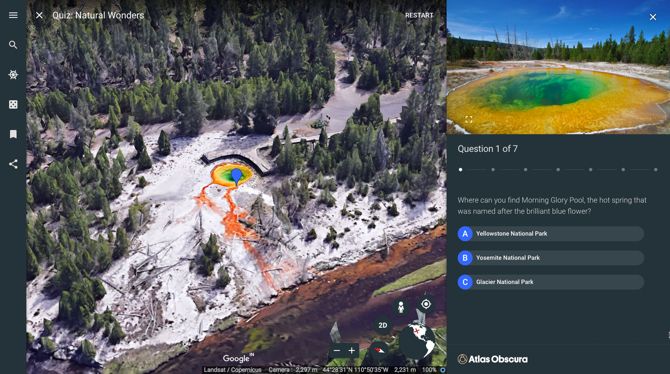
The Natural Wonders Quiz on Google Earth is a multiple-choice challenge that will ask you to identify special locations around the world. As the Google Earth blog says,
“Atlas Obscura takes you to some of the most beautiful—and intriguing—places on the planet. Know where Morning Glory Pool is? Or the hot springs of Dallol? See how well you know your planet, and explore these places in Google Earth.”
The questions and the locales are fertile ground for a site like Atlas Obscura. The popular traveler’s guidebook loves to dig up rare and hidden wonders around the world. It’s a perfect blend of history and geography. So, just click on the blue Let’s Go button and hit a spot on the blue orb of Google Earth.
Pick an answer from the multiple choices and Google Earth will give you the answer. Either way, you will get to jump to the specific spot on the 3D globe and explore it further. Go from cool ice caves in Alaska to the blazing salt mines of Ethiopia. Learn about geographical features and romantic legends.
In the end, just walk away with a better appreciation of the world we live in. There are only seven questions in the first edition of this quiz. Google Earth will continue to update the quizzes with other themes as they hint the next one might be about “magnificent castles and palaces”. Until then, don’t miss these Google Earth gems.
from MakeUseOf https://ift.tt/2IzDA3O
via IFTTT
How to Find the Best Mortgage Rates Online
Mortgage rates are complex. And figuring out how to get the best rate is even more so. But with the right tools and a solid understanding of how mortgage rates work, you can find the best rates online.
This guide will help you understand:
- What a mortgage rate is
- How mortgage rates are determined and calculated
- How to research today’s mortgage rates
- How to find mortgage forecasts and trends
- How to get the most useful information out of a mortgage rate calculator
What Is a Mortgage Rate?
If you’re just getting started in the mortgage research process, you might not have a great idea of what a mortgage rate actually is. So we’ll clear it up.
A mortgage rate is the rate of interest that you pay on the loan you’ve received to buy a house. It’s the cost you pay to the lender in exchange for giving you the loan.
Your mortgage rate is one of the most significant factors in determining the ultimate cost of your house.
If you’re familiar with other types of loans (like credit cards), it’s important to realize that mortgage rate is not the same as annual percentage rate (APR). Your APR is likely higher than your mortgage rate, as it includes other fees.
Fortunately, APR isn’t usually a lot higher than the mortgage rate, and the loan estimate that you receive from a lender will include both.
In general, you don’t need to worry about your mortgage APR. You can, however, run this mortgage APR calculator to compare loans from different providers.
What Determines Your Mortgage Rate
Several factors affect mortgage rates. The first—and most important—is the current economic climate and trends. Mortgage rates respond to various economic triggers, like the strength of bonds, the rate at which people are buying houses, and wages.
There’s not much you can do about these factors other than timing your purchase well. We’ll talk about paying attention to mortgage forecasts and trends in a moment.
The other factor that makes a big difference is your credit rating. Your lender will pull your credit score from all three reporting bureaus.
There’s no hard and fast rule, but if your rating dips into the mid-600s, you may find it difficult to get a mortgage. And you’ll likely get a higher interest rate if you do.
Should you wait and try to raise your credit rating before you get a mortgage? The answer may depend on other trends.
If your credit score is below 700 or so, it’s a good idea to make an effort to get it back up. Use a budgeting service like Mint to get regular credit score updates and monitor your spending and payment habits.
Even if you decide to get a mortgage at a higher rate now, you could refinance to a better rate later if you raise your credit score.
How Mortgage Interest Is Calculated
Most mortgages accrue monthly. Here’s how to calculate mortgage interest on a monthly basis, with an example:
- Divide mortgage rate by 12 (4.75% / 12 = .0039583)
- Multiply remaining mortgage principal by result ($225,000 * 0.0039583 = $890.62)
In this example, the remaining loan balance after accruing interest would be $225,890.62. An amortization schedule can help you understand this information. We’ll talk about those in a moment when we discuss mortgage calculators.
Some loans, called “simple interest mortgages,” accrue interest daily, which means the rate is divided by 365 and added to the total each day. If you’re good about making payments, this shouldn’t cause too much of a problem. But if you’re even a day late, you’ll pay more.
As you start the process of researching mortgage rates, it’s important to understand that there are many factors involved. Take mortgage points, for example.
Mortgage points (also called discount points) let you pay your lender some money up front to reduce the mortgage rate of your loan. This can save you a lot of money in the long run, but it depends on your lender. (For more information, check out Better Money Habits’ primer on mortgage points).
If you have an adjustable-rate mortgage (ARM), your mortgage rate can fluctuate over the life of the loan, which will also change how interest is calculated and how much you’ll pay over the life of the loan.
How Interest Affects Your Mortgage Payments
To see how the interest on your loan accrues over the life of a loan, you can check out an amortization schedule.
We’ll talk more about amortization schedules at the end of this article, but if you want to get started now, I recommend using MortgageCalculator.org to get an idea of how much interest you’re paying.
As you’ll see, your early payments go almost completely to paying off the interest on the loan. Each payment only makes a small dent in the principal balance. Later in the loan period, a larger percentage of your payments start going toward the principal.
Many 30-year loans result in lifetime interest that ends up costing 60% or more of the borrowed amount. That means if you get a $300,000 loan, you may pay back a total of $480,000 or more. It’s a good thing to keep in mind while you’re making a long-term financial plan.
How to Research Current Mortgage Rates
Now that you have a better idea of how your mortgage rate affects what you pay, let’s look at some tools for estimating what your mortgage rate will actually be. It’s important to note that your mortgage rate usually isn’t set until you close on your house.
If you’re not closing for another six months, today’s mortgage rates might not be all that useful. Nonetheless, it’s a good idea to keep an eye on them if you’re considering buying a house anytime soon.
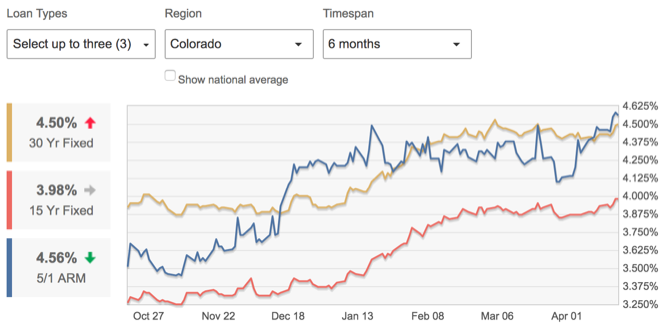
Mortgage News Daily is a great place to start. They provide the results of their survey of lenders and originators to give you an accurate representation of the day’s rates:
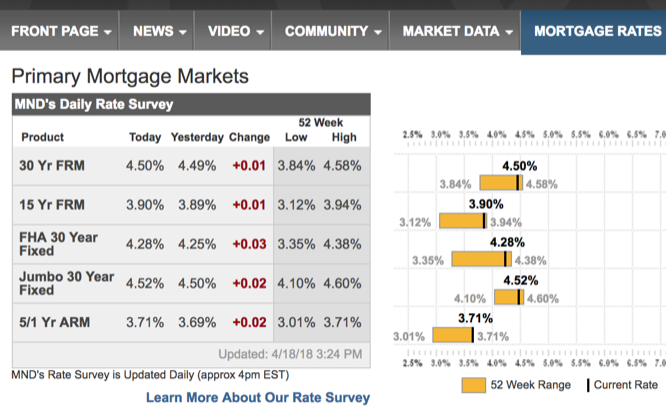
Rates are provided for 30-year fixed-rate, 15-year fixed-rate, Federal Housing Authority (FHA) 30-year fixed, jumbo 30-year fixed, and 5/1 ARM. You can scroll down to find a variety of other mortgage rates as well.
Unless you’re planning on getting a mortgage right away, the most useful information is probably the change and the location within the 52-week spread. In the image above, mortgage rates have gone up, and they’re close to as high as they’ve been in a year.
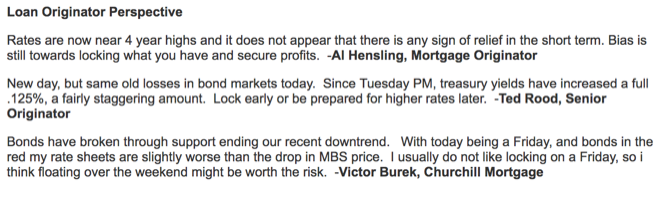
Mortgage News Daily also has a daily report that gives you information on rate changes, suspected changes in the near future, and suggestions on whether you should lock your interest rate.
You can subscribe to the report to get an email update every day with the latest rates and information.
For a simpler view of national rates, head to the Wells Fargo’s Mortgage Rates page.
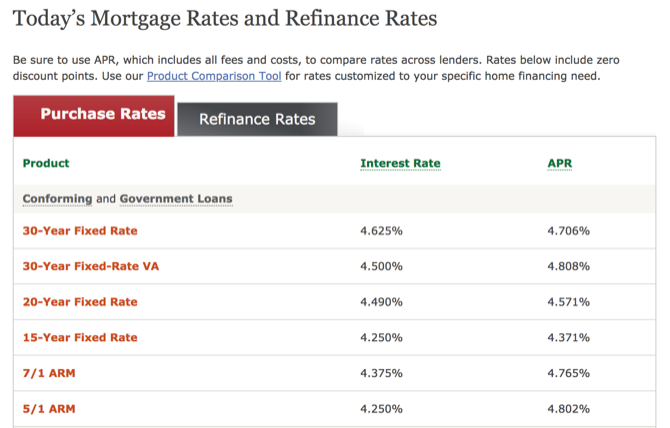
While these rates only apply to mortgages from Wells Fargo, they’ll give you a quick look at the current rates.
When I checked today, the Wells Fargo rates were higher than those reported by the Mortgage News Daily survey. In some cases, it was a tenth of a percent; in others, it was closer to .05%. So keep that in mind.
Of course, mortgage rates aren’t the same everywhere in the country. To find a sampling of mortgage rates in your area, head to Bankrate’s mortgage page. Here you’ll need to enter the value of the home you’re looking to buy, your down payment, credit score, and ZIP code.
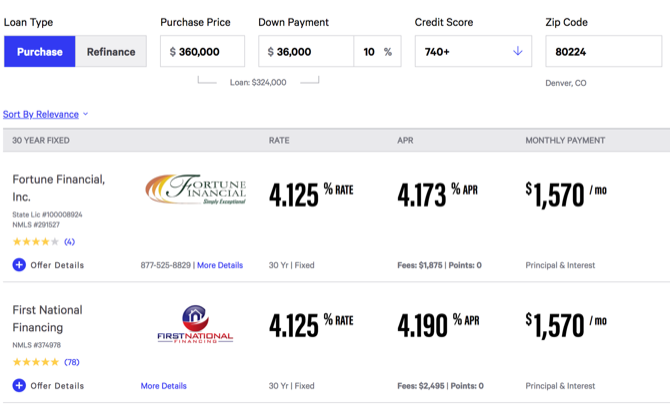
You’ll get a sampling of what different lenders are offering in your area—you’ll see the rate, fees, APR, and monthly payment.
With these sites, you should be able to get a good idea of the average mortgage rate around the country and near where you live.
But is it a good time to get a mortgage, or should you hold off? Let’s take a look at mortgage forecasts to find out.
How to Understand Mortgage Rates Trends and Forecasts
Should you get a mortgage now? Or should you wait to see if rates get better? That’s what the mortgage forecast will tell you. Or try to tell you.
The US economy is volatile and can see large swings in short periods of time. That tends to have an effect on bonds, which in turn affect mortgage rates. So how do you know whether you should get a mortgage now or wait?
Unfortunately, there’s no single place to go to find a simple mortgage rate projection chart that tells you everything you need to know. Instead, you’ll have to look for reports.
Mortgage Rate Watch from Mortgage News Daily is a good place to start. Their daily reports often contain projections about where the market will be headed, and the contributions from licensed loan originators provide industry insights.
Bankrate’s Mortgage Trend Index also gathers opinions from industry insiders as to whether the mortgage rate is predicted to rise, fall, or stay the same over the course of the week.
For a more quantitative view of mortgage rate trends, you may want to visit Realtor.com’s trends page. While it won’t make predictions on where rates will be in the future, you can see where they’ve been in the past, and that can give you an idea of what could be coming.
You can also limit the trends to your current location or the place where you’d like to buy to get more detailed information.
In the end, mortgage rate forecasts are just guesses. But they can give you an idea of when you should get the best mortgage rates. It’s always a good idea to talk to a financial advisor (or an independent mortgage broker) to get their opinion on the matter, as well.
Getting the Most Out of a Mortgage Calculator
While signing your mortgage at the right time will go a long way toward getting you the best rate possible, there are a lot of other things to think about, too. And a high-quality mortgage calculator will help you figure those things out.
There are certainly some simple mortgage calculators out there—Google even has one built into its results pages:
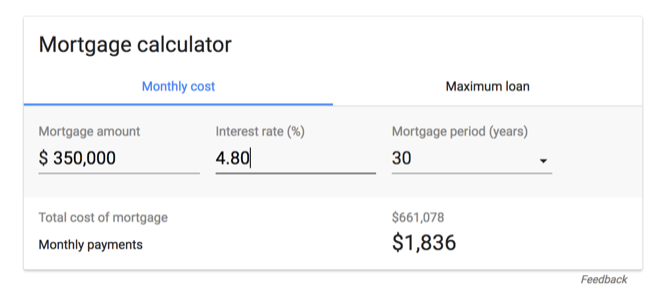
These simple calculators let you enter the size of your mortgage, your down payment, and the term. Then you get estimated monthly payments.
But if you want to really understand your mortgage rate and what it means, you’re going to want to use one of the more complicated calculators. They take into account things like fees, closing costs, prepayment penalties, and so on.
MortgageCalculator.org is one of the best mortgage calculators around. Here’s the information you’ll need to use it effectively:
- Home value
- Down payment
- Loan amount
- Interest rate
- Loan term
- Start date
- Annual property tax
- Cost of private mortgage insurance
- Annual home insurance cost
- Monthly HOA Dues
With that, you’ll get a full amortization table that tells you how much you’ll pay per month, when your loan will be paid off, the total amount of interest you’ll pay, the amount of money you’ll save if you pay bi-weekly instead of monthly, and more.
It’ll take you a while to collect all this information, but most of it should be readily available from your bank, the property listing, and your real estate agent.
Once you’ve collected the information and put it in the mortgage calculator, you’ll get a result like this:
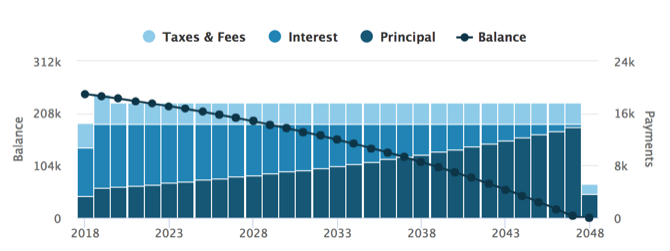
This view shows you what you pay each year, and breaks that amount down into taxes and fees, interest, and principal. As you can see, the earlier years of the loan are spent mainly paying back interest, while you start to make a larger dent in the principal later on.
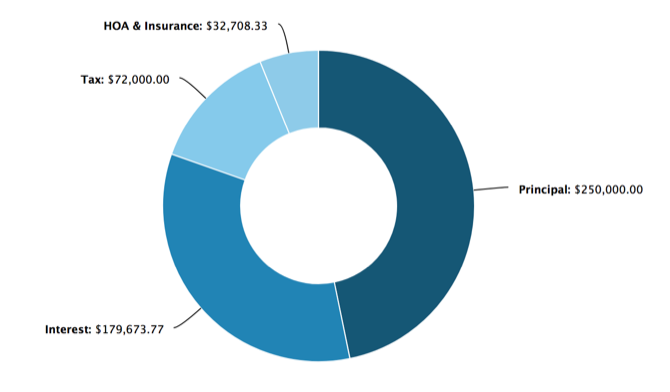
Clicking on View Loan Breakdown will give you total amounts for each over the life of the loan:
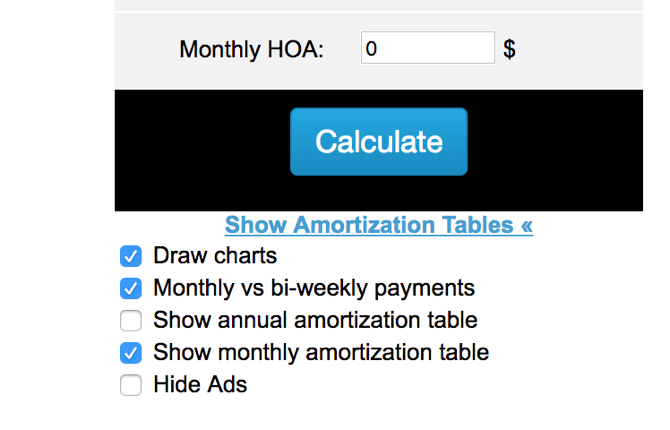
Finally, you can view an amortization table, which shows you how your payments break down each month. To get this table on MortgageCalculator.org, scroll down and click Show Amortization Tables, then select monthly or annual:
When you click Calculate again, you’ll get a full breakdown of each payment:
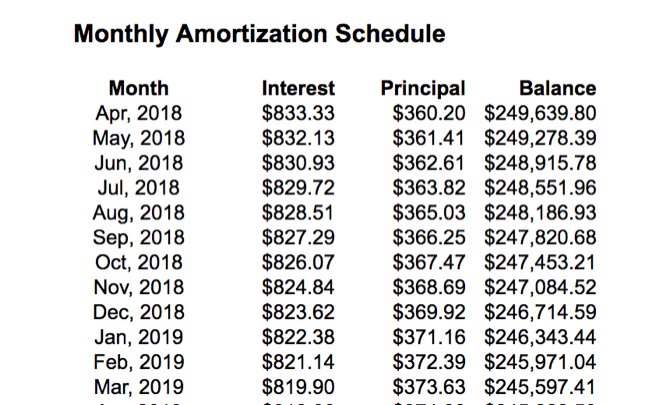
Change your mortgage rate, down payment, or any other number to see how your monthly payment breakdown changes, and you’ll start to really understand your mortgage rate.
You’ll notice that even a small change in your mortgage rate can make a difference over 30 years.
Using a Mortgage Calculator With Prepayments
Want to see how some extra payments would help pay down your mortgage? You need a prepayment mortgage calculator.
One of the best calculators for this purpose is from HSH. Enter the amount of your loan, the loan term, and the interest rate. Then, enter your desired monthly payment or how quickly you’d like to pay the loan off. Click Calculate:
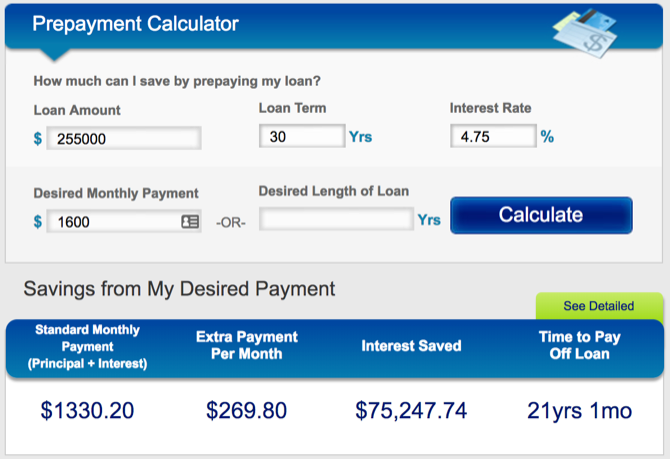
You’ll see how much extra you’re paying (or need to pay), how long it will take to pay off the loan, and how much money you’ll save in interest. As you can see, a couple hundred extra dollars each money can save you a phenomenal amount of money in the long run.
The Best Mortgage Calculator
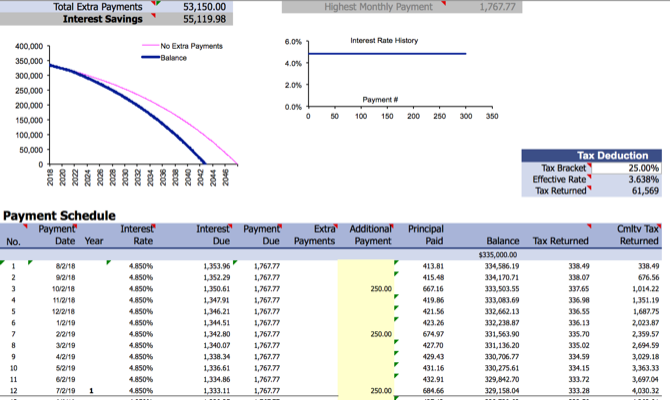
If you want the absolute best mortgage calculator, you’ll want this Excel spreadsheet from Vertex 42. You’ll need a lot of information to take full advantage of it, including all your mortgage rate information, your tax bracket, planned extra payments, property taxes, home insurance, and a few more things.
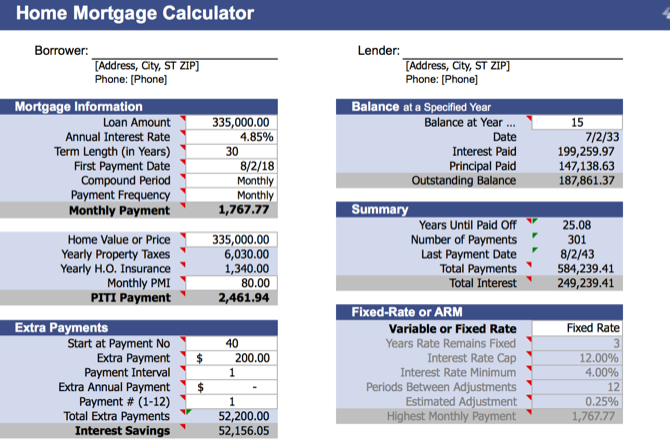
But if you can collect all that information, you’ll get everything you could want from a mortgage calculator. You’ll get a full amortization table. The total amount of interest paid. The total amount of tax breaks received. The effect of increased monthly payments or one-time extra payments. Anything you could want.
It takes a while to gather and enter all of the information you need, but this mortgage calculator can’t be beat.
Vertex 42 also has other great mortgage calculators that aren’t quite so complicated. Check out their Mortgage Calculators for Excel page to peruse and download them!
Mortgage Calculator App for On-the-Go Estimates
When you’re thinking about buying a house, you’re going to be on the go a lot. You’ll be looking at houses, visiting banks, checking out new locations, and generally spending a lot of time in the car.
To get a quick calculation of your potential mortgage payments on a house from your phone, try the QuickenLoans Mortgage Calculator app.
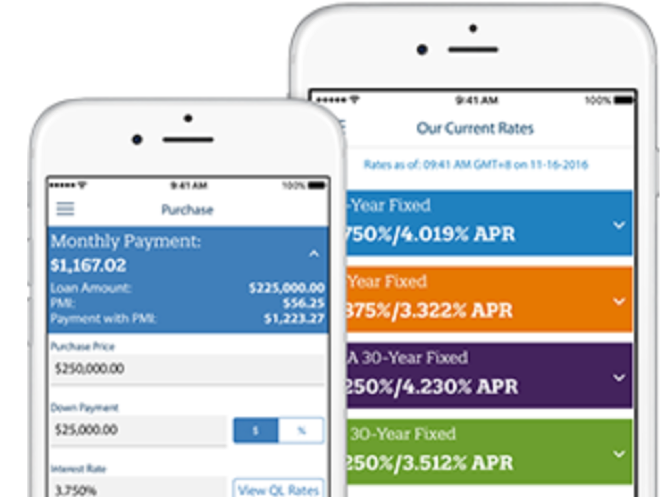
While it’s meant to get you to use Quicken for your mortgage, it does have a decent interface for getting this information quickly. You could also upload a mortgage calculator spreadsheet to the Google Sheets app and update it as you go.
Download: QuickenLoans Mortgage Calculator for Android | iOS (Free)
How to Get a Better Mortgage Rate
Armed with all of this information, you’re ready to go out and get the best mortgage rate possible. You’ll know what the average rates are, whether it’s a good time to buy, what you can afford, and what you can expect to pay for it.
With all of that knowledge in hand, you’ll be able to work with a banker to get the best mortgage rate. It could be a banker from one of the banks you found on a mortgage comparison site. Or from your own bank. Or an independent broker.
No matter who you decide to work with, you’ll be able to use this information to make sure you’re getting the best mortgage possible. Just don’t forget that mortgage is a debt and you need to be smart to get out of it.
from MakeUseOf https://ift.tt/2s59CxJ
via IFTTT
Saturday, 19 May 2018
Google Is Making HTTPS the Chrome Default
With well over half of all websites now encrypted, it’s time to think of HTTPS as the default option rather than the exception. That is, at least, according to Google, which is changing the way Chrome handles secure vs. non-secure web pages. And about time too.
Over the last year there has been a push to switch all websites to use HTTPS (Hyper Text Transfer Protocol Secure). Google has been especially keen for sites to make the switch, and with more sites complying, it’s time to change the way we view the web.
Switching From HTTP to HTTPS
At the moment, sites that aren’t secure don’t have any special labels attached. As far as Chrome is concerned they’re considered the standard. On the flipside, sites which have HTTPS switched on get a green “Secure” label with a lock symbol attached.
However, this is all set to change over the next few months. As outlined on the Chromium Blog, with the release of Chrome 69 in September, the “Secure” label will disappear. And then at some point in the future, Google will remove the lock symbol as well.
Since HTTPS should be the default, Chrome will remove the "Secure" indicator for HTTPS sites. It's the new default. Insecure sites (HTTP) will be called out. https://t.co/JW6Bms0APV pic.twitter.com/kXq7x7FAsk
— /dev/eloper (@mattiasgeniar) May 18, 2018
In addition to this, with the release of Chrome 70 in October, standard HTTP pages will be labelled with a “Not Secure” warning with a red triangle attached. In other words, Google is turning everything on its head and labelling HTTP rather than HTTPS.
Google’s reasoning for making this change is that “users should expect that the web is safe by default”. So, rather than having HTTP as the standard to be expected and HTTPS as a rare beast to be celebrated, HTTPS becomes the standard and HTTP is vilified.
Google Ups the HTTPS Ante
This actually makes a lot of sense. Thanks to companies such as Google, more of the web is now encrypted, which means that’s the default. Unfortunately for sites which still haven’t made the switch from HTTP to HTTPS this just piles the pressure on.
It’s shocking it has taken this long for most of the web to switch to HTTPS. We were explaining what HTTPS means back in 2011, and it has taken seven years to get to this point. Still that was before we understood quite how much we’re all being surveilled.
Image Credit: Stephen Shankland/Flickr
from MakeUseOf https://ift.tt/2kdejlb
via IFTTT
5 Famous Websites That Died (And Their Best Alternatives Today)
The rapidly changing nature of the internet means that services can fall out of favor as quickly as they explode in interest. Who knows if we’ll refer to Facebook and WhatsApp in the same sentence as MySpace and AIM in a few years?
Today we’re going to take a step back and look at once-popular web services that went extinct. We’ll see exactly why they went defunct, and provide the best alternatives to them.
Note that in this list, we’re only including old websites that are no longer available. We’ve left out services like Digg that are a shadow of their former selves but still in service.
1. ChaCha
Founded: 2006 | Defunct: 2016
Before internet access was ubiquitous on mobile phones, people had to wait to get answers for their questions when they weren’t home. If you were out with friends and wanted to know the weather across the world or some obscure piece of sports trivia, you couldn’t easily Google it on the go.
In addition, search engines of the time weren’t always good at answering questions like they are now. They could match keywords, but questions tripped them up.
That’s where ChaCha came in. It was a human-powered search engine that you interacted with via texting. Sending an SMS to 242-242 with your question would lead to a team member replying with an answer. Since it was free, and most people had access to texting, it was a great way to get quick information when you weren’t at a computer.
ChaCha paid its part-time workers a few cents per answer. And while the company had strong beginnings with an investment from Jeff Bezos, the widespread adoption of smartphones meant that its services became increasingly unnecessary.
In late 2016, ChaCha shut down completely due to a lack of funding. The company’s owner moved to Hawaii but couldn’t even pay the employees what they were due. It’s a sad case of a model that was brilliant at the time but became unnecessary as Google became more powerful and ubiquitous.
ChaCha Alternatives
Google’s free mobile apps can answer pretty much anything ChaCha could. Its recent updates have made refinements to Featured Snippets, which pull relevant info from a page so you get an answer to your question without even leaving the results page.
If you’d prefer a human answer to your questions, the Stack Exchange network of sites is a great place for questions and answers. Quora is a similar service, and you can always ask questions on Reddit and other forums too.
2. Grooveshark
Founded: 2006 | Defunct: 2015
People have wanted to find free music online since the dawn of the internet. While downloading from old websites like LimeWire was a popular option, that came with the risk of a virus infection. Grooveshark provided music fans with a way to listen to whatever they liked in a browser for free.
Since you streamed music instead of downloading it, it was a safer alternative to other piracy services. Remember that at the time, Spotify wasn’t widely available yet and Pandora only allowed you to listen to the radio. Grooveshark letting you search for any song and create your own playlists was quite convenient.
This site allowed anyone to upload music so others could find it. While it wasn’t always a super polished experience (miscategorized and partial songs popped up often) it was good enough for a lot of people.
Though it didn’t allow users to download tracks, Grooveshark was still an illegal service. It had several bouts with the law that didn’t produce lasting results, but that changed in 2015. The site settled with the big three records companies and immediately shut down.
You can read a more detailed history of the service in our Grooveshark retrospective.
Grooveshark Alternatives
As you’re probably aware, you have lots of options for replacing Grooveshark. Spotify is probably the closest alternative, as it lets you stream millions of songs on your desktop for free. However, you’ll need to pay for a Premium subscription if you want to remove the ads.
If you don’t like Spotify, you can try one of the many other music streaming services. Most of them have a free plan that should more than fill the void Grooveshark left behind.
3. Megaupload
Founded: 2005 | Defunct: 2012
Megaupload was an extremely popular service for uploading and sharing content both legal and illegal. It seemed that nearly everyone who wanted to make a file available for others in YouTube descriptions, forum posts, or similar put it on Megaupload. In fact, when the service closed down, it held 25 petabytes of data!
One of the biggest legal problems with Megaupload was that when a user uploaded a file that matched one already on the service, the uploader asked to create another link to the file instead of adding a duplicate. Under DMCA, Megaupload only had to remove a link when the copyright holder requested it. Thus, a DMCA takedown could potentially remove just one link from the many pointing to an illegal file.
In early 2012, the US Department of Justice took control of Megaupload and shut it down. The government claimed that several behaviors on the site proved criminal intent. These included the fact that only the most popular files were kept available for download, the ad-focused revenue scheme was dependent on maximizing downloads, and more.
Megaupload was semi-reborn as Mega a year later. This version encrypts files before uploading, meaning the company can’t access them. It also doesn’t use the matching system to create multiple links to one file, so Mega should be more government-proof.
On a similar note, Rapidshare was a service much like Megaupload. Once the latter was taken down, Rapidshare changed its ways to avoid a similar fate. This killed the service’s popularity and crippled the company, resulting in its closing down in 2015.
Megaupload Alternatives
Mega is a decent alternative to Megaupload. If you don’t want to use it, any cloud storage provider like Dropbox or Google Drive works too.
Barring that, check out tons of easy ways to share files without cloud storage.
4. Orkut
Founded: 2004 | Defunct: 2014
Orkut was a wildly popular social media website before the dominance of Facebook. It was most popular in India and Brazil and was created by Orkut Büyükkökten as an independent project while he was working for Google.
At first, Orkut made networking more open by allowing anyone to visit your profile unless they were on your block list. It had standard social features like creating polls, sharing videos, and liking posts.
Nothing particularly interesting happened to cause Orkut’s demise. While it enjoyed popularity in a few regions, much of the world didn’t use it. This meant that Google’s other products like YouTube and Blogger outpaced Orkut.
Combined with the dominance of Facebook and Google+, which Google was still pushing at the time, the company cut the dead weight in late 2014.
Orkut Alternatives
You’re probably already on an alternative to Orkut. The best social network is the one that most of your friends use. Facebook is an obvious choice, while Twitter, Instagram, and Snapchat are also popular.
5. Heat.net
Founded: 1997 | Defunct: 2000
One of the lesser-known old websites, Heat was ahead of its time. Heat.net was an online gaming platform from Sega. It let you enjoy first and second-party games, along with other big games like Quake 2, online with other players. The subscription cost $10 per month and included chat lobbies.
But the service quickly ran into problems. It rewarded players with currency named “degrees” simply for staying connected to the service. It didn’t take long for players to abuse this, as they’d leave their computers connected but idle and earn degrees for doing nothing. You could spend these degrees on games, magazines, and computer hardware.
Sega reduced the value of degrees to combat this problem, but it wasn’t enough. The company closed down Heat.net in 2000 and replaced it with SegaNet, a new online service for the Dreamcast. However, the Dreamcast failed due to the hype from the upcoming PlayStation 2, resulting in Sega discontinuing the console in early 2001.
This, in turn, led to Sega exiting the video game console business entirely. It’s easy to trace modern online services like Xbox Live back to Heat.net, so it definitely had an impact.
Heat.net Alternatives
Steam is the closest modern service to Heat.net on PC, as it lets you buy and play games online with others. If you play on a console, you can subscribe to PlayStation Plus or Xbox Live to enjoy many of the same features.
Popular Old Websites That Died: Gone but Not Forgotten
You’ll note that we didn’t include any Google services here. But in fact, Google has killed off so many services that it’s hard to count them all.
These five services were all popular for some time but faded as technology advanced. But whether they were superseded by superior alternatives, forced to shut down due to illegal content, or just couldn’t keep up, none could stay afloat.
It’s fun to take a nostalgic look back to see what was popular years ago, and what we can learn. Thankfully, all these old websites have modern equivalents.
For more, check out these famous programs that no longer exist.
from MakeUseOf https://ift.tt/2rSQGTs
via IFTTT
Friday, 18 May 2018
How to View and Recover Your Microsoft Outlook Password
Microsoft Outlook is one of the most popular email clients around, regularly ranking among the top clients. It’s only beaten by Apple’s integrated mail solution and Gmail for global email opens. Most people use Outlook at some time in their lives.
Given those millions of users, it is understandable that at some point, someone will forget their Outlook password. And in those moments, you need a tool that can retrieve the password while keeping your data intact.
Here are three tools to help with Outlook password recovery. But first, we need to understand the difference between PST and OST files and how they store and password-protect your mail in Outlook.
Differences Between Outlook PST and OST Files
The way Outlook stores, manages, and secures your data depends on the type of account you are using. There are two main types of Outlook data files:
- PST: A Personal Storage Table is the storage system Outlook uses for POP and IMAP accounts. Your email is delivered to and stored on the mail server, and is only accessible while online. You can take backups of your email to work on, but this also creates a new PST file. When you move to a new computer, PST files transfer easily between systems.
- OST: You can use an Offline Storage Table file when you want to keep an entire local backup of an email account. All the data is stored on your computer as well as the mail server. This means the entire user account email database is accessible, regardless of network connection. Changes sync when the user establishes a connection with the mail server.
There are two more vital differences between the two file types.
By and large, PST data files store vital information, such as passwords, to the local machine. This password locks unauthorized users out of the Outlook account, protecting emails and user data in the process. The OST data file also uses local storage but doesn’t contain any passwords. As such, the PST file is open for password retrieval. (Do note that OST passwords aren’t much more secure.)
The second difference is a bug in Microsoft Outlook’s password protection that relates to password storage.
The Microsoft Outlook PST Password Protection Bug
When you enter a password on a website, the site (hopefully) doesn’t store it in plaintext. Plaintext is what you’re reading now, so you can see why storing a password in this form isn’t so wise. The website takes your password and creates a hash.
A hash is a long string of alphanumeric characters that represent your password and is tied to your username. When you type your username and password combination, the database returns a positive response, and you enter your account. But if an attacker enters the database, all they see is a long list of confusing hash values.
Here’s the problem with Outlook: Instead of using a complex hashing algorithm (ideally with a salt), Microsoft appears to have cut some security corners using the basic CRC32 algorithm.
The bad news is that each CRC32 hash has a lot of matching values, meaning there’s a strong chance a password retrieval program will unlock your file. This is great if you need your PST file unlocked, but utterly terrible if you want to keep it secure.
This is where Outlook password recovery tools come in.
PST Tools for Outlook Password Recovery
There are several tools you can use to retrieve PST passwords and unlock your data file.
1. PstPassword
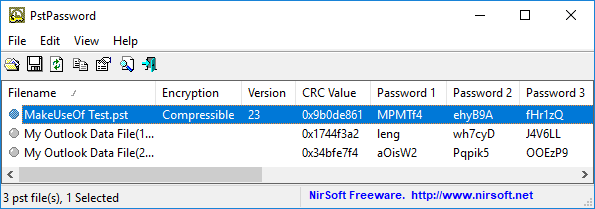
Nirsoft’s PstPassword is a great free utility that automatically retrieves PST passwords for local data files. PstPassword displays three potential passwords due to the encryption bug. If the first option fails, you have two more choices. (In fact, PstPassword generates a long list of CRC32 hashes that might unlock the data file.)
PstPassword doesn’t require installation, either. However, your system might detect it as a malicious file (as it is harvesting passwords, something that you don’t want at other times).
2. Kernel Outlook PST Password Recovery Tool
Kernel Outlook PST Password Recovery Tool is a limited free utility. The major limitation is the size of the PST file the tool will unlock. Kernel’s tool will unlock PST files up to 500MB for free. However, if your data file size surpasses that you will need to upgrade to the Home License for $39.
The tool quickly analyzes your PST files, providing a hash value for you to enter. Unlike PstPassword, Kernel only grants a single password hash to try. However, if that doesn’t work, Kernel also has the option to remove the password protection from the PST file (as well as adding a new one if you desire).
3. Recovery Toolbox for Outlook Password
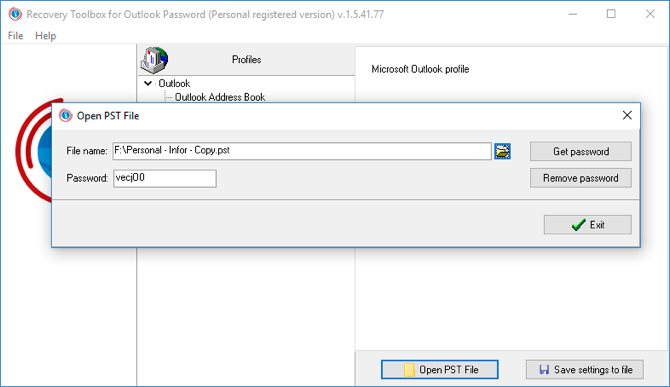
Our final tool is Recovery Toolbox for Outlook Password. Recovery Toolbox costs $19 but comes with a few more options than either free option. For example, Recovery Toolbox can:
- Recover and show passwords for PST data files
- Reset PST data file passwords
- Recover and remove some passwords for OST data files
The major difference is support for OST files. The paid version of Recovery Toolbox shows and removes OST passwords, too, giving it a slight advantage. That said, other free online tools will uncover even the most secure Outlook OST data file passwords, too.
Testing the PST Password Protection Bug
You can check the password protection bug out for yourself using PstPassword.
Open Outlook and head to File > Account Settings > Data Files. Press Add to create a new data file, giving it a temporary name. Next, head to Settings > Change Password. Leaving the “Old password” field empty (as it is a new data file), enter a strong new password in the “New password” and “Verify password” fields. (In fact, I’m using a Secure Password Generator to create a super-strong 16-character password.)
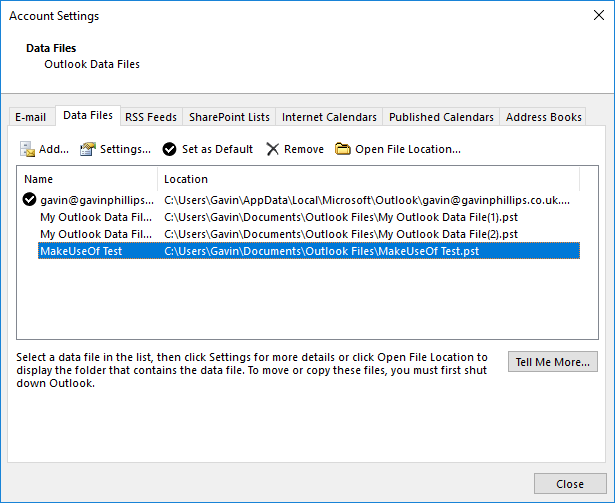
You might note that despite the 16-character password, Outlook only accepts 15-characters. Regardless, press OK, close the panel, then close Outlook.
Download, then open PstPassword. It should automatically detect your newly created PST file, as well as any existing data files, too. Now, alongside your test file, there are three potential passwords. Because the password is over a certain amount of characters, PstPassword displays the hash values.
Open Outlook again and enter one of the hash values. If it doesn’t work, try the next one. In the event the first three don’t work, right-click the test data file and select Get more passwords.
Mail PassView is another free password viewing and recovery tool from Nirsoft. Mail PassView uncovers OST data file passwords, rather than PST data files. However, as OST data file passwords are usually set via mail server rather than in Outlook itself, the tool cannot remove passwords or offer alternatives.
Still, Mail PassView is a useful free tool for recovering your Outlook password.
Outlook Password Recovery Complete!
One of these tools will grant you access to your Microsoft Outlook PST data file. Some Microsoft Office programs have strong integrated encryption. However, you have seen the Outlook password protection bug and how you can easily uncover a lost password.
from MakeUseOf https://ift.tt/2rQm70E
via IFTTT
7 Tips for Making Your Instagram Stories Stand Out
It’s hard to imagine anything easier than posting a story on Instagram. After all, it only takes a few seconds and three taps to take a photo or video and immediately share it on your profile. Especially as Stories are often seen as the unpolished antidote to many users’ curated Instagram feeds.
But there’s more to Instagram Stories than meets the eye. When used properly, they are an incredible tool for driving engagement with your followers, building connections with other users, and sharing your life with the people you care about.
When used improperly, however, Stories can quickly become annoying and over-long monologues that are confusing to anyone but their creator. Here are our best Instagram Stories tips to help your posts stand out from the crowd.
What Are Instagram Stories?
In case you’re still unfamiliar with the Stories feature (pioneered by Snapchat and quickly integrated into Facebook and Instagram), here’s what you need to know.
Essentially, an Instagram story is a sequential collection of photos and videos that is visible on your Instagram profile to any of your followers for 24 hours. After 24 hours, the story disappears.
Instagram Stories fill a variety of purposes. They can tell the behind-the-scenes story of an impressive Instagram post, provide insider information about a promotion, or can be a fun way to share an event in your life that doesn’t warrant a formal post.
Posting a story is easy: open Instagram, and tap the camera icon in the top left. Take a photo, and hit Send To, then press Share next to the contact labelled “Your Story”.
Of course, there’s a whole lot more to know, including Instagram mistakes you should avoid making.
1. Post Quality Photos and Videos
While this Instagram Story tip may seem like common sense, it’s often overlooked by Instagram users. Instagram stories are less formal than official Instagram posts, and leave some room for unedited photos or videos that sound more like a casual conversation.
However, if you are looking for social media success, everything you post needs to be worth your audience’s attention.
Here’s a quick checklist:
- Photos and videos should be in focus and interesting
- Simple editing (such as straightening horizons, cropping, and color correction) can go a long way
- Text should be readable, and not overly long
- Videos with voiceovers shouldn’t cut off at awkward times or in the middle of a sentence
- Standard strategies for making your Instagram photos stand out still apply—you can never go wrong with a little extra editing!
Also, just because Stories gives you the freedom to post as many photos or videos as you want doesn’t mean that you should post every photo or video you take. Your complete story shouldn’t last longer than two or three minutes—and that’s an absolute maximum. Stories are designed to give people a quick and exclusive look “behind the scenes” of your social media; lengthy commentary is better suited to a blog post or YouTube video.
2. Give Context for Your Instagram Stories
One of the biggest mistakes Instagram users make is posting stories that don’t make any sense. But, you also don’t want to spend your time typing out lengthy explanations that no one will read, or offering voice overs that no one will listen to.
Instead, Instagram offers simple stickers (found in the top right of the photo-editing screen) for each image or video. Use these stickers to identify your location, provide a time stamp, tag the people you’re with, or to add a relevant hashtag.
Paired with a sentence or two on Instagram Stories’ “Type” screen (swipe all the way left after opening the Stories camera), your story will make sense to everyone who views it.
3. Be Interesting
Instagram has a ton of great features specifically for Stories. And since one of the main purposes of Instagram Stories is to show off a more personal (and fun!) side of your social media, you should take full advantage of these features whenever possible!
Great Instagram Stories features include:
- Taking and sharing Boomerangs
- A Focus filter that ensures your face stands out from the background
- A “Superzoom” filter that can be paired with different sound clips (including “bounce”, “TV show”, “dramatic”, and “beats”) to help emphasize a key item or person in your story
- Playing a video in rewind
- A “Hands Free” mode that lets you take video clips without holding down the shutter button
- A “Stop Motion” mode that lets you create short, looping videos out of still photos
- Your choice of a changing selection of live filters (press and hold on someone’s face or tap on the smiley face at the bottom right of the screen) that can give you silly accessories, distort your face in funny ways, or even work some Photoshop magic
- A huge variety of stickers, GIFs, and emojis that you can add anywhere on your image/video
Have fun exploring these Instagram Stories tricks to make your Instagram Stories stand out from the crowd.
4. Ask Questions on Instagram Stories
One easy way to get viewers invested in your Instagram Story is to ask them to share their opinion. Instagram offers two easy tools to get input from the people watching your story.
First, you can choose to create a poll. Simply select the “Poll” sticker, type in your question, and then enter two options for viewers to choose between. As people select either option the poll will constantly update its percentage.
Want something a little less polarizing? Choose the slider sticker instead. You can customize both the question you ask and the sticker you use to label the slider. Viewers can then drag the slider to the intensity of their reaction to your question.
5. Cultivate a Community on Instagram
One of the potential downsides to Instagram Stories is that your followers can’t respond publicly to your posts through comments. And while the polls and sliders shown above are fun, they don’t allow for a lot of nuance. Many successful Instagram accounts address this shortcoming by posting screenshots of thoughtful responses that have landed in their direct messages.
This strategy can be a great way to build a community around your Instagram account—but be careful to respect your followers’ privacy. It’s always best to ask before tagging someone’s username or showing identifying information in a screenshot. You can also always draw over any identifying information using the marker tool.
6. Think Outside the Box
Instagram has a ton of great features that are native to the app. But you can also add to your stories from any photos (or screenshots of photos) that you’ve saved to your phone over the last 24 hours. This feature opens up a world of possibilities , especially when paired with awesome third-party Instagram apps.
When it comes to Instagram Stories, the only limits are your creativity and your audience’s attention span. Stories offer a truly unique method of telling stories and sharing information, and third-party apps and editing features can go a long way towards helping you to achieve any effect you want.
7. Branch Out
While they may seem gimmicky at first, Instagram Stories are a powerful way of reaching followers. Whether you’re promoting a brand on Instagram, establishing a business, or just sharing what you had for breakfast, it’s important to use Instagram Stories as a way to link viewers in to your other social media accounts.
Don’t be afraid to direct viewers to other social media accounts through your Stories.
For example, after showing a behind-the-scenes interview, you can ask viewers to go view the final product on YouTube, enter a contest on your blog, or visit a specific site with a coupon code.
If you have over 10,000 followers (or are a verified account) you can even include a link directly in your story. If you have fewer followers than that, you can always use the old “link in bio” trick!
Instagram Stories are also key for promoting other accounts that you enjoy, building hype for a promotion, or helping viewers to feel more connected to you as an individual.
What’s Your Instagram Story?
Stories on platforms like Instagram and Snapchat have been one of the biggest recent shifts in social media. Their flexibility is a key component of that—the way you make your stories can be completely different than anyone else’s.
That being said, it’s important to make sure that what you are doing is working. Be sure to monitor who’s viewing your Instagram Story and adjust your strategies as needed until you reach the audience you want to reach!
from MakeUseOf https://ift.tt/2wZlV3Y
via IFTTT
5 Cool Custom Data Dashboards You Can Make With Google Sites
Google Sites is one of the most convenient ways to create and publish a website with the least amount of effort. With the tools available in Google Sites, you can actually create very useful personal dashboards that can boost your organization and productivity.
In this article, you’re going to see how you can use Google Sites to create some very cool dashboards that can:
- Monitor your email
- Analyze your website performance
- Create a time management system
- Stay informed with live news
- Save your favorite locations
1. Email Monitoring Dashboard
One of the most annoying things about email is that you need some kind of email client to know when a new email has arrived in your inbox.
If you have a Google email account, that might be your preferred online Gmail inbox, or any of the desktop email clients out there.
But with Google Sites, you could actually build a custom data dashboard to display all incoming emails in one place. With a single dashboard, you can just glance to see all the new incoming emails for the day.
This requires syncing Gmail to a Google Sheets and then displaying those sheets in a Google Sites page.
Display Timestamp of Latest Email
It’s possible to sync Gmail with Google Sheets using IFTTT. But with IFTTT you can only do this with one Gmail account. This is why I usually turn to Zapier to sync multiple Gmail accounts to multiple Google Sheets. However, keep in mind that Zapier isn’t free.
With Zapier, you just create a “Zap” with an input for the Gmail account you want to monitor and choose it to trigger with every new incoming email. Then choose Google Sheets as the output.
You should create a Google Sheet called “Incoming Emails” ahead of time.
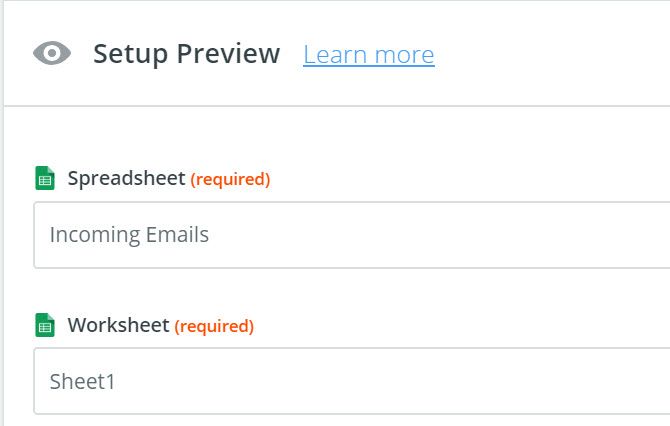
Zapier lets you choose the spreadsheet by name and the worksheet inside it where you want your email information to go.
In this first example, you’ll create a widget on your dashboard that shows each account.
Something like this:
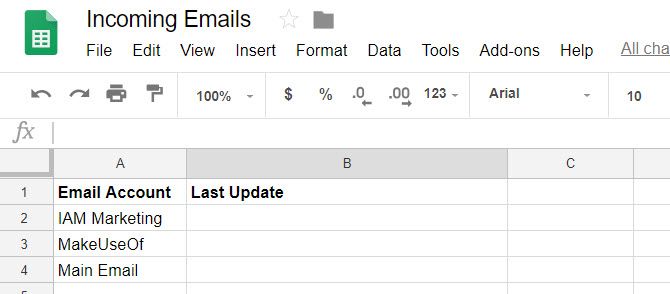
Every few minutes, the script will run and update the second column, of the row you specify.
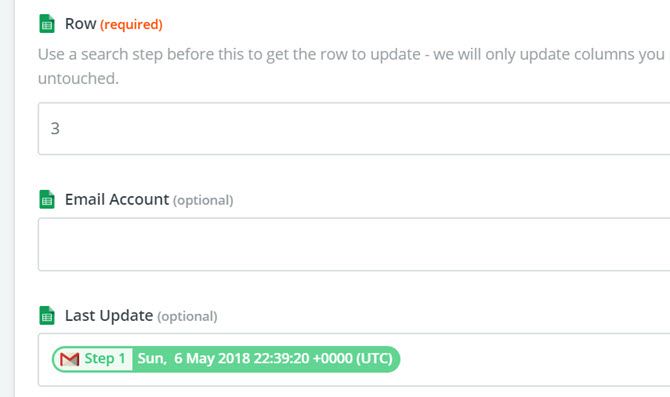
So to update the MakeUseOf row with the timestamp of the latest email in the inbox, I’d choose row three. Then select the email data you want to import.
In this case, I’m importing the received date of the latest email.
Once an individual “Zap” is created for each gmail account, the dashboard widget will look something like below.
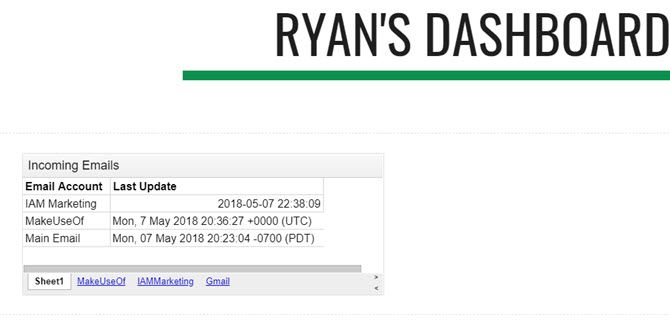
You can import this widget into your Google Sites web page (dashboard) by clicking on Sheets under the Insert menu on the right side of the page.
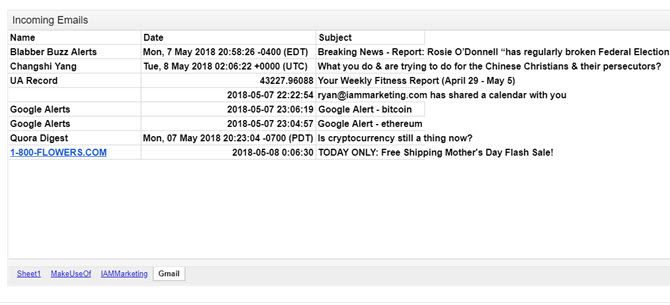
Display All Incoming Email
To add a widget that’ll show you all the incoming emails for the day, create the same kind of Zap. Also, create three columns in the sheet: Name, Date, and Subject.
Then, when you add the Sheet action in the Zap, you’ll choose the same workbook, but choose the sheet you created for that email account.
Then fill out the fields with the email data you want to import.

This will bring all new incoming emails into your new Google Sheet. Here’s what the widget will look like when you import it into your new dashboard.
Of course, you don’t want to just let this sheet keep filling up. The widget’s purpose is to show you incoming emails for the day, so you’ll want to add a Google Script to the sheet to clear out the sheets every day at midnight.
This is very easy to do. In the Google sheet, just click on the Tools menu, and select Script editor.
Paste a new function called “ClearAll” into this script editor.
function ClearAll() {
var start, end;
var sheet = SpreadsheetApp.getActive().getSheetByName('Makeuseof');
start = 2;
end = sheet.getLastRow() - 1;//Number of last row with content
      //blank rows after last row with content will not be deleted
sheet.deleteRows(start, end);
var sheet = SpreadsheetApp.getActive().getSheetByName('IAMMarketing');
start = 2;
end = sheet.getLastRow() - 1;//Number of last row with content
      //blank rows after last row with content will not be deleted
sheet.deleteRows(start, end);
var sheet = SpreadsheetApp.getActive().getSheetByName('Gmail');
start = 2;
end = sheet.getLastRow() - 1;//Number of last row with content
      //blank rows after last row with content will not be deleted

sheet.deleteRows(start, end);
}
You’ll want to edit the “getSheetByName” section with the actual name of your sheets that contain the emails.
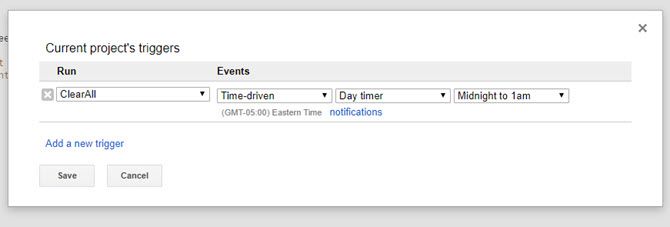
To run this script every day at midnight, in the Script Editor, save your script by clicking on File and then Save. Then click on Edit and Current project’s triggers.
Set the events to Time-driven, Day timer, and Midnight to 1am. Then click Save.
This will clear all sheets at midnight, so every morning you’re dashboard will start with a fresh sheet, displaying only the latest incoming emails for the day.
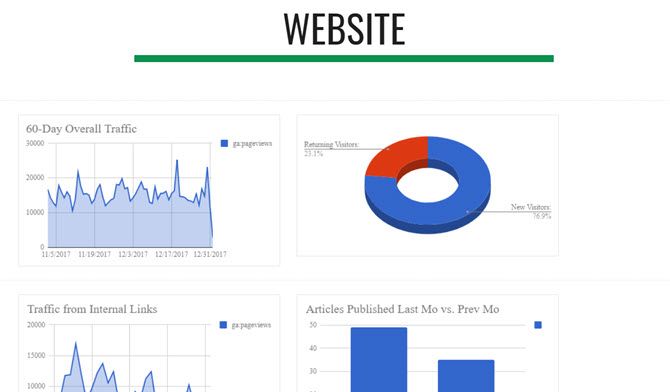
2. Website Performance Dashboard
Another useful data dashboard is a performance display if you own or operate a website.
To create a dashboard that shows you data about your website performance, you’ll need that data in a location that automatically updates. Since Google Sites lets you import charts from Google Sheets, you’ll want to set up Google Sheets to automatically receive data from Google Analytics.
That’s outside of the scope of this article, but we’ve got you covered. There are two ways you can accomplish this. Either set up an IFTTT applet that sends Google Analytics data via email to Google Sheets, or build your own spreadsheet using the Google Core Reporting API.
The reporting API is much more powerful and gives you access to nearly all of the data Google Analytics collects about your website, but it has a slightly steeper learning curve.
Once your spreadsheet is receiving data and you’ve created a few charts that plot your traffic or demographics, you’re ready to build your dashboard.
In Google Sites, just click the Insert menu and select Charts. Browse to the spreadsheet in Google Drive where you’ve saved your spreadsheet, and Google Sites will give you the option to select any of the charts that exist in that spreadsheet.
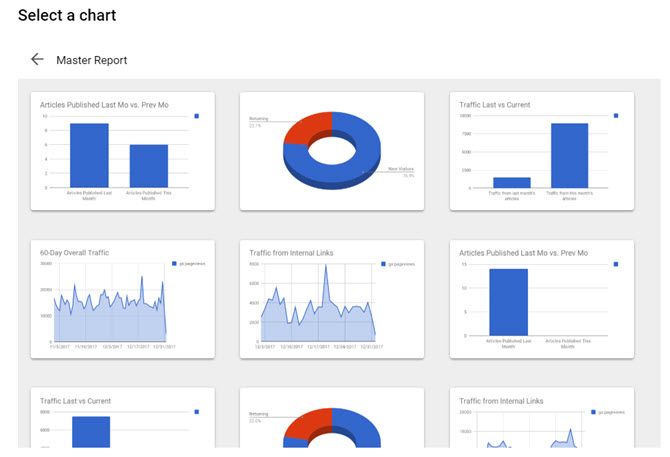
Build your website dashboard by clicking each of the charts you want to include, and place them on the page where you’d like them to go.
In just a few clicks you’ll have a beautiful web performance monitoring dashboard.
You don’t need an individual Google Site for these different dashboards. You can create sub-pages on the site for each individual dashboard.
This way there’s just one URL to access everything you want to monitor.
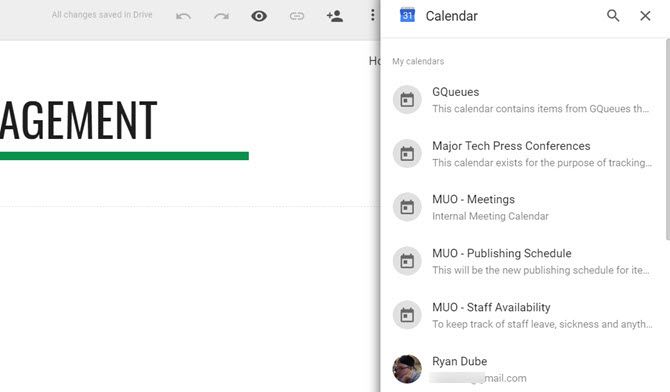
3. Time Management Dashboard
If you have several Google Calendars, you can use a time management dashboard that displays three formats of your calendar: Agenda, The Week, and The Month.
Unlike Google Calendar where you have to flip between these views, you can create a Google Sites dashboard that displays them all at once.
Even better, you could embed all the calendars from all of your Google accounts on a single dashboard. Here’s how you do it:
In Google Sites, under Insert, click on Calendar.
This gives you the option to select which Google Calendar you want to insert.
When you select the calendar you want to embed, under View Selection, you can choose from Month, Week, or Agenda.
To create a dashboard with all three, just insert one of these at a time into the dashboard.
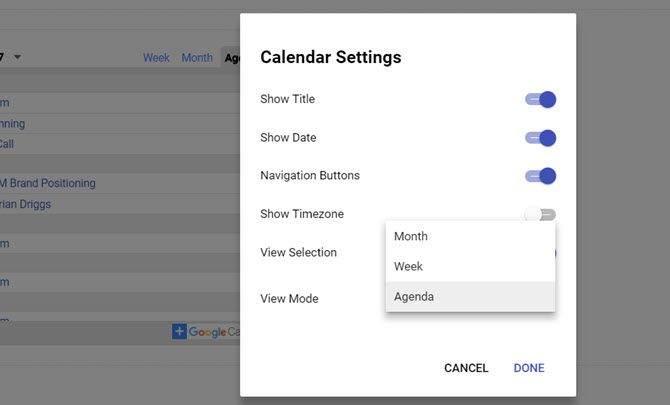
Choose a clean layout for the three formats, and you’ll have a highly functional time management dashboard.
Since the Agenda view is so narrow, you could easily fit the Weekly calendar view beside it.
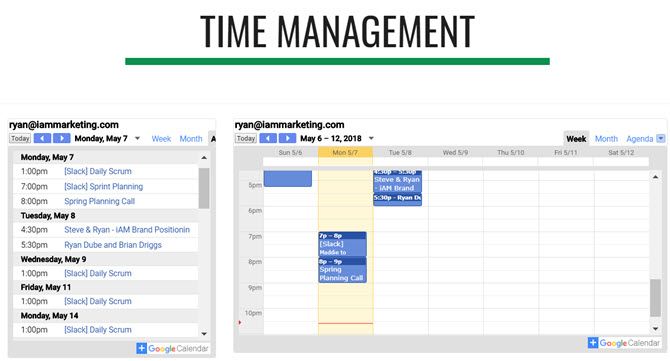
Then, add the larger Monthly calendar view underneath both of those.
Also, you can switch the display mode of each of these widgets on the live dashboard at any time. So you aren’t stuck to a static display after setting it up.
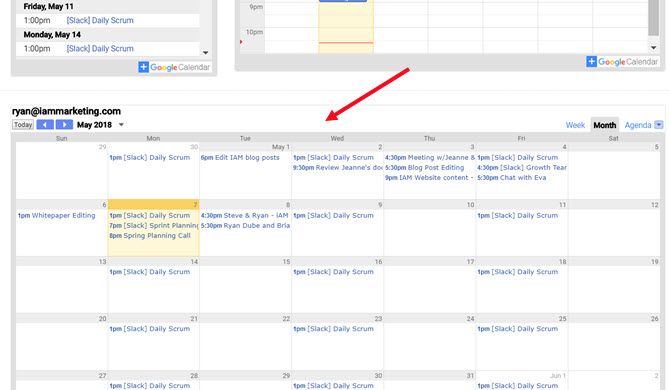
If you want to include calendars from your other Google accounts on the same page, just scroll down to the bottom and start adding more. Or you can create an entirely new sub-page for each Google account.
The layout you choose for your dashboard is completely up to you!
4. Live News Dashboard
If you’ve ever wanted a “mission control” panel with a bunch of displays streaming lots of information at you all at once, Google Sites is the perfect platform to do it.
In the Insert menu, click on YouTube. This brings up a search field where you can find any video on YouTube you may want to embed on your web page.
Most YouTube videos are static though, which would be pretty boring. Luckily there are live news channels on YouTube you can embed. Just search for “live news” or “live” followed by your favorite news network, to find them.
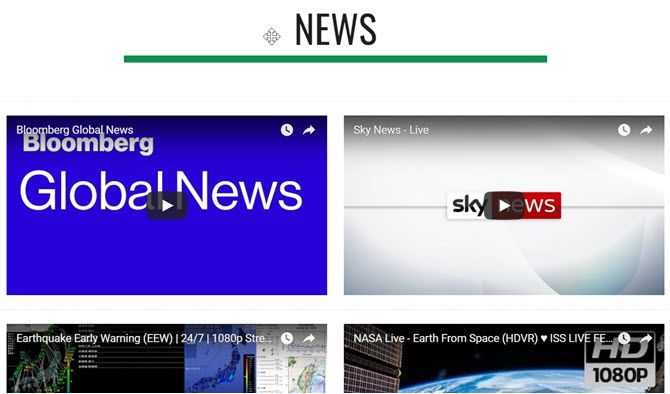
After you’ve embedded all of the live YouTube streams you want to monitor, you can click on each of them to start them playing.
All videos will stream simultaneously on the same page. It looks really cool and will make you feel like you’re sitting at a desk at mission control under Cheyenne Mountain.
5. Dashboard of Places on Google Maps
If you don’t know you can create and share lists in Google Maps, then you’ll want to explore that feature.
It’s a really useful way to keep track of all of your favorite places in organized lists.
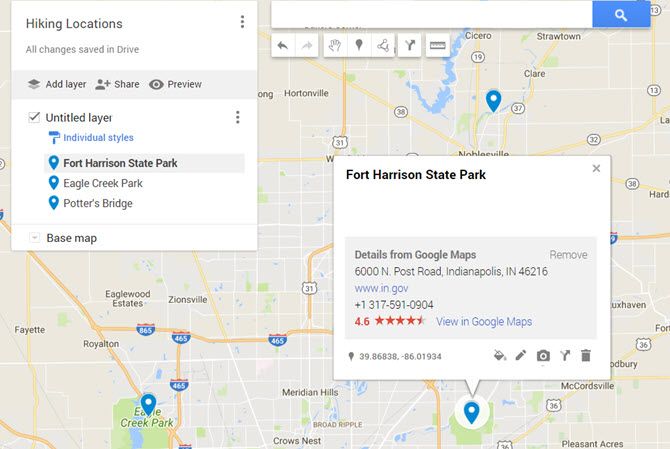
How can you use this to build a Google Sites dashboard? Easy. When you click on the Insert menu in Google Sites and click on Map, you’ll see a menu option called My Maps.
Click on that, and you’ll see all of the lists storing your favorite locations.
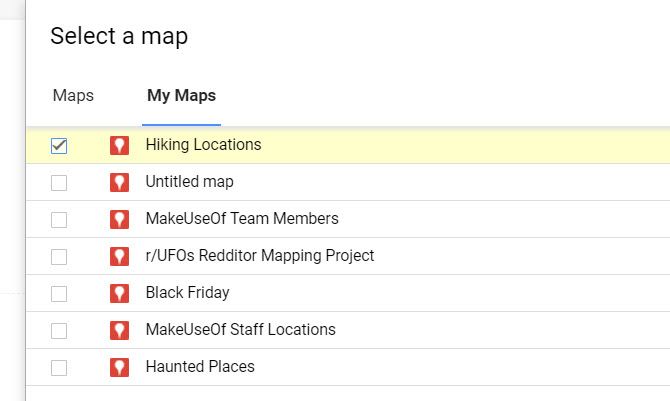
Select one of the lists, and you’ll have an embedded map on your dashboard featuring all of those saved locations.
It’s a really convenient way to store all of your favorite spots on one URL.
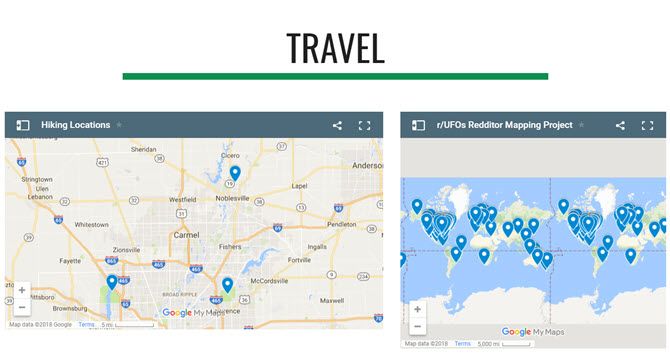
The next time you can’t remember the location of that hiking trail you love to visit, just open up your dashboard and check out your “hiking trails” map.
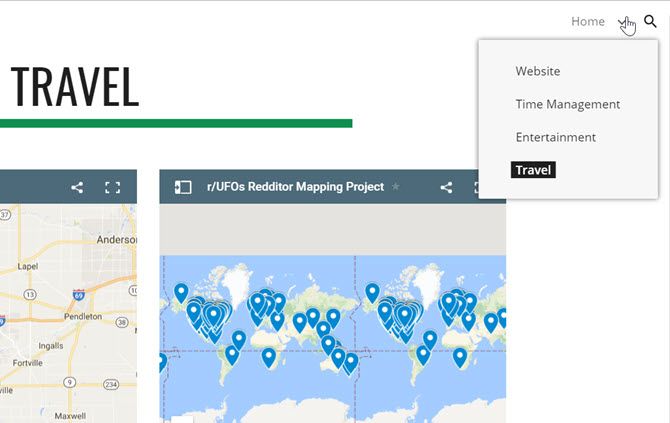
Switching between all of your dashboards is as simple as clicking the dropdown icon next to Home, and selecting the dashboard you want to see.
You could even use a dashboard like this to plot out an itinerary for someone and then share the URL with them.
They could access it from any browser or phone, no matter where they are.
Start Using Google Sites Data Dashboards Today
The examples above are just the tip of the iceberg when it comes to building useful dashboards that’ll make your life a whole lot easier.
Just think of all the ways you could incorporate YouTube content, map locations, information from Google Docs or Google Sheets, and more.
Google Sites has always been an easy way to make web pages, but with the new Google Sites, you can actually make beautiful and useful dashboards like these. There’s no need for dedicated data dashboard software.
from MakeUseOf https://ift.tt/2wNYzyi
via IFTTT
eBay Uses Your Interests to Help You Shop Online
Shopping online offers a lot of advantages over shopping in bricks-and-mortar stores. There’s the convenience of just tapping a few buttons and having a box delivered to your door, for starters. And there’s also a much larger range of products to choose from.
However, having more things to choose from isn’t always a good thing. Where do you start? How do you zero in on what you actually want to buy in that moment? Eager to help you buy more things, eBay has a solution, and it involves you revealing your “Interests”.
eBay Is Interested In You
eBay Interests is a new feature designed to help match you with the items you’ll actually want to buy. In a nutshell, you tell eBay what sort of things you’re into, and eBay will create a store unique to you, filled with items you’re going to want to buy.
The only thing you have to do is answer a short survey about your hobbies, your passions in life, and your style. eBay will then use this information, along with your purchase history, to create a storefront unique to you and your interests.
There’s a new way to shop for everything you love, all in one place. Today, @eBay introduces Interests— a new feature that curates millions of items from our global marketplace, exclusively for you: https://t.co/90Sburkgil pic.twitter.com/C44HD2oDbI
— eBay Newsroom (@eBayNewsroom) May 17, 2018
Your homepage will be transformed from a huge repository of random items into a storefront filled with items designed to appeal directly to you. This should, therefore, prevent you from having to wade through countless menus before you can start shopping.
Bradford Shellhammer of eBay said, “Our shopping experience should be as individual as each shopper on eBay. By asking people to tell us a little bit about their interests, we’re delivering a personalized store built around the things you care about most”.
Interests is available in the eBay app on Android and on iOS right now, with eBay promising to roll it out to more platforms and other markets around the world in the coming months.
A Line of Innovations
This is an interesting move by eBay. In many ways it borrows from streaming services, which recommend content based on your previous viewing/listening habits. eBay is using the same kind of approach to help draw your attention to potential purchases.
This is the latest in a line of innovations from eBay. In June 2017, eBay offered a price-match guarantee. In October 2017, eBay launched visual search tools. In March, eBay launched an Under $10 section. And in April, eBay simplified its listing process.
from MakeUseOf https://ift.tt/2k9PZAS
via IFTTT
What Is 404? 4 Common Website Errors and What They Mean
Most of the time, visiting a website is a simple affair. You type in the name of the site you’re interested in or click a browser bookmark, and you see it within a few seconds.
But what about when it goes wrong? Sometimes, you’ll see various errors alerting you to problems with visiting that website. While some of these are out of your control, you can troubleshoot others to find out what’s wrong.
Let’s quickly review some of the most common website errors. Note that errors starting with 4 (like error 451) are client-side errors (issues with your computer), while those starting with 5 are server-side (problems with the website).
1. Error 404
404 is a common error. It signifies that the page you were looking for doesn’t exist. This often occurs when you click a broken link, or if a website moves a page without redirecting it properly. But it can also happen if you mistype a URL.
When you see a 404, check to make sure that you haven’t entered the wrong address. Then try a Google search to find the right page, as it may have moved.
2. Error 401
A 401 error means that you need authentication to access the page, but don’t have it. This usually occurs when you need to log into a website to access something but haven’t done so yet.
If you see this, try visiting the main page of the site and logging in again.
3. Error 403
A 403 error signifies that you’ve made a valid request, but the server won’t complete it because you’re not allowed to access it. This is different than a 401.
A 401 tells you that you haven’t logged in and so it can’t authenticate you. But a 403 error says that it knows who you are, yet won’t let you access the page. Typically, this means you’ve stumbled across something private and need to access the website administrator for access.
4. Error 504
A 504 error signifies a gateway timeout, meaning that a server the website relies on isn’t communicating with it quickly. When this happens, you won’t be able to access the website until its administrators resolve this issue. You can try refreshing the page a few times, but you’ll likely have to wait until it’s fixed.
For some funny errors, check out ridiculous Windows error messages.
from MakeUseOf https://ift.tt/2KwdizO
via IFTTT
How to Ensure Your Signal Messages Really Disappear for Good
These days, WhatsApp is no longer the only show in town. You have a number of high-quality instant messaging apps to choose from. And while I’m a massive fan of Telegram if you’re looking for a WhatsApp replacement, Signal continues to grow on me with every passing day.
It’s one of most secure messaging apps around. End-to-end encryption is standard, the app offers tools to verify the identity of people in chat groups and the integrity of the data channel, and it doubles as an SMS client.
Except, there’s a security problem. Or at least, there’s a security problem for Mac users.
What’s the Issue With Signal Messages?
Quite simply, messages which are supposed to disappear and leave no trace are leaving a very noticeable trace. Two traces, in fact.
One of the traces is caused by the Notification Center. By default, the Notification Center will show the content of a message along with the sender’s name. This information will persist long after Signal’s copy of the message has self-destructed.
In a worst-case scenario, a hacker could gain control of your machine and see what’s being said. It’s a nightmare if you use Signal to send sensitive data.
The second trace is a database-level copy of every self-destruction message that someone with sufficient computing knowledge could easily access. As we said, not very secure.
How to Ensure Signal Messages Really Disappear
To remedy the notification center issue, you need to tweak some settings in the Signal app.
Go to Preferences > Notifications and select Neither name nor message. Hit Save when you’ve made the changes.
The database issue is more problematic. If you’re feeling adventurous and fancy a project, you can follow Patrick Wardle’s somewhat complicated walkthrough. If that’s all a bit beyond you, you could run his script to see what data has been secretly stored.
And remember, if these revelations have soured Signal in your mind, there are plenty of other secure messaging apps out there.
from MakeUseOf https://ift.tt/2LbIJ3U
via IFTTT
How to Use Trello With the New Gmail
More than 1.2 billion users have made Gmail a part of their lives. Several third-party add-ons and browser extensions have helped the humble email inbox become the core part of our everyday productivity.
Let’s take another look at the new Gmail and the “official” add-ons that fuse better with the inbox than the extensions of the past. Trello for Gmail is one of the more popular partnerships that now connect your emails to your boards.
How to Use Trello With the New Gmail
The Trello add-on for Gmail seems more baked in than its previous avatar as a browser extension. They can be specifically used in-context of the email they are connected to. For instance, you can turn one email into an actionable task in Trello and give your team a shared perspective on the work that needs to be done.
More importantly: Each add-on will work the same across the web and Android.
- Log into Gmail. Click the Settings (gear) icon and select Get add-ons.
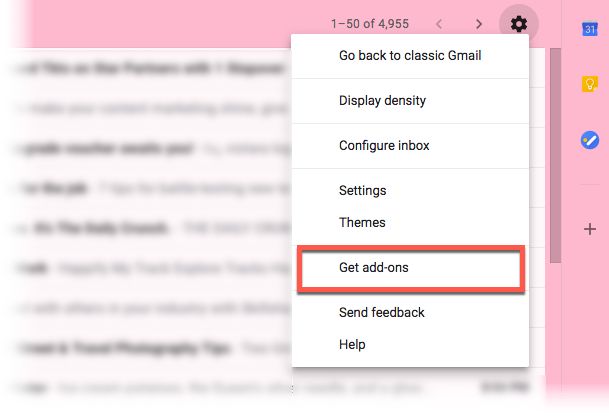
- The GSuite Marketplace opens up with a grid of 31 add-ons as of now. Choose Trello from the available list.
- Click Install and give your permission to make the add-on a part of your inbox.
- Log-into Trello via the icon next to the message pane.
- Open any email and click the Trello icon next to it. The new Trello card will take the email subject line as the card title and the email text as the card description automatically.
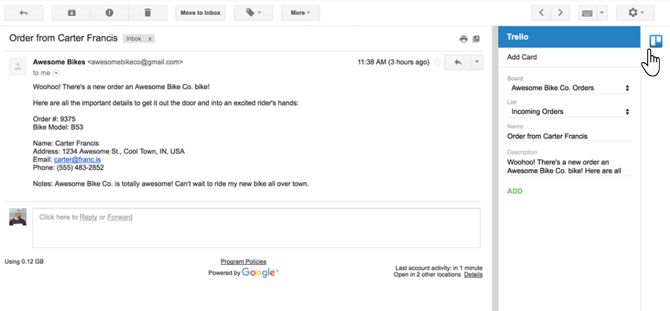
- Turn any email into a task or a to-do and track all follow-up actions on the card.


You can apply all Trello features to manage your email like small projects. Due dates, reminders, and the Trello calendar can boost your efficiency right from the inbox. Do remember, with the right idea you can put Trello to many creative uses alongside your inbox.
from MakeUseOf https://ift.tt/2KAcUAw
via IFTTT
Thursday, 17 May 2018
3 Easy Ways to Convert Webpages Into PDFs
Most people know how to save print-friendly versions of webpages for easier reading. They often exclude many of the images and advertisements to save printing time and ink. But what about converting a webpage into a PDF?
By doing that, you could read any webpage offline in no-internet zones, making it easy to read articles and other pages offline. Here are several ways to turn webpages into PDFs.
1. Convert to PDF via Print Page in Browser
Some browsers allow saving a webpage as a PDF. You only need to go through some of the steps typically necessary to print what you see on the screen.
If you are using Google Chrome, open the website you want to convert. Then, click Chrome’s menu button. It’s on the top right corner of the browser window and looks like three horizontal lines.
Next, click the Print option. Doing that changes the screen to a print dialog box. Below the blue Print button and the Cancel option, look for the Destination section. It’s probably currently set to send the document to a connected printer.
Click the Change button in the Destination section. You’ll then see a list of options. Look for the Local Destinations menu, which includes a Save as PDF option. Choose that one, making the Destination change as a result.
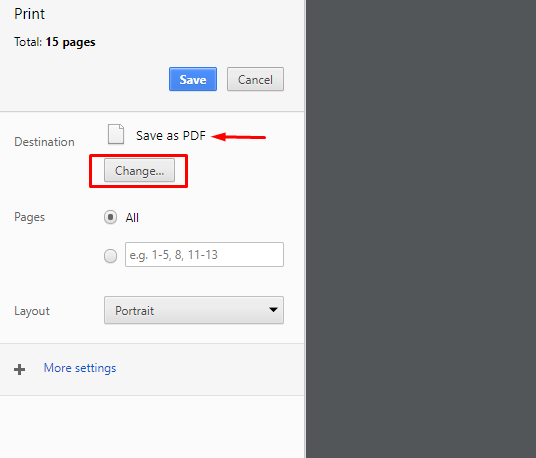
Before clicking the blue Save button, check out the options underneath. They determine the page range of the saved PDF and the document layout, among other specifics. Paying attention to the settings there prevents unintentionally only saving one page worth of a large website.
Once you click the Save button, you’ll choose where your browser saves the PDF. Sending the file to your desktop might make it easiest to find. If your desktop isn’t very organized and has lots of icons, create a new desktop folder. Then, put the PDF in it.
On a Mac, the options are a bit different.
Click the Print option from your browser’s file menu first.
When it opens, look for the Pages and Layout settings near the middle of the box. Even more importantly, notice the PDF drop-down menu in the bottom left of the box that appears when you click the Print using system dialog option.
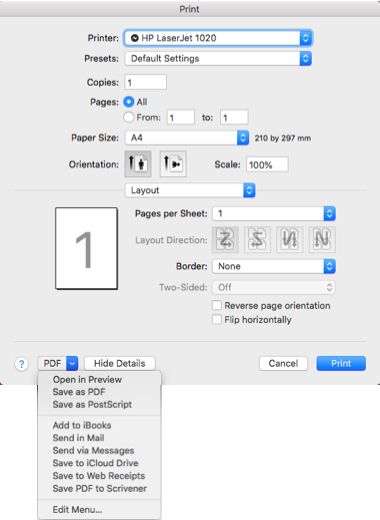
Clicking it gives you various options related to PDFs. The Save As PDF option is the most straightforward choice. However, you can also select Open in Preview. That option lets you make sure everything looks correct regarding the saved file. Once you verify it does, save the PDF to your Mac with Preview’s file menu.
2. Use the Share Function on iOS Devices
You can use an Apple mobile device to save webpages as PDFs, too. Do it with the Share button in Safari on the top of your toolbar. It looks like a box with an arrow coming out of it. Tap it, then swipe through the available options.
One of them is Save PDF to iBooks. Choosing that one lets you launch the webpage in iBooks and view it as a PDF.
Alternatively, you may see a Create PDF option if using the Files app in iOS 11. Tap it, then choose Done in the upper right to start the conversion process. Next, pick Save PDF To. You can send the file to your device or a cloud service.
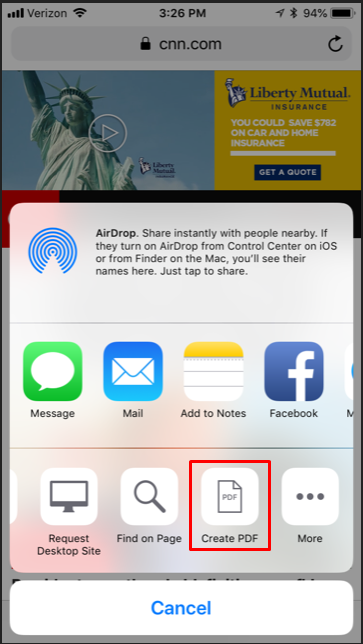
To change the file name first, press and hold on the PDF file’s icon. Then, look for the Rename option and tap it. When the keyboard appears on your screen, use it to change the file name.
3. Try Online Tools, Apps, and Browser Extensions
Besides relying on options built into your devices, you may want to depend on third-party solutions. Let’s look at some online options first. They don’t require downloading anything new.
Webpage to PDF
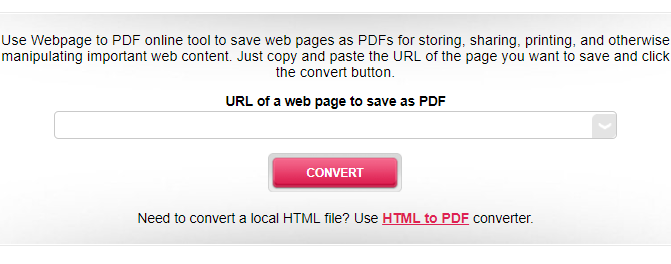
Webpage to PDF only requires copy-pasting the URL into a box and clicking Convert. However, if you click the arrow button to the right of the URL area, it gives you more options.
For example, you can do a low-quality conversion, remove background images, or select a grayscale option.
Web2PDF
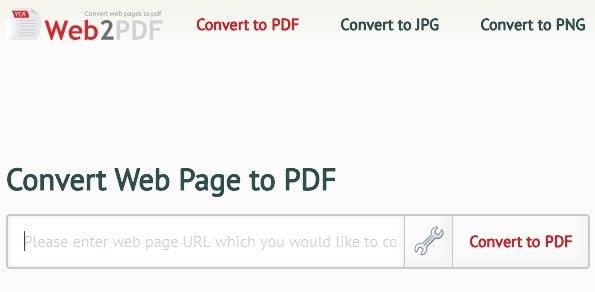
Web2PDF functions similarly but offers numerous other options when you click the wrench icon to open Settings. Both of these sites are free to use. Plus, they work in any browser.
Convert Web to PDF (Android)
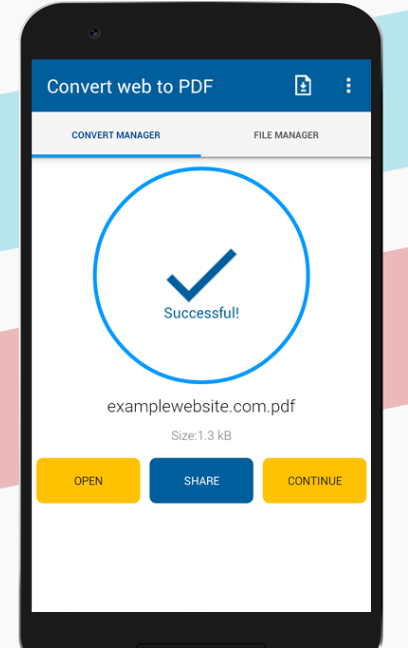
Android users can fall back on Convert Web to PDF. One handy thing is that the app reads PDFs as well as converts webpages for you. Additionally, the app has a feature that removes images to make the PDF file size smaller. It’s convenient when dealing with free space constraints on your phone.
Download: Convert Web to PDF for Android (Free)
InstaWeb (iOS)
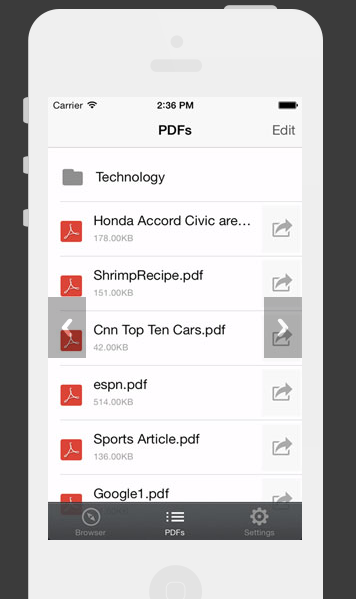
If you use an iOS device, consider the InstaWeb app. It offers a “clutter remover” feature that gets rid of all unnecessary content on a webpage. That function makes the PDF easier to read.
Organizing your PDFs is simple, too, because InstaWeb offers folders. Create them by topic, a day of the week, or any other method that makes sense.
After downloading and installing InstaWeb on your iOS device, the app appears on the Share menu mentioned earlier. So, instead of choosing an option to create a PDF through Apple’s Files tool, you can send a webpage directly to InstaWeb.
Download: InstaWeb (Free, In-App Purchase)
Web2PDF (Windows)
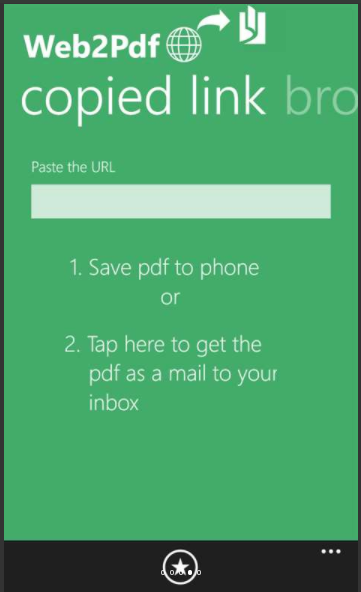
Are you still on a Windows device? Think about installing the Web2PDF application. It works on Windows phones or any gadget using the Windows 10 Mobile platform.
After downloading the app, you have several options for working with webpages to turn them into PDFs. First, you can save any webpage as a PDF to your device. If lack of space is a concern, use the app’s function that sends the PDF to your inbox.
Or use the arguably simplest possibility and enter a URL into the form field to convert it. Finally, you can use your device’s browser to navigate to the webpage and start the conversion there.
Then, what about browser extensions? If you work on a desktop or laptop computer often, they might be more appropriate than apps.
Save as PDF Add-On (Chrome, Firefox)

The Save as PDF extension is available from PDFcrowd and allows saving webpages as PDFs with one click. Begin by opening the webpage to convert in your browser. Then, click the PDFcrowd toolbar icon. When it becomes animated, that indicates a conversion in progress.
If you see a red rectangle instead of the converted file, something went wrong. Hover your cursor over the shape to get details about the problem.
There are some webpages this extension does not support. They include those protected by passwords, websites with Flash, and frameset sites.
Want to customize a PDF or remove the PDFcrowd branding from the document? Doing those things requires purchasing an annual subscription to the paid version.
Print Friendly & PDF (Chrome)
The Print Friendly & PDF Chrome extension is another useful possibility. It allows clicking any webpage content to delete it before printing or saving as a PDF. Furthermore, you can change the webpage’s text size. All PDFs you save through this extension feature clickable links, too. They include the source URL for easy reference as well, which is helpful if compiling research.
Keep These Webpage-to-PDF Converters on Hand
No matter how often you convert websites to PDFs or if you need extra features, possibilities exist. This list gets you off to a good start. Many of the options work with the browsers or devices you know and aren’t expensive.
If you enjoyed learning how to convert webpages to PDFs, take it a step further by converting your PDF files to a Powerpoint presentation!
from MakeUseOf https://ift.tt/2IQr3fy
via IFTTT