Saturday 28 September 2019

5 YouTube Cheats to Break Restrictions and Make YouTube Fun Again

youtube-cheats

It’s time to beat YouTube at its own game. Some third-party developers have the perfect combination of cheats and tricks to make for a better YouTube than the official experience. No more restrictions, and no more time wastage!

For a long time now, developers have been making sites and extensions to tweak YouTube so that you can fix some of its common annoyances. Some others focus on making YouTube more fun and light-hearted like it once was years ago.

Here are a few apps that use smart ideas for that better YouTube experience.

Use captions to quickly browse through a video, intelligently take out sponsored segments, and even check out the best videos from a decade ago.

1. YTCutter (Web): Download a Specific Portion as Video, GIF, or Audio

Clip a portion of a youtube video and download it as a video, GIF, or audio file

YTCutter is a single tool with multiple purposes. It recognizes that you don’t always want to download a full YouTube video, and only need a small clip. So you can select the portion and download just that.

The web app stands out for how user-friendly and smooth it is. Copy-paste a YouTube URL and it will immediately start playing. Click Start when you want the clip to begin, and End to finish trimming. You can adjust the timestamps if you want. You’ll see how many seconds the clip is, and a handy Preview button lets you check it before you download.

The trimmed clip can be downloaded as a video file (MP4), a GIF file, or an audio file (MP3). The MP4 file will download at the resolution you watch the video at, so select high-def beforehand if that’s what you want.

All in all, YTCutter is among the smoothest and slickest third-party YouTube apps we have seen. We hope it sticks around for a long time, but YouTube is notorious for striking down such tools, so enjoy it while it lasts.

2. YouTube Caption (Web): Get Full Text of Closed Captions

YouTube Caption extracts closed captions from YouTube videos

Several YouTube videos have closed captions, whether made by the uploader or auto-generated by YouTube. YouTube Caption extracts these as readable text, complete with built-in timestamps.

It only works with videos that have captions. Copy-paste the video link into the box and press the search icon. After a few seconds, you’ll get the video’s preview with full captions listed below.

It’s a brilliant way to scrub through a long video, such as a TED Talk or a presentation. Not only that, if you are learning something through a YouTube lecture, this tool gives you the full text of whatever the teacher said. It’s the easiest way to make notes.

While you’re reading, if at any point it seems like the video was aiding the text, click that line to jump directly to that point in the video. If you are a fast reader, you can get through a video much quicker by using YouTube Caption instead of sitting through the whole clip.

3. YouTube Rabbit Hole (Chrome): Disable Distractions for a Productive YouTube

Disable YouTube distractions with YouTube Rabbit Hole

Someone sends you a link to a YouTube video. You click and watch it. And the automated suggestion for the next video starts. The sidebar recommends similar things you might enjoy. A commenter says something nasty and riles you up. YouTube is designed to be a time sink. This extension wants to put an end to that.

YouTube Rabbit Hole attacks several distractions on the video streaming site. It blanks out suggested content, hides comments and livestream chats, and disables the “You might also like” suggestion wall at the end of a video. Instead, all you see are cute bunnies.

The extension also ensures you can visit the homepage without distractions. The trending and subscription pages are gone. It simplifies the navigation drawer so you only end up watching what you want to watch. And it also removes banner-style ads.

In the end, it’s just you, the video, and the search box. You can check channels that you are subscribed to, but forget about anything else. It’s time to trim the fat off YouTube.

Download: YouTube Rabbit Hole for Chrome (Free)

4. SponsorBlock (Chrome, Firefox): Skip Sponsored Segments Automatically

There are YouTube ad-blockers to try and skip the annoying wait periods in videos, or you could use YouTube Premium. But that still doesn’t let you skip the parts of videos where the maker sneaks in an ad from the sponsor. Until now…

SponsorBlock is a crowd-sourced extension that automatically skips those “this video is sponsored by…” parts. Try it out, it’s shocking how well this works on popular channels.

Most of these sponsorships are part of bundles for a large set of channels, so once the basic idea is reported a few times, it works across other videos too. It’s as useful as the “Skip Intro” feature of Netflix and Amazon Prime.

The developer notes that the add-on is completely open source. It uses a combination of algorithms and an upvote/downvote system. As a user, you don’t need to worry about that though.

When you’re watching a video, you’ll get an alert if the extension skips a sponsorship. You can choose to “unskip” it and watch the ad, report it, or do nothing to register the skip as an upvote. If you come across a sponsored segment that wasn’t skipped, tap the extension icon and mark it to help other users.

Download: SponsorBlock for Chrome | Firefox (Free)

5. YouTube Decade (Web): Biggest Video of the Day, 10 Years Ago

YouTube Decade shows you the best videos of the day from 10 years ago

Here’s a fun little experiment that is a much cooler way to browse YouTube than the default overloaded homepage. Developer Bennett Feely created a website that showcases the most popular videos among those uploaded ten years ago on this very day.

Every day, YouTube Decade updates with eight new videos. Categories include music, comedy, film and animation, entertainment, news and politics, sports, pets and animals, and gaming.

That’s it, eight videos, no information overload! If you’re checking on September 27, 2019, then the videos will be chosen from those uploaded on September 27, 2009.

You can browse through the site by going back one day at a time. It’s groovy because there will be times when the videos are from regional YouTube picks, so you might not even know the language. But given their popularity, they’re usually worth a watch.

YouTube Decade might be a fun homepage to set for your browser, giving you a little time capsule when you start your day.

Make YouTube Awesome!

The best part about YouTube isn’t the number of videos it has. It’s the number of third-party developers who make tools and apps to make it even better. From creating a mixtape to identifying any song in a video, check out this massive list of amazing tools to make YouTube better.

Read the full article: 5 YouTube Cheats to Break Restrictions and Make YouTube Fun Again


from MakeUseOf https://ift.tt/2nmUXPy
via IFTTT

How to Convert Delimited Text Files to Excel Spreadsheets

import-spreadsheets-excel

There will come a time when you must deal with all sorts of information stored in other kinds of files and bring it into Microsoft Excel. You cannot run away from an ever-present text file. I bet you find some of them every day.

Unlock the "Essential Excel Formulas" cheat sheet now!

This will sign you up to our newsletter

Enter your Email

Here are a few everyday examples:

  • An Excel analysis of sales or product information stored in a text file.
  • Exchange of data between two different software (maybe, from a database to a spreadsheet).
  • Names, addresses, and email ID stored in an email program (e.g. export from Microsoft Outlook to Excel).

Microsoft Excel gives you all the tools to connect to external sources of data. Let’s talk about delimited text files.

This Is a Delimited Text File

A Delimited Text File

As you can see, the first and last names, the companies they work for and other details are separated by commas. This comma delimited text file is easy to create in any text editor.

Right now, it isn’t useful. Bring this into a spreadsheet and you can make a more professional document.

For instance, you can easily look for duplicate data and remove them. Then, you can use the spreadsheet to create labels and mail merge if addresses are also part of the data.

The basic idea here is to import the information from a text file and split up your various pieces of information into separate columns and name each column with an appropriate header.

Let’s look at a delimited text file in more detail…

The 3 Different Kinds of Delimited Text Files

There are three common kinds of delimited files depending on the way you separate (delimit) each value. Any character can be used to separate the individual entries in a file.

For instance: the pipe (|) or a simple space. You will find these three to be the most common kinds of delimited separators between each text entry.

  1. Comma separated values.
  2. Tab separated values.
  3. Colon separated values.

The Text Delimiter keeps each value separate from the next. Any value that follows the delimiter and precedes the next occurrence of the delimiter is imported as one value. Do remember that the value between the assigned delimiter can have another delimiter character, but it needs a quotation mark (“) or an apostrophe (‘).

Confusing? Not so much. Let’s see how with an example:

In a text file with city and state names, there may be some values like “Albany, NY”.

Microsoft Excel can read the comma (,) in between the two words as a delimiter. To treat the city and country names as one value and import them into one Excel cell we have to use double quotes or an apostrophe as a text qualifier. If no character is specified as the text qualifier, “Albany, NY” is imported into two adjacent cells as Albany and NY.

In brief, to retain any value in a column exactly as it is, you can enclose the value in quotation marks or an apostrophe.

As we will see below, Microsoft Excel gives you complete control over the import process and a Preview pane to see the format of the data before it fills the cells.

Convert From a Delimited Text File to a Spreadsheet

There are many online converters that can take a raw CSV text file and spit out an XLS spreadsheet. Zamzar and Convertio are two excellent tools.

But you don’t need to hunt for an online converter because Microsoft Excel has a native feature that does the job much better.

Let’s take a sample CSV file and walk through the steps to convert delimited text files to spreadsheets. The screenshot above of a jumble of comma-separated values in a Notepad file is a good example.

Microsoft Excel can help turn this confused jumble into neat rows and columns. You can then go to work on it and turn it into a beautifully formatted report or prepare it for printing.

Imported Text

There are three ways to bring data into an Excel spreadsheet from a CSV file. Start with the easy one first.

Method 1: The Automatic Import

1. Click the File tab, then click Open.

2. Select the CSV file you want to open. Microsoft Excel opens the text file automatically and displays the data in a new workbook.

CSV File Opened in Excel

This is the most direct (and quickest) route to open a CSV file. Microsoft Excel uses the default data format settings to read and import each column of data. But the automatic import does not give you the flexibility you want.

So, let’s see the second way which uses a wizard.

Method 2: Restore the Text Import Wizard

The Text Import Wizard enables you to control the structure of the data you want to import. It starts automatically when you import text files (i.e. a file with a TXT extension).

Open Microsoft Excel and browse to a text file (or change the extension of the CSV file to TXT).

Microsoft hid the old Text Import Wizard in Excel 365 and 2016 (version 1704 onwards). But you can bring back the text import wizard from Excel’s Options.

1. Go to File > Options > Data.

2. Scroll down to the Show legacy data import wizards section.

Enable the Text Import Wizard in Microsoft Excel

3. For importing text or CSV-files, select From Text (Legacy). Click OK to close the Options.

4. Now, you can use the wizard from the Ribbon. Go to Data > Get Data > Legacy Wizards > From Text (Legacy). Browse to and open the CSV file you want to import.

The Text Legacy Wizard in Microsoft Excel

Use this three-step process to control the format of the data.

Step 1

This is what the Text Import Wizard looks like in the first step.

Choose Delimited File Type in the Microsoft Excel Text Import Wizard

Select Delimited — When items in the text file are separated by tabs, colons, semicolons, spaces, or other characters.

Select Fixed Width — When all the items are the same length and neatly structured in space separated columns.

Sometimes, the raw data might have a header row. For instance: ["first_name","last_name","company_name","address","city","county"].

Use Start import at row to select the row from where the import will begin.

The File Origin can be left at its default for most cases.

The Preview displays the values as they will appear when they are delimited into columns on the worksheet.

Click Next.

Step 2

Choose the Delimiters for your file (comma, in our case). For some other character, check Other and enter the character in the little field. The Data preview window gives you a glimpse of the columnar data.

Choose the delimiter in the Text Import Wizard Screen

Select the Treat consecutive delimiters as one checkbox if your data contains a delimiter of more than one character between data fields or if your data contains multiple custom delimiters.

For example, this helps you handle files which may have an extra space before or after another delimiter. You can help identify space as another delimiter and tick this box.

Use the Text qualifier dropdown to select the character that encloses values in your text file. We talked earlier how a text qualifier can help you import some values into one cell instead of separate ones.

Use the Data preview window to check the appearance.

Click on Next.

Note: The wizard screen changes when importing fixed-width data.

The Data preview window can help you set column widths. Use the top bar on the window to set a column break represented by a vertical line. Drag a column break to increase or decrease the width. Double-click a column break to remove it.

Import Fixed Width Data in Microsoft Excel

In a fixed-width file, no delimiters are used to separate the values in the file. Data is organized in rows and columns, with one entry per row. Each column has a fixed width, specified in characters, which determines the maximum amount of data it can hold.

Step 3

The Preview windows become more important in this screen because you can fine-tune the format of data that goes into each field with the Column data format. By default, Microsoft Excel imports data in the General format. Select the column in the preview window and set the appropriate format.

Column data format in Excel's Text Import Wizard

For example, you can select…

  • Text for the text fields.
  • Date and the date format for any column that contains dates.
  • General for converting currencies to the Excel Currency format.

Use the Advanced button to specify the type of decimal and the thousand place separators for numeric data.

For instance, if you want to display 100,000 as 1,00,000. Excel displays the numbers as per the format set in your computer’s regional settings.

Click Finish. A final Import Data dialog box pops up.

The Import Data Dialog the Text Import Wizard

Don’t worry about it too much now. It gives you a few options to insert the data in the spreadsheet or create a connection with an external database. Inserting the text-delimited values as a table in the present worksheet is the default setting.

The “old” legacy method is still the best way to go about it when your CSV file is simple. If not, there is a new method now which can fit the bill for any text import needs.

Method 3: Use Get & Transform Data

The Data tab includes all the tools you will need to gather external data and make it behave the way you want it too. For instance, you can create a PivotTable report and refresh it whenever the external data changes.

It is an overkill for simple CSV files, but let’s go ahead and see how to bring in columns of delimited data into Excel.

1. Open a blank workbook.

2. Go to the Data tab on the Ribbon. Then click the tiny dropdown arrow under the Get Data button (in the Get & Transform Data group). Choose From File > From Text/CSV.

Launch the Text Data Wizard manually

3. In the Import Text File dialog box, browse to the location on your desktop and select the CSV text file you want to import. The Text Import Wizard is neatly displayed with the options you can now select.

New Text Import Wizard in Excel

As you can see, you can change the character encoding and the choice of the delimited character or enter a custom delimiter.

Excel figures out the delimiter by analyzing the first few hundred rows of the dataset by default. You can change this and let Excel work with the entire dataset too. It’s not recommended if you have millions of records to import.

4. Click the Load button to import your data into a new pretty worksheet.

5. Whenever you import data into Excel, a data connection is created. You can run queries and connect the worksheet to the external source. Any change to the original source data will be automatically updated in the Excel sheet.

6. You can cancel this connection by going to Data > Queries and Connections to open the panel on the side.

Right-click and choose Delete. Or, hover over the file name of the data source and hit Delete in the window that comes up. If you are sure, click on Delete again.

Queries in Excel

Transforming the data is beyond the scope of this tutorial. So I will direct you to Microsoft’s Getting Started with Get & Transform in Excel support page for more help.

The Many Uses of Delimited Files in Excel

Need to separate a list of first and last names and prepare them for printing? Convert the delimited text file to Excel. You can import or export up to 1,048,576 rows and 16,384 columns. And delimited files are supported almost everywhere. Use Excel as a timesaver with the above techniques and the tips below.

Read the full article: How to Convert Delimited Text Files to Excel Spreadsheets


from MakeUseOf https://ift.tt/2mpourJ
via IFTTT

11 Tips to Help You Fix the Windows Blue Screen Error

windows-10-bsod

The blue screen of death (BSOD) error is something every Windows user runs into sooner or later. It’s a frustrating problem, as it’s often tough to troubleshoot and can pop up out of nowhere.

We’ll walk you through some basic tips on how to solve a blue screen error, as well as provide resources for specific blue screen error codes.

What Is a Blue Screen?

Old Windows Blue Screen

In case you’re not sure, let’s first review this important Windows term.

What’s commonly called a blue screen of death is technically known as a stop error or fatal system error. This occurs when the operating system crashes, meaning it ran into some issue that prevented it from running safely. When this happens, Windows displays a blue screen with some information about the problem and then restarts.

Blue screens can happen for many reasons, which we’ll dig into below. Common BSOD causes include bad drivers, problems with hardware, and operating system errors.

Newer versions of Windows are more stable than earlier ones, so you hopefully won’t run into blue screens too often. You should also know that a blue screen occurring one time isn’t necessarily an issue. Sometimes Windows will freak out with a BSOD, then work perfectly fine after you reboot.

Thus, you should only need to dig into the following blue screen error fixes if you continually hit a blue screen.

1. Note Your Blue Screen Stop Code

It’s tough to talk about how to resolve blue screen errors without knowing the specific error you’re hitting. Thus, the best place to start with fixing blue screens is noting the actual problem.

In Windows 10, a BSOD contains a sad face, along with a simple error message. Below this, you’ll see a link to Microsoft’s blue screen troubleshooting page, a QR code, and a Stop Code field. If you want, you can scan the QR code with your phone’s camera to jump to a Microsoft support page.

Modern Windows Blue Screen

The most important part is to note the stop code listed on the page, which will help you narrow your troubleshooting.

2. Try Specific Troubleshooting for Your Error Code

Now that you know what your specific issue is, you can move towards appropriate blue screen fixes. We’ve written articles on some of these:

These aren’t the only blue screen errors you’ll come across, but they’re some of the most common. In case you can’t determine your exact error code or the troubleshooting in those guides didn’t solve your issues, here are more general blue screen error solutions.

3. Review Recent Computer Changes

Many times, you’ll start seeing blue screen errors after making a change to your system. Such changes can introduce problematic elements into an otherwise stable environment. Identifying this can help your troubleshooting.

For example, if you just installed a new printer, try unplugging it from your computer and see if the blue screen persists. If you recently ran a Windows update, head to Settings > Update & Security > Windows Update and click View update history.

On the next page with the list, click Uninstall updates at the top and remove the most recent update to see if that solves the problem.

Windows 10 Uninstall Updates

The same goes for software. If you only noticed the blue screens happen after installing a new app, try removing that app.

4. Check for Windows and Driver Updates

While bad updates can introduce issues, oftentimes Microsoft and third-party companies issue updates to fix problems like these. Visit Settings > Update & Security > Windows Update and apply any pending updates, just in case they hold the fix.

It’s also important to check your drivers since they can often be a source of blue screens. Press Win + X (or right-click on the Start button) to open the power user menu. Choose Device Manager to open that utility.

Here, check for yellow triangle icons, which indicate a problem with the driver. You should double-check any devices that appear with this, as you may need to reinstall the driver or remove the device. You can right-click an entry and choose Update driver to check for updates, but this isn’t always reliable.

Updating video driver in Windows 10

Instead, you should visit your computer manufacturer’s website and grab the latest drivers from there. Follow our guide to updating Windows drivers for help.

5. Run a System Restore

The System Restore feature in Windows allows you to return your system to a previous state. It’s a handy troubleshooting tool, as it’s simple to use and lets you see if your issue is software-based.

Type recovery into the Start menu and open the Recovery Control Panel entry that appears. Here, click Open System Restore to launch the tool. After clicking Next once, you’ll see a list of restore points you can return to. Select one, then hit Scan for affected programs if you want to see what software will change.

Windows System Restore Points

Running a System Restore doesn’t affect your files, but it will uninstall any drivers or software you’ve installed since the restore point was made. In addition, it will reinstall anything you removed since that time.

Confirm your system restore, then you can start the process. This will take a few moments, then you’ll be back to your system as it was at the time. If you don’t get blue screens after this, your problem was likely software related.

6. Scan for Malware

malwarebytes premium home

Malware can damage your Windows system files and result in a blue screen. You should run a scan for infection to rule out anything like this.

We recommend using the free version of Malwarebytes to run a scan. This will look for all sorts of rogue software and remove it for you. If it finds anything, reboot after the cleaning and see if your blue screen errors go away.

7. Test Your Computer Hardware

If you haven’t figured out why you’re getting a blue screen of death, you should next check your computer’s physical components. Sometimes a failing stick of RAM or similar can result in a blue screen.

We’ve showed how to test your PC for hardware failure before. Use those tools to test your system and you can plan to replace anything that’s faulty.

8. Run an SFC Scan

Running sfc to fix video scheduler internal error

Windows includes a command line tool called SFC (system file checker). Running it checks for damaged Windows system files and attempts to fix them. Doing so may solve your blue screen issue.

Again, press Win + X (or right-click on the Start button) to open the power user shortcut menu. Choose Command Prompt (Admin) or Windows PowerShell (Admin), then type the following:

sfc /scannow

Give this some time to run, and you’ll see the results before long.

9. Boot Into Safe Mode

Depending on the severity of your issue, you may be able to perform all the above troubleshooting steps while working in Windows as usual. However, if you have a major issue, the blue screen errors might prevent you from working normally. In that case, you’ll need to boot into safe mode.

Safe mode allows you to load a basic Windows configuration with only the essentials that it needs to run. This prevents third-party apps from interfering with normal operation. If you can work in Safe Mode without hitting a blue screen, it’s an installed app or service that’s causing the problem.

While in Safe Mode, you can run a malware scan, use System Restore, and otherwise troubleshoot as we’ve discussed.

10. Use Advanced Tools

For deeper troubleshooting, you can utilize tools that make the information Windows dumps after it crashes easier to interpret. These are typically only for advanced users.

Follow our instructions on how to fix blue screen errors with WinDbg and BlueScreenView for help using a few of these tools.

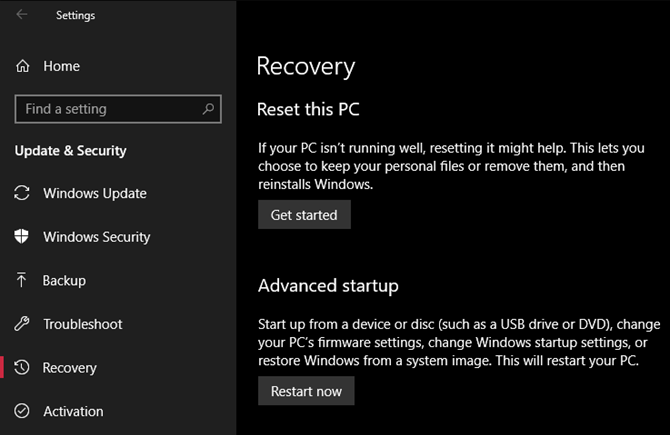
11. Reinstall Windows

Windows 10 Recovery Reset

If all else fails, you’ll need to reinstall Windows on your computer. At this point you’ve ruled out drivers, hardware, malware, and software issues, so there must be some deep underlying problem on your system.

Follow our guide on resetting Windows 10 to learn the best way to do this.

Now You Know What to Do When a Blue Screen Appears

Blue screen errors are frustrating to deal with, especially because they can block you from troubleshooting properly. But after reading this, you know what a blue screen error is and how to resolve it.

For the future, you should learn to recognize the signs your computer is about to crash so you can take action beforehand.

Read the full article: 11 Tips to Help You Fix the Windows Blue Screen Error


from MakeUseOf https://ift.tt/2nfsXgS
via IFTTT

6 Ways You Can Contribute to Linux

linux-devices

Linux isn’t like commercial operating systems. The name is as much a shorthand for a particular community as it is a specific piece of code. In the free software world, you’re not limited to being a consumer of your favorite apps and interfaces. You can take part in creating them and you don’t have to be a developer to do so.

The biggest and smallest projects alike can use a helping hand. Here are ways you can get involved and make a difference.

1. Provide Feedback

Purism employee asking for community feedback

Free software projects don’t treat users as consumers, so they can’t monitor sales. Most also don’t try to track your behavior. So developers don’t know what users want unless they receive feedback. You can help out a lot just by speaking up and helping projects establish a sense of direction.

While social media is one way to be heard, that environment is filled with noise. Many projects establish their own communities. Purism, for example, has a forum for people who purchase its products or use PureOS.

When the company was deciding whether to switch from a rolling release model to stable versions with longer support, it asked people in the Purism community forums. The company ultimately landed on defaulting to a stable version with a rolling release option for those who want newer software.

Seek out the avenues available for your project of choice. Sometimes this is a forum. Other times it’s a chat group in IRC or Telegram. Maybe it’s a Gitlab page. If all else fails, find an email address.

2. Answer Questions for New Users

Ask Ubuntu website for asking and answering questions

When people switch to Linux for the first time, they often don’t have anyone, or anywhere, they can go to for help in person. Instead, search engines are their help desk.

These search engines point to forums alongside question and answer boards. One of the most prominent examples is Ask Ubuntu, which people turn to with concrete and specific questions. Such locations can be immense resources, but that’s only if knowledgeable people sign up and take the time to assist others.

You can be that person.

When you do take part in various community discussion boards, be sure to seek out the code of conduct. Your behavior doesn’t just reflect on you. It reflects on the entire community and can really turn new users away from a project.

3. Write Documentation

Arch Wiki page about contributing documentation

While it’s great to have users helping one another, nothing quite takes the place of having easy-to-read official documentation. Such guides can tell you how developers intend for you to use the desktop they’ve provided, how to overcome hurdles, and what bugs they’re aware of.

Documentation rarely gets the spotlight, but it can make or break your experience with a given Linux distribution. Many people love Arch Linux in part because of the sheer depth and usefulness of the ArchWiki. You can often turn to the Arch Wiki for help even if you’ve never installed Arch. Many instructions work for other distributions as well.

Speaking of Arch, EndeavourOS is a young project that continues the legacy of Antergos, an Arch Linux-based distro that’s easier and faster to get up and running. With so much that has to happen in order to begin a new distro, the team could use help documenting what users need to know.

4. Design Icons for Your Favorite Desktop or App

Design matters. Every few years, major Linux desktop environments revamp their icon themes in some form or fashion. Typically, designers make icons more distinct, flatter (to match design trends), simpler (for easier compliance), or all the above.

No matter the size of a project, they can use your help.

GNOME, for example, changed its icon theme in version 3.32. A major motivation for the revamp was to make new icons easier to create, as you can see in GNOME visual designer Jakub Steiner’s recorded talk from GUADEC 2019. Some apps, such a gThumb, don’t yet have an updated icon. That’s where you can step in.

elementaryOS has had a relatively consistent look since its inception, though its themes have not been without their tweaks. Still, with every aspect of the elementary desktop offering its own distinct character, there remain small system and interface icons still in need of an elementary-infused take.

When you’re lending a hand to shape the look of a project, it helps to first familiarize yourself with the relevant Human Interface Guidelines.

5. Test Out New Software

GIMP website listing ways to get involved

Developers need users to try out the latest versions of their programs. This is helpful with current stable version, and it’s especially useful with software that is still in the pre-release stages.

Free software developers generally work alone or in small remote teams. They don’t have access to various types of hardware and can’t possibly try out all of the different Linux desktop configurations that exist.

By testing apps, you give these developers insight into how their apps run on both your hardware and chosen desktop configuration (Linux distribution/desktop environment/display server/etc.). Of course, developers only get this insight if you reach out to them. So file bug reports, and please remember to be polite when you do.

6. Translate Apps or Improve Accessibility

If there’s one role that virtually any project can use help with, it’s translation. That’s because even if a team already has capable translators on board, there’s no way they speak every language. Few developers would take issue with you spending time to make the software more accessible to people where you live.

This doesn’t just refer to language. Developers also need help making their software more accessible to people who have a harder time seeing or hearing. Some apps simply won’t be usable under certain circumstances, but in other cases, a tweak or two can make a big difference.

Ready to Help Out With Linux Development?

Great! Now let’s act on that excitement while it’s burning bright and hot. Each free software project has its own preferred way of communication and different methods for getting involved, so you can start by hopping to your distro, app, theme, or component’s webpage and looking for instructions on how to contribute.

elementary OS offers some of the most detailed guidelines you will find from a Linux distro, but most of the ones that have been around a while provide instructions on how to help. The same is true of apps. The GIMP Project places a menu option at the top of its homepage that leads to a list of what you can do.

Note, love for Linux is not the only reason to get involved. There are many other benefits to contributing to open source projects.

Read the full article: 6 Ways You Can Contribute to Linux


from MakeUseOf https://ift.tt/2lObawU
via IFTTT

How to Remove Shadows From Photos

remove-shadow

If you shoot a lot of photos in natural light you’ll know the kinds of problems that can cause.

When it’s cloudy the light is flat and your shots look boring. And when the sun’s out it casts deep, ugly shadows over large parts of your photos.

Fortunately, this second problem is easy to fix. You can do it in Photoshop, and sometimes in more simple editing apps. Let’s look at how to remove shadows from photos.

How to Remove Shadows From Photos Using Adobe Photoshop

Shadows are often a problem when you’re shooting in very contrasty conditions, especially in bright sunlight. Since it’s harder to recover detail from overexposed areas, it’s better to expose your shot for the brightest parts, such as the sky.

shadowy photo

This will often leave you with dark shadows in the foreground. Fortunately, it’s pretty easy to fix them. Here’s how to do it in Photoshop.

First, hit Ctrl + J on Windows, or Cmd + J on Mac, to create a copy of your image on a new layer. This will enable you to remove the changes if you need to, simply by deleting this layer.

fix shadows photoshop

Go to Image > Adjustment > Shadows/Highlights. You might find the default settings do a good enough job straight away. If not, click Show More Options to tweak them.

shadows sliders photoshop

First, under Shadows, adjust the Amount slider. Move it to the right to brighten the shadows, and move it to the left to darken them.

Move the Tone slider to the left to reduce the range of shadows that you can adjust, and move it to the right to increase it. For instance, setting it to 10 will see only the darkest areas of your image changed, while setting it to 90 will see some of the mid-tones also being brightened.

When you’re happy, click OK to save the changes.

fixed shadows photoshop

How to Remove Shadows From Photos Without Photoshop

You don’t need expensive software to remove shadows in contrasty images. You can also do it in GIMP, the free photo editing app. Just go to Colors > Shadows-Highlights and drag the Shadows slider left or right to make your changes.

remove shadows in gimp

Google Photos often fixes the contrast in your photos automatically. If not, you can do it manually by going to Edit > Basic adjustments > Light then using the Shadows slider.

And in Apple Photos you can carry out the same adjustments using Edit > Light > Options > Shadows.

In fact, virtually all basic image editing apps will be able to carry out this simple fix. Where there’s a Shadows slider, it’ll work in the same way as we’ve described.

For harsher shadows, and more complex edits, you will need Photoshop, GIMP, or another full-featured photo-editing app.

How to Remove Harsh Shadows on Faces

Harsher shadows on a person’s face, or on the wall behind a subject, are harder to fix. They can be a problem when you’re shooting in hard light like bright sunlight, or with a flash pointing front on.

It’s difficult to remove these shadows completely, but you can reduce them to a level where they become a less distracting part of your photo.

harsh shadows face

We’ll do it by using the Mask tool to paint in some selective shadow adjustments.

Load up your image in Photoshop. In the Adjustments panel, click Levels. This will create a new adjustment layer above your image.

adjust levels photoshop

Click the middle tab below the Levels graph and drag it to the left until the shadows have reached the level of brightness you’re looking for. Don’t worry if other parts of the image are too bright—that’s only temporary.

Now, with the Levels layer selected, click the Mask button. Invert the mask by pressing Ctrl + I on Windows, or Cmd + I on Mac. Your image will revert back to its original dark level.

Select the Brush tool, and set the color to white. In the Options bar at the top, set the Hardness of the brush to a low figure, around 5 to 10 percent. Also, set Opacity to around 30 to 50 percent. Experiment with different brush sizes as you go.

paint out shadows photoshop

Now start brushing over the shadows in the image. Where you brush, the shadows will brighten. Where you don’t they will stay the same.

Because we set the opacity quite low the effect will be subtle. Brush over the same area several times to build up the effect.

remove harsh shadows

If you accidentally brighten areas you want to be dark, change the brush to white and repaint over those areas.

How to Avoid Unwanted Shadows

Rather than trying to fix unwanted shadows in your photos, you’re better off trying to avoid them in the first place.

Nailing the exposure is one of the most important things in photography. Our article full of photography tips for beginners explains the principles of the “Exposure Triangle”—understanding that is the first step to getting it right every time.

It isn’t easy, though, because you often don’t have control over the light you’re shooting in. But there are a few things you can try:

  • When you’re shooting on a phone turn on Auto HDR mode. This will help to reduce contrast and shadows whenever the conditions call for it.
  • Some mirrorless and other dedicated cameras also have an HDR mode. If yours doesn’t, try using the Exposure Bracketing option instead. This shoots three separate images at different exposures so you can pick the best (or merge them all in Photoshop).
  • If possible, use an off-body flash so you can control the direction of the light. A flash attached to the camera will produce harsh shadows and glare on the subject.
  • When you have to use a front-on flash hold a sheet of white paper or card below it or to the side. This bounces the light off the ceiling or wall to create a more flattering effect. Alternatively, hold white tissue in front of the flash to diffuse it and make the light softer.
  • When shooting faces in harsh sunlight, hold a piece of white card or paper angled towards the face to reflect the light and soften the shadows.

And if your snaps still come out darker than you’d like, it’s easy to learn how to lighten underexposed photos. Our guide has all of the information you need.

Read the full article: How to Remove Shadows From Photos


from MakeUseOf https://ift.tt/2nfNpOH
via IFTTT

5 PC Games You Can Continue Playing on Mobile

conitnue-game-mobile

Sometimes, real-life can seriously impact on your gaming time. However, if you buy the right games you can start playing them on your PC and then continue playing them on your smartphone.

Here’s a short list of PC games you can continue playing on mobile, giving you the best of both worlds. Thus, these games will allow you to maximize your gaming time, no matter where you are.

1. Fortnite

It feels like Fortnite is on every console and system known to man, and your smartphone is no exception. Fortunately, if you get stuck into this wildly popular battle royale game, you won’t need to make a separate account for each system.

While Fortnite didn’t invent the battle royale genre, it’s one of its most popular entries. It also fought to bring cross-platform compatibility between all the devices it’s on. This feature means you can purchase and earn items on your PC, then retrieve them when you’re playing on mobile.

Fortnite also supports cross-platform play with PC, consoles, and mobile. This feature means that you can play with friends on different systems. Thankfully, if you’re not playing alongside anyone on a separate system, the game will pair you with other mobile players to keep things fair.

Because of Fortnite’s rampant success, scammers are always on the hunt to crack open Fortnite accounts. So if you play this game, be sure to secure your Fortnite account with two-factor authentication.

Download: Fortnite for PC | Android | iOS (Free)

2. Minecraft

Another game that’s hard to avoid no matter where you are, Minecraft is playable on all modern devices. It takes a little more work to get Minecraft to work cross-platform, but it is possible.

For one, you need the Bedrock version of Minecraft on your PC. The Bedrock version is the standard that all devices should meet. Because every device uses the same version, they’re all on the same level and can play nicely with one another.

To run the Bedrock edition on your computer, you need Windows 10. Then, you need to download Minecraft for Windows 10 from the app store. You don’t need to re-buy this version; instead, you can get it for free after you buy the main version of Minecraft.

The Windows 10 version of Minecraft uses the Bedrock version, meaning you can cross-play with other systems. If you run Minecraft and it says “Java edition,” this is the new, flashy version of Minecraft and isn’t compatible with other devices.

You’ll also need Minecraft: Pocket Edition on your mobile device. Unfortunately, the mobile version doesn’t come free with the PC version, so you must re-buy it on your mobile device.

Once you’re using the Bedrock version, you can share a world between all your devices. The best way to do this is on a server which saves your progress as you build. You can either set up a server yourself or grab one from Minecraft Realms.

These steps represent quite a lot of work, so it’s best done if you have friends who want to play along. Fortunately, if you performed the above steps, you now have a server that’s running the standard Bedrock version. This means any friend, regardless of how they play, can hop on.

There are some good reasons why you should make your own server, so consider them before you purchase a Realms server.

Download: Minecraft for PC ($26.95)

Download: Minecraft for Android | iOS ($6.99)

3. Hearthstone

If you want to play card games while you’re out and about, Hearthstone is a fantastic choice. This fantasy-based trading card game (TCG) takes inspiration from the characters and settings within the hit game World of Warcraft. Since its release, Hearthstone has been taking more liberties with the source material and creating a style for itself.

Hearthstone’s core design is for PC and mobile cross-play. This means you can build and play decks on PC, then continue your card-based conquest while on the go. All of your cards and decks follow you, so you never need to rebuild the decks from scratch.

Best of all, TCGs have a slower, turn-based pace than other games. If you’re on mobile and a PC player challenges you, they don’t have an inherent gameplay advantage over you.

Download: Hearthstone for PC | Android | iOS (Free)

If you’ve never played Hearthstone before, check out our complete guide to Hearthstone to get started playing the game.

4. Shadowverse

If you’re not keen on Hearthstone, give Shadowverse a try. This is an anime-based card game that is not as popular as Hearthstone but has an active fanbase that appreciates the art style.

Shadowverse is an excellent pick if you don’t want to spend too much on a TCG. The developer is generous with its gifts, so you can make a decent deck while paying nothing. The option is there to buy more packs if you feel inclined, but it’s a lot less restrictive than other TCGs.

At the time of writing, the gameplay revolves around playing “one-hit knockout” (OHKO) cards that win the game on the spot. As such, Shadowverse may not be an ideal choice for people who enjoy creature combat over combo wins.

Download: Shadowverse for PC | Android | iOS (Free)

5. Crashlands

A lot of games start on one platform, then expand to others when their success warrants it. Crashlands is unique in that the developers designed it to span both PC and mobile by default.

The PC and mobile versions are so in-sync, the developers wanted one game purchase to span both systems. Unfortunately, they couldn’t sell the PC and mobile version in a bundle, so they split the total asking price of the game between the two editions. As such, when you buy both versions, you’ve essentially bought the full game.

Crashlands has a similar style to games such as Minecraft and Don’t Starve. You play as Flux Danes, a space delivery man who’s shot down and lands on an alien planet. You’re forced to make a life for yourself by building a base, fighting off the wildlife, and collecting alien eggs to hatch as your pet.

Given that it’s designed to be cross-platform, you don’t lose progress between the PC and mobile versions. The game uses BscotchID to sync up the saves between both games. Once you have finished playing on PC and need to travel, just tell your phone to sync up the saves and you can start playing where you left off.

Download: Crashlands for PC ($14.99)

Download: Crashlands for Android | iOS ($6.99)

Find New Mobile Games Worth Playing

Just because you’ve left your PC behind doesn’t mean you have to leave your games behind with it. With these multi-platform games, you can pick up where you left off no matter where you are.

And if you’re big into mobile gaming, here’s how to find new mobile games worth playing.

Read the full article: 5 PC Games You Can Continue Playing on Mobile


from MakeUseOf https://ift.tt/2lGJGcw
via IFTTT

Friday 27 September 2019

Turn Your Raspberry Pi Into a Media Server With Emby

raspi-media-server

Looking for a smart, easy-to-use Raspberry Pi media server solution with a good choice of client apps? Perhaps you looked at Plex or Kodi but found they didn’t seem right. If so, it’s worth giving Emby a go.

Easy to install and set up, Emby is a smart media server alternative. Here’s how to install Emby Server and Emby Theater on the Raspberry Pi.

What Is Emby?

Emby is a media server. While it isn’t as well-known as other solutions (e.g. Plex, or Kodi), open source Emby has client and server software. This means that you can install the server module on the computer with your media on it, then share to other devices using client apps.

Various plugins can extend the features of Emby. You’ll find IPTV plugins for internet TV, for example. Emby also offers built-in parental controls, to help protect your family from sensitive content. While Emby is less well-known than its competitors, the userbase is growing.

For more information, here’s why you should forget Plex and Kodi, and try Emby instead.

What You Need for a Raspberry Pi Emby Media Center

To build an Emby media server, you will need:

  • Raspberry Pi 2 or later (we used the Raspberry Pi 4)
  • microSD card (16GB or more for the best results)
  • PC with a card reader
  • Keyboard and mouse
  • HDMI cable and suitable display

Make sure you have a suitable power connector for your Raspberry Pi.

The process is straightforward: install Emby, connect it to your network, then use it as a media server. Media stored on a USB hard disk drive can be added to Emby, then served to devices on your network.

For example, the Raspberry Pi Emby box could serve your favorite home movies and photos to your TV or mobile.

Install the Emby Media Server on Raspberry Pi

Installing the Emby Server on Raspberry Pi’s default Raspbian Buster is straightforward. Open a terminal and update and upgrade to begin:

sudo rpi-update

sudo apt dist-upgrade

Next, use wget to download the ARMHF version from the Linux downloads page; this version is compatible with the Raspberry Pi.

wget https://github.com/MediaBrowser/Emby.Releases/releases/download/4.2.1.0/emby-server-deb_4.2.1.0_armhf.deb

Install this with

dpkg -i emby-server-deb_4.2.1.0_armhf.deb

Wait while this completes. Your Raspberry Pi-powered Emby server is installed. All you need to do now is configure it.

Configure Your Emby Media Server

Access the Emby Server via your browser. It’s easiest using the Raspberry Pi itself—use the address http://localhost:8096.

This brings you to the server set up. You’ll need to set the preferred language, username, password, and other options. Setup also gives you the option to link your Emby Connect account. This is a great way to connect to your server from any Emby account, without needing the IP address. However, it’s not necessary.

Following this, you’ll see the Setup your media libraries screen. Here, click Add Media Library.

Add media to Emby

Simply browse for the location, then set the meta information according to the menus.

Emby library meta settings

This is mostly language-based and shouldn’t take long.

Configure Meta settings on Emby

When you’re done adding media locations, click Save. It’s time to start viewing content on your Emby media server!

Connect Any Device to Your Emby Server

An impressive collection of apps is available for Emby. Want to watch on a smart TV? You can! You’ll also find apps for Android TV and Amazon Fire TV, along with Xbox One and PS4. Using Kodi? There’s an Emby add-on available.

Additionally, Emby produce mobile apps for Android and iOS mobile devices. There is even a version for Windows 10 and Windows 10 Mobile, as well as a HTML5 web client.

In short, all devices are covered.

To enjoy content on your Emby server, simply install the app and proceed through the setup. You’ll be asked for the server or device name, and if you set it up, the Emby account credentials.

Once this is all configured, you’ll be ready to enjoy streamed media from your Raspberry Pi Emby server.

Set Up Raspberry Pi as an Emby Client

Thanks to the Emby Theater tool for Linux, you can view the media files on your Raspberry Pi Emby server on another Pi.

Set up Emby Theater on Raspberry Pi

You have two choices to install the Emby Theater client app on a Raspberry Pi.

  1. Download the DEB file to your Raspberry Pi and install it on Raspbian Buster (or any Debian-based operating system).
  2. Alternatively, download a full disk image, write it to a spare SD card, and boot this.

Use the appropriate download link based on how you plan to install Emby on your Pi.

Download: Emby Theater DEB File for Raspbian Buster

Download: Emby Theater Disk Image

With your chosen download complete, it’s time to install Emby.

How to Install Emby Theater on Raspbian Buster

Get started with Emby Theater by downloading the DEB file from GitHub. This should be downloaded direct to your Raspberry Pi, or to a location from it can be copied to the Pi.

Next, open the terminal and update and upgrade:

sudo rpi-update

sudo apt dist-upgrade

Next, run the installation command:

sudo apt install -f ./emby-theater_3.0.9_armhf.deb

Then reboot:

reboot

Finally, run Emby with

emby-theater

Want Emby Theater to autostart when you boot your Pi? That’s not a problem. In the terminal, edit the autostart file:

sudo nano ~/.config/lxsession/LXDE-pi/autostart

Scroll to the end and add:

@emby-theater

Save and exit (Ctrl + X, then Y) and restart your Raspberry Pi. Emby should automatically start. Of course, if you want this functionality then it’s smarter to just install the disk image.

Install Emby Theater From a Disk Image

To turn your Raspberry Pi into a dedicated Emby client, download the zipped disk image to your main PC.

Next, unzip the file. By now you should have your Raspberry Pi’s SD card inserted in your PC’s card reader.

Launch Etcher, then click Select image to browse for the IMG file. Ensure that the correct drive is selected (Etcher is good at autodetecting flash media but check regardless) then Flash. Etcher will format the media and write the Emby disk image.

Install Emby Theater on Raspberry Pi with Etcher

A notification will appear when done. Close the software, safely eject the SD card, then replace it in your Raspberry Pi. The computer should boot straight into Emby Theater.

Stream Content on Raspberry Pi With Emby

Emby brings a whole new dimension to serving media on a Raspberry Pi. To start off, it’s compatible with the Raspberry Pi 4, and the hardware boost this delivers over its predecessors.

Browse files on your Raspberry Pi Emby server

But there’s more to Emby. Don’t want the bells and whistles of a Raspberry Pi Plex server? Find that streaming content on Kodi isn’t as smooth as you would like? Don’t worry. Emby has a clearer focus to sharing media on your network. Sure, you can upgrade to the Emby subscription program for additional features, but you probably won’t need these.

With apps for virtually any device, you’ll find Emby is perfectly suited to the Raspberry Pi and your media files.

Considering alternatives? Here are more ways you can set up your Raspberry Pi as a media server.

Read the full article: Turn Your Raspberry Pi Into a Media Server With Emby


from MakeUseOf https://ift.tt/2naVu75
via IFTTT