Tuesday 31 March 2020

Maxoak Bluetti 1500Wh Backup Solar Generator Review: Be Ready for Anything

Our verdict of the Maxoak Bluetti EB150:
An affordable all-round great performing backup battery that stores an epic amount of energy. Combine with a solar panel or two (cable included) for complete electrical resiliency.
1010

I thought I’d never see the day that supermarket shelves are empty, but as recent events have demonstrated, our modern societies are more fragile than we’d like to believe. It’s more important than ever that you’re prepared for emergencies: whether that’s a virus pandemic, a natural disaster, or civil unrest. These events can happen, and will increasingly do so in the coming decades.

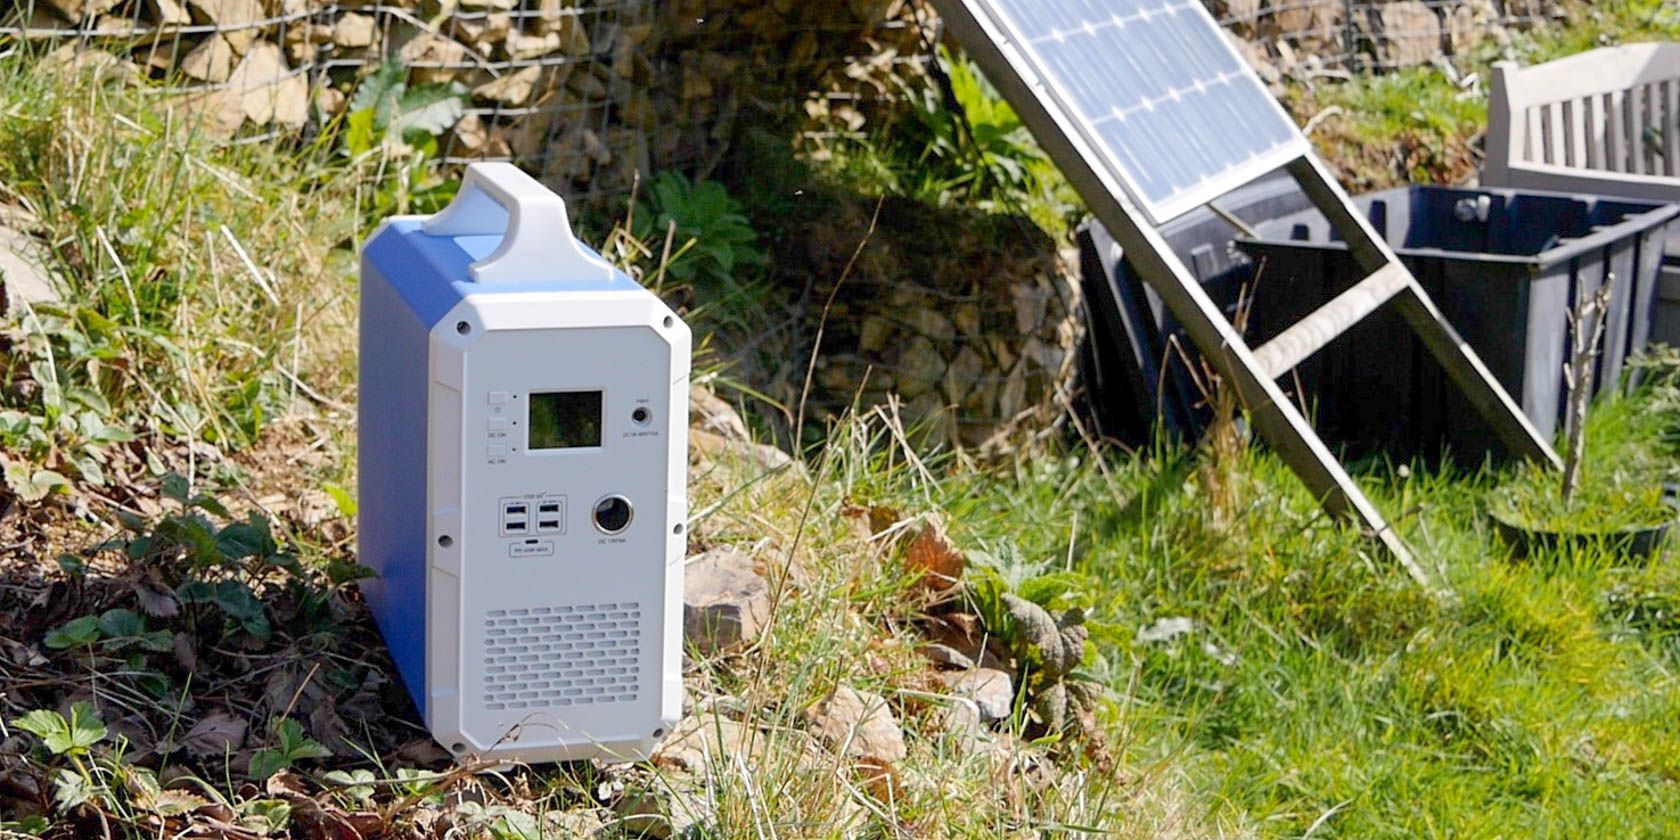
One important aspect of emergency preparedness is electrical power. It’s no good having six months of food in the freezer if it’s all going to thaw in a day. So today, we’re taking a look at the Maxoak “Bluetti” EB150; also marketed under the PowerOak brand in the UK. It’s an enormous 1500Wh energy store with 1000W AC output, and includes an MPPT controller for direct connection to large solar panels.

Design and Specifications

  • Inputs: AC adapter or solar (16-60V 10A), 9mm DC connector
  • Output: 2 x AC sockets, 4 x 2.1A 5V USB ports, 1 x 45W PD USB-C, 1 x 12V 9A car port
  • Total Capacity: 1500Wh
  • Maximum Output: 1000W continuous, 1200 peak
  • Battery Technology: Lithium-ion
  • Charge time: AC 10 hours, solar variable (minimum 4 hours)

Weighing 38 pounds (17kg), the Maxoak EB150 is about the size of a small office PC. There are no ruggedization features like rubber bumpers or covers for the sockets, but the case itself is solid metal with a secure ABS handle and front/rear panels. It can certainly take a beating unless said beating involves any element of water. This is not waterproof, or even splashproof. Keep it away from rain.

zombie pigs attacking bluetti power generator
The Bluetti will easily withstand the odd zombie or animal attack

Also, as a large lithium-ion battery, you shouldn’t attempt to pierce it, as that may result in a fire. So keep it away from bullets or crossbow bolts, too.

The AC sockets are located at the rear, with everything else around the front.

bluetti ac sockets
Two AC sockets around the back (this is the UK model; the US model has 3-pin 110V sockets)

There are three buttons for power, AC, and DC output. Outputs are activated by holding down the relevant button for a few seconds. A small display screen indicates the current battery level (an estimate via five segments), and exact numbers for input, AC and DC output wattage.

bluetti front sockets
4 x USB-A ports, 1 x USB-C PD port, and a car socket provide plenty of DC output options for all your devices

Although I had no problem seeing the LCD screen in direct sunlight, I was only able to capture it indoors. If I have one complaint about the Bluetti, it’s that the battery remaining indicator is too vague, consisting only of five segments. The aspect aspects of the display give an exact figure, but not for the battery. A simple percentage would have been preferable here.

bluetti lcd screen

How is This a “Solar Generator”?

Strictly speaking, the Maxoak Bluetti EB150 doesn’t generate anything itself, but it does include the circuitry necessary to charge the battery from standard solar panels, and even includes the right cables. It can also simultaneously charge and discharge at the same time.

Built-in to the Bluetti is an MPPT charge controller; these are superior to the older style PWM, particularly on cloudy days, as they’re able to balance the conversion to get a greater charge.

The Maxoak Bluetti can be used with nearly any kind of solar panel, but with a couple of specifications. It must ran at 16-60V, and a maximum of 10A. The total possible input power is 500W. For testing, I hooked it up to an old monocrystalline panel rated at 175W, and was able to generate about 120W at peak (mid-afternoon on a clear UK spring day). I don’t have a watt-meter to test exactly what the voltage the panel was putting out, but it seemed to work: the Bluetti was showing roughly 50% after a day of gloriously good weather and was fully charged after another. I should also note the fan was running almost constantly when charging or using the AC.

If you have multiple panels but they’re under-voltage, you can wire them in series to increase the voltage to the required range. Or if they’re the right voltage already but well under the maximum current, you can wire them in parallel, which will increase the current while keeping the voltage the same. A combination of parallel and series wiring can also be used.

Under ideal conditions, it could take as little as 4 hours to fully charge the Bluetti from solar. If you’re doing the math, you might be wondering why it isn’t 1500 (the total capacity) divided by 500 (the total possible input)–or 3 hours. That’s due to an inherent inefficiency in any charge controller; in this case 25% of the electrical energy is lost in the process. This isn’t a flaw of the Bluetti, it’s true across the board when doing this kind of conversion.

The Bluetti includes overcharge protection, meaning that once the battery is full, it won’t continue charging and explode. That’s always a good thing.

bluetti front panel close up

Charging from AC

A standard AC charger (168W) is also included should you wish to charge from the grid, and since this is a fixed input we can tell you it would take 10 hours to do so. This must be from an AC electrical output; there is no way to charge from a car battery.

One of the few compromises in the Bluetti is that there’s only a single input. So you couldn’t, for example, combine a solar panel on top of your campervan with a wind turbine. While this would have been a nice feature, it’s probably of less use to most people and would have increased the price significantly.

The Maxoak Bluetti is rated to 1500 charge cycles, which is about average. A cycle is anytime the battery is used then charged again (even if it wasn’t fully discharged). While this sounds like a short lifetime, in reality, it means you could run the battery down and recharge daily for about five years; and at that point, it would still function but at a”degraded” 80% capacity. It’s difficult to test these claims extensively, but Maxoak provides a 1-year warranty. If you’re at the point where you’re having to use this as your only source of power for years on end though, you probably have bigger concerns.

Discharging: What Can It Run?

The Bluetti is rated to 1000W continuous and 1200W peak (for a few minutes). That’s a combined total for everything plugged into the device (AC and DC), not just any single device. If two AC sockets isn’t enough, it’s okay to plug in an extension lead; the additional sockets don’t inherently draw extra power, it’s just a case of ensuring the devices plugged into it are within the total limits. Exceeding the limit shouldn’t damage anything though, it will simply result in the unit shutting down.

In real terms, what does 1000W look like?

A deep freezer may take anywhere from 30-100W. CPAP machines are about 30-60W. The oxygen concentrator that keeps my father alive peaks at 300W. The Bluetti could comfortably run all of them, at the same time, along with multiple smartphones charging, and my Macbook Pro. On the other hand, an electric chainsaw is around 2000W; it could not run that. Nor could you plug in a kettle, which may be anywhere from 1500W to 3000W.

This is only half the picture though; the other half is how long it’ll stay powered for. To find this out, divide the total capacity in Watt-hours (Wh), and divide by the total power being drawn (in watts). This will give you a number of hours. So a 100W freezer, from a full 1500Wh charge, would last 15 hours.

We tested the stated capacity of the Bluetti with a total 750W load, consisting of a plasma TV, gaming PC, lamp, and dehumidifier. Sure enough, it lasted around the two-hour mark, as would be expected.

That’s a lot of stuff plugged into the Bluetti!

Taking it to the extreme, an average smartphone battery is 10Wh. If you fully discharged your smartphone and used the Bluetti to charge it up, you could survive for roughly six months.

Should You Buy a Maxoak Bluetti EB150?

The Maxoak Bluetti provides more than enough power for most people and at a sensible price point. You’ll find models from competitors with a higher peak output, even if they don’t have a greater total capacity; these will cost more, but perhaps your specific use-case demands that. You’ll also find models that can charge faster, which might be more suitable if you want more solar panels, or the ability to charge from the grid in only a few hours. But again, those will either be more expensive or compromised elsewhere. The Maxoak Bluetti is a good all-rounder for most people.

The package doesn’t include solar panels, but that’s probably a good thing–it’ll be much cheaper for you to source them locally, or used. There’s no need to buy perfectly new panels or with a brand name attached, they are much the same and have a longer life span than batteries. While you could just charge the Bluetti from an AC outlet, you’ll be a lot safer should anything bad happen if you have a permanently free source of energy.

Maxoak Bluetti 1500Wh Maxoak Bluetti 1500Wh Buy Now On Amazon $1,399.99

If you do need even more capacity, Maxoak have you covered there too. The EB240 stores a whopping 2400Wh of power. The continuous and peak rating are the same, but it’ll last longer. If you’re powering critical medical equipment, it’s a good idea to buy the largest battery you can afford.

I wish we didn’t have to recommend a backup power generator at all if I’m completely honest. It’s a lot of money to spend on something you should hopefully never need. But I think we’re all coming to the realization that we have a very fragile existence. Please don’t let the next major catastrophe catch you unaware: build resilience into every aspect of your life. What would you do if faced with a week-long power cut?

bluetti with chick sitting on it

Money Off Coupons for the Maxoak Bluetti 1500Wh

We’ve secured some coupons to make the Bluetti even more affordable.

US readers: Maxoak Bluetti EB150 on Amazon US. Use the code “bluetti1500” at checkout for $140 off; combine with the voucher that can be applied on the Amazon page for a total of $290 off. The EB240 model currently has a promotion for $390 off the purchase price of $2000 (no coupon code needed).

UK readers: Poweroak EB150 on Amazon UK. Use the code “IBQWIGRI” for a £70 discount; combine with the £130 voucher that can be applied on the Amazon page for a total of £200 off.

We also have one Maxoak Bluetti EB150 to give away to one lucky reader! Enter below, but please note this competition is open to US residents only. 

Enter the Competition!

Maxoak Bluetti 1500Wh Solar Generator

Read the full article: Maxoak Bluetti 1500Wh Backup Solar Generator Review: Be Ready for Anything


from MakeUseOf https://ift.tt/3ayzdnF
via IFTTT

Dive Into Data With 43 Hours of Microsoft Excel Training for Under $50

From sales figures to financial forecasts, data plays a key role in business. The tool most often used to crunch the numbers is Microsoft Excel, but relatively few people know the software inside out. If you would like to improve your knowledge, the 2020 Ultimate Microsoft Excel Certification Training Bundle provides 43 hours of hands-on training from top instructor, Alan Jarvis. You can get it now for just $49.99 at MakeUseOf Deals.

Basic to Advanced

In the world of work, everyone is expected to know Excel. However, this powerful software can seem daunting to an absolute beginner. 

This bundle helps you get started and master the more advanced features, with 10 in-depth courses. You start with the basics — how to create a new worksheet, how to format a spreadsheet, and so on. 

You can discover advanced techniques and powerful tools, such as VBA and macros. The training also covers functions, formulas, pivot tables, data visualization, and more. Each course provides hands-on examples and certification.

Your primary instructor is Alan Jarvis, who has taught over 80,000 students from 194 countries. With 4.6 stars from over 14,000 reviews on Udemy, he has an outstanding track record.

43 Hours of Training for $49.99

These courses are worth $1,732 in total, but you can pick up the bundle now for $49.99.

Read the full article: Dive Into Data With 43 Hours of Microsoft Excel Training for Under $50


from MakeUseOf https://ift.tt/2xz7nce
via IFTTT

5 Cheap and Easy Recipe Sites to Cook Healthy Meals at Home on a Budget

Cooking at Home With Budget Recipes

Looking to cook a healthy meal while on a limited budget or low on supplies? These websites teach you the best cheap recipes to make at home, whether you’re a beginner or seasoned cook.

With the coronavirus outbreak, most people are stuck in their houses all day. The no-risk option is to cook your own meals. The pandemic has also wreaked havoc on the global economy, so it’s wise to cook healthy and cheap food yourself.

Whether you have only the pantry essentials or fresh produce, you can make delicious meals at home with the right recipes. You don’t even need to be a great cook as these websites work for beginners in the kitchen too.

1. The Stonesoup (Web): Low-Carb Recipes With Only Six Ingredients

The Stonesoup recommends recipes with only six ingredients that are also low-carb

The Stonesoup’s claim to fame is making recipes that use only six ingredients. This makes it much easier for beginner cooks, and cheaper.

At the same time, author Jules Clancy focuses on making them low-carb and healthy. And you can trust Clancy on her claims since she’s a former food scientist.

The recipe format is usually pretty standard, but the best part is what comes after the recipe. Clancy usually shows how to make it fancier and adds substitutes for a variety of dietary choices such as vegetarian, vegan, dairy-free, pantry-friendly, etc.

You can check out all her recommended common food substitutes in a separate section. The site also sorts recipes by the amount of time it takes to cook, dietary choices, and dish type.

Clancy also includes “waste avoidance strategies” so that you’re making full use of all your ingredients and not wasting food. These easy and healthy recipes also have a section on whether they can be prepped as part of future meal planning.

For offline references, you can download a free ebook with 29 low-carb, 6-ingredient recipes.

2. Mob Kitchen (Web): Serve Four People in 10 Bucks

Mob Kitchen makes cooking simpler for students and beginners with recipes for less than 10 bucks

Mob Kitchen targets students who are fending for themselves for the first time in their lives. So all the meals here are easy to make for beginner cooks while trying to stay healthy. And all of these are recipes on a budget.

The website’s big idea is to make recipes that serve four people and cost less than 10 British pounds.

In America, you should still be able to get all these ingredients in 10 dollars. And really, they include everything except pantry essentials like salt, pepper, milk, and oil.

Mob Kitchen presents recipes in a slightly different format than more recipe sites, but it’s actually quite thoughtful. You’ll find the steps more wordy than normal, but that’s because they are careful to include all the “dummy’s guide” steps.

For example, they won’t say “cut the cucumber in two” but instead write “peel the skin off the cucumber, then chop it in half.” These specifics might seem overkill for an experienced cook, but they are important notes for beginners.

The website doesn’t have a huge collection of recipes, but the available options are varied and sound delicious. Make sure you also check out the Mob Kitchen student hacks ebook for tips and tricks for any beginner.

3. Brokeass Gourmet (Web): Recipes Under $20 and Cooking Tips

Brokeass Gourmet gives awesome home-cooking recipes that cost less than 20 dollars to make

As the name suggests, Brokeass Gourmet is all about staying on a budget while you eat delicious and healthy food. Author Gabi Moskowitz’s idea is to make recipes that cost less than $20 but still look and taste awesome.

The blog has been around for over 10 years, so the collection of recipes is extensive. The recipe archives are a nice mix of full meals, diet-restricted dishes, varied cuisines, and some items that you wouldn’t have thought of.

Also, look for the signature “$5 Dessert” column to find cheap but rich desserts to satisfy your sweet tooth.

The nice part is that you don’t have to read through long paragraphs to set the mood, as the blog dives right into the recipe with only a short intro.

Moskowitz also often writes guides about the things related to cooking on a budget, like how to make produce stay fresh for a longer time.

4. One Pot Recipes (Web): 30 Minute Meals Using a Single Pot

One Pot Recipes reduces cleaning in the kitchen with simple one-pot recipes that can be made with 30 minutes of work

The worst part about cooking is the cleaning that goes with it. You put in all that effort over the stove and instead of enjoying the meal, you’re thinking about that mess in your sink that needs tending to.

One Pot Recipes shows you how to reduce that mess and make cooking simpler by using one large vessel for the whole meal.

Blogger Abeer says most of these recipes need only 30 minutes of work from you. One Pot Recipes often relies on store-bought pantry items with long shelf life, thus making it easier for amateur cooks.

You’ll need a good slow pot or instant pot a.k.a. pressure cooker to make many of the dishes, which have their own sections too. But you’ll also find recipes without those, for everything from salads to dessert.

One Pot Recipes has a nice format that tells you variations for the dish, like adding or deleting ingredients, or changing the base itself.

You’ll also find storage instructions for the item, and tips and techniques to ensure you are getting the best result as per the recipe.

5. One Dish Kitchen (Web): Recipes to Cook Meals for One Person

One Dish Kitchen reduces waste and leftovers with recipes for food that serves a single person

Most food websites give you recipes that serve a family. But if you are staying by yourself, that’s a lot of food wastage or leftovers. Plus, it’s not as simple as simply dividing the recipe’s quantities to turn it into a single person’s food. One Dish Kitchen focuses on cooking for one person.

The website packs recipes for breakfast, main dish, side dish, appetizer, salad, soup, sauces, drinks, and desserts. It also includes meal planning ideas so that you can prep in advance to cook food later. The instructions are clear and the recipes have helpful tips and tricks to ensure a smooth cook.

One Dish Kitchen regularly adds new recipes and relevant guides, like the 14-day isolation meal plan to make single-serving items in advance. If you prefer watching to reading, check out their YouTube channel for many of the same recipes in video format.

Sharpen Your Basic Cooking Skills

Just because you’re cooking and eating at home doesn’t mean the food has to be boring. If you sharpen your basic cooking skills, you’ll be eating delicious home-cooked meals without taking a step out of the house.

One of our favorite resources to learn the essential skills of cooking is the 51-page free Cooking Crash Course by Chef Gui Alinat. You can find that and more tools for beginner cooks in our collection of five essential sites for newbies in the kitchen.

Read the full article: 5 Cheap and Easy Recipe Sites to Cook Healthy Meals at Home on a Budget


from MakeUseOf https://ift.tt/2xFBoHb
via IFTTT

Reddit Polls Help You Gauge People’s Opinions

Reddit now officially supports Polls, with the social media platform rolling them out as a new type of post. This means that you can create a Poll on Reddit without needing to use a third-party service to do so. And the Poll can be about (almost) anything.

You have always been able to post a poll on Reddit. However, thanks to a lack of official support, you have had to use a third-party site to do so. Until now. After testing the feature for a few months, Reddit Polls are now available across the site.

How to Create a Poll on Reddit

In a post on /r/announcements/, Reddit describes Polls as “a brand new post type that encourages redditors to share their opinion via voting.” Anyone can create a Poll and then vote in that Poll. Polls are supported in all subreddits aside from text-only communities.

To create a Poll on Reddit, open the subreddit you want to post to and click “Create a Post”. Choose “Poll”, and enter a title, the question you want to ask, and the answers you want to offer. Finally, choose a “Voting Length”, and click “Post”.

Reddit Polls cannot be edited once published, so make sure you double-check every element before posting. As well as voting in a Poll, Reddit users can leave a comment on it. Which means the debate can continue beyond the simple act of voting.

You can create and vote in Polls on Android (be sure to update to the latest version of the app), iOS, and the new version of Reddit on the web. However, on the mobile web and the old version of Reddit, while you can vote, you cannot create Polls.

What Is Reddit and How Does It Work?

Polls are just the latest addition to Reddit—and a welcome one at that—with the social media platform regularly rolling out new features. However, if you’re completely new to Reddit, be sure to read our article explaining what Reddit is and how it works.

Image Credit: Lettawren/Flickr

Read the full article: Reddit Polls Help You Gauge People’s Opinions


from MakeUseOf https://ift.tt/3bHHOod
via IFTTT

Real Online Privacy for Beginners: 60+ Essential Tips and Warnings

online-privacy-guide

Companies and governments are spying on you all over the internet and beyond. We have all kinds of tips to help you reclaim your privacy online!

Every year, we lose a little bit more of what little online privacy we have left. Our activities are tracked from site to site, and it doesn’t matter where you live because nobody is safe from these prying eyes—unless you know how to protect yourself.

Don’t want your internet activity tracked? Creeped out by the idea of corporations listening in on your conversations? Tired of shady businesses profiting off of your personal information? Here’s what you need to know, and do!

Understanding Basic Online Privacy

If you’ve never quite “bought into” the idea or importance of online privacy, we don’t blame you. It can often sound like exaggerated and unnecessary paranoia over nothing! We recommend checking out these introductory articles:

Online Privacy While Browsing the Web

These days, the moment you connect to the internet, you start leaving traces of who you are and what you’ve done with every single action. Protecting your privacy is hard, but not impossible:

Online Privacy on Social Media

facebook-privacy-scandal

Social media companies are some of the worst offenders when it comes to privacy violations. Most of them rely on your personal info to turn a buck—and no one is looking out for you, so you need to look out for yourself:

We have several articles specifically written for better privacy on Facebook. Given how flippant the company has been regarding personal information on their social network, we highly recommend heeding these tips if you still use Facebook:

Don’t neglect your personal privacy on Instagram, which is owned by Facebook:

WhatsApp has also been a recurring subject of privacy-related issues. If you’re a regular WhatsApp user, here are a few things you need to know:

Online Privacy and Online Dating

Online Privacy via VPNs

windscribe-vpn

One of the best ways to protect your personal privacy online is to use a virtual private network (VPN). Don’t worry, VPNs are a lot simpler and easier to use than it sounds. Here’s what you need to know:

Online Privacy and Your Emails

Don’t want others peeking at your emails? Want to send emails that can’t be traced back to you? Here are the tips you need:

Online Privacy and Your Devices

Privacy tips for your computer:

Privacy tips for your smartphone:

Read the full article: Real Online Privacy for Beginners: 60+ Essential Tips and Warnings


from MakeUseOf https://ift.tt/2QRPZpZ
via IFTTT

How to Set Up TeamViewer and Access Your PC From Anywhere

For home users who want to access a computer remotely, it doesn’t get any easier than TeamViewer. Whether you want to access your home computer from anywhere or connect to a friend’s machine to help them out, TeamViewer is a great option.

Here’s a complete guide on how to use TeamViewer, including how to set up unattended access and some TeamViewer tips along the way.

How to Install TeamViewer

To start, download TeamViewer on your computer. The service has apps available for Windows, Mac, Linux, and Chrome OS, as well as Android and iOS. We’ll cover Windows here, but the experience is similar across platforms.

When installing, you can select Default installation, as we’ll set up unattended access shortly. TeamViewer is free for personal use, so select Personal / Non-commercial use for the second box and hit Accept to install.

TeamViewer Installation

After installation, you’ll see the TeamViewer home screen and are ready to use the service.

How to Connect Using TeamViewer

Using TeamViewer is simple. To start a remote connection, you’ll need your partner’s ID and Password provided on the main menu. If you’re connecting to someone else, ask them to install the app and send you these details via email or other means.

TeamViewer Home Screen

Note that if you’re connecting to someone who isn’t tech-savvy or can’t install the full version of TeamViewer, they can use the Download QuickSupport button on TeamViewer’s download page to download a single-use version.

Enter the Partner ID in the box, make sure you have Remote control selected, and hit Connect. After a few seconds, you’ll see a prompt to provide the other machine’s Password. Enter this and you’ll connect within a moment.

Once you’ve connected, you’ll have full control over the remote computer. Use your mouse and keyboard to work on the other person’s machine just like you were sitting in front of it.

TeamViewer Controlling Remotely

The only exception to keep in mind is that you might have issues accepting UAC prompts for admin access. Depending on how they ran TeamViewer, you may have to ask the other person to accept these prompts.

How to Use TeamViewer’s Tools

TeamViewer provides you with some tools and tricks to help with your remote sessions. If you don’t see the toolbar at the top already, click the small down arrow to show it.

Click the Home button and you can review some general information about the remote computer, which is helpful for troubleshooting purposes. Under Actions, you’ll find commands that you can send to the remote machine, including rebooting, Ctrl + Alt + Del, and leaving a note for the person.

Use the options under View to adjust the resolution of the remote session, choose between quality and speed, and decide how the windows display. In the Communication menu, you’ll find options for starting a voice/video call via the internet, sending text chat, and using a whiteboard for illustration.

TeamViewer Change Options

Finally, expand the Files & Extras section to take a screenshot, record the session, or easily transfer files between machines. In particular, a recording is a great way to create an instructional video that the other person can refer to in the future.

When you’re done, click the X on the left side of the navigation bar to end the session.

Meanwhile, on the remote computer, expand the TeamViewer panel in the bottom-right corner to access similar options. You can see who’s in the session, access the chat box, send files, and more.

TeamViewer Remote Chat Box

How to Set Up Unattended Access in TeamViewer

One of TeamViewer’s best features is unattended access. This allows you to remotely connect to your own computers from any machine running TeamViewer. It takes a bit of preparation to do, but it’s worth it for anyone who uses remote access regularly.

To start, open TeamViewer and you’ll see two boxes under Unattended Access. First, check the box to Start TeamViewer with Windows. This is important so you don’t have to manually run it every time you boot up. It should configure this automatically, but you can set the app to run at Windows startup manually if needed.

Next, select the Grant easy access box. When you do, you’ll be prompted to sign into a TeamViewer account. If you don’t have one, click Create account. You can instead sign up for TeamViewer on the web if you prefer.

Once you have an account, sign into the TeamViewer app. You can check your sign-in status by clicking the profile icon at the top of the app’s left sidebar. When that’s set, click Grant easy access again, followed by the Assign button to confirm.

TeamViewer Assign Unattended

When everything is set, you’ll see the second box change to Easy access for [Name] is granted.

Using Unattended Access in TeamViewer

Once you’ve followed the above procedure, that computer is added to your list of machines in TeamViewer. As long as you’re logged in with your TeamViewer account, you can connect to the machine without having to input a password from it.

To do so, on another device, open TeamViewer and make sure you’re signed in. Click the Computers & Contacts tab on the left (it looks like an address book) to show your list of machines. You should see the one you just added under the My Computers header.

Select it, then click Remote control (using password) to connect without any further authentication. If you choose Remote control (prompt for confirmation) instead, it will ask the other machine to confirm first.

TeamViewer Unattended Connection

From there, you can use the same tools as mentioned above. Because you’re signed into your own machines with the full version of TeamViewer, you shouldn’t have any problems with UAC when using this method.

Using Unattended Access With a Personal Password

If you prefer not to create a TeamViewer account for whatever reason, you can still use unattended access with a custom password. To do this, open TeamViewer on the computer that you want to access remotely and choose Extras > Options.

On the left sidebar, select Security and you’ll see a section labeled Personal password (for unattended access). Create a password here, enter it twice, and you can use that to connect to this machine from another computer running TeamViewer.

TeamViewer Personal Password

With this method, you’ll need your ID to connect, so it’s a good idea to note that down somewhere safe. Enter the computer’s ID in TeamViewer as described earlier (this doesn’t change), then type your personal password when asked for one. You’ll then connect without any input needed from the remote machine.

Remember that anyone with your computer’s ID and password can use it to connect to your computer remotely, so make sure to keep this information safe.

TeamViewer Tips and Tricks

We close with a few quick TeamViewer tips to help you get more out of the service.

Use TeamViewer’s Mobile Apps

You can use TeamViewer’s free mobile remote control apps to control your desktop from an Android or iOS device. It’s obviously not ideal to control your desktop from a small smartphone screen, but it’s a nice option to have in a pinch. With unattended access set up as above, you can connect anytime you need.

If you want to connect to a mobile device, you’ll need the TeamViewer QuickSupport app on your device instead.

Download: TeamViewer Remote Control for Android | iOS (Free)
Download: TeamViewer QuickSupport for Android | iOS (Free)

Configure TeamViewer Options

Under Extras > Options on the main menu, you can tweak a variety of preferences about how TeamViewer runs. There are too many to review individually here, but a few highlights include:

  • Use the Choose a theme box on the General tab to enable dark mode.
  • On the Security tab, you can change the password strength for random passwords. Of course, a longer password is more secure.
  • Have a look at Computers & Contacts to change notification options for your account.
  • In Custom invitation, you can change the default message that TeamViewer provides when you’re inviting someone. This is easy to paste into an email to help the other person get set up.

TeamViewer Invite Setting

Transfer Files and Start Meetings

On the main page, of TeamViewer, you’ll notice a File transfer option under the usual Remote control button. While you have other ways to transfer files, this is an easy way to send data to a remote computer if you already use TeamViewer.

TeamViewer has a lot of other features that are intended for business use. While most of these are unavailable in the free plan, anyone can use it to meet. Jump over the to Meeting tab on the left sidebar to create a new presentation, video call, or phone call. You can also join someone else’s meeting using an ID here.

TeamViewer Meeting

See the best free group conference call tools if TeamViewer doesn’t work for you.

How to Update TeamViewer

Finally, if you’re wondering how to update TeamViewer, simply select Help > Check for new version on the main menu. By default, TeamViewer checks for updates on its own, so you shouldn’t have to do this often.

Now You Know How to Use TeamViewer

That’s all you need to know about how TeamViewer works. It’s a powerful yet easy tool for remote access that anyone can use. You can install TeamViewer on Windows, Mac, Linux, and even mobile devices. Give it a try if you need remote access regularly.

If TeamViewer doesn’t work for your needs, have a look at other great remote access tools.

Image Credit: hypermania/Depositphotos

Read the full article: How to Set Up TeamViewer and Access Your PC From Anywhere


from MakeUseOf https://ift.tt/3dA9aya
via IFTTT

Complete Guide to Twitch Subscriptions: Everything You Need to Know

twitch-subscriptions

Twitch is the leading live-streaming site for games. Millions of people tune in to see others play games like League of Legends and Fortnite. Although people also stream other things, games are the dominant broadcast choice.

While you can use Twitch for free, if you want to support a favorite broadcaster then you can buy a subscription to their channel. Twitch subscriptions are a way of providing income for a streamer and receiving benefits as a viewer.

In this article, we’ll explain everything you need to know about Twitch subscriptions.

What Are Twitch Turbo and Twitch Prime?

Twitch Turbo and Twitch Prime logos

Before we cover Twitch subscriptions, let’s detail what they aren’t.

Twitch Turbo and Twitch Prime are two separate membership schemes that Twitch offers. Neither are the same thing as a Twitch subscription, though it’s easy to confuse them due to overlapping benefits.

You can be a member of Twitch Turbo, Twitch Prime, and be a Twitch subscriber. All three are individual.

Twitch Turbo

Twitch Turbo is a membership scheme that costs $8.99/month.

It grants you the following benefits across every channel:

  • No advertisements
  • A badge displayed next to your name
  • Use additional sets of emojis
  • Change your username color
  • Save your past broadcasts for 60 days instead of 14

You can find out more from the Twitch Turbo page.

Twitch Prime

Twitch Prime is a membership scheme only available if you have an Amazon Prime subscription. If you do, it’s free.

With Twitch Prime, you get the following benefits:

  • A badge displayed next to your name
  • Use additional sets of emojis
  • Change your username color
  • Save your past broadcasts for 60 days instead of 14
  • Some free games and in-game loot
  • One free Twitch subscription per month

You can find out more from the Twitch Prime page.

What Are Twitch Subscriptions?

You can follow a channel on Twitch to receive updates, much like you do on other social networks. This is free to all.

Subscribing is different. This is a paid membership to a specific channel in return for benefits like emojis and exclusive streams.

Twitch subscriptions are a way of financially supporting your favorite streamers and receiving some benefits in return.

Twitch subscriptions can help streamers build a bigger and loyal audience.

How Much Does a Twitch Subscription Cost?

Twitch subscription tiers

At minimum, a subscription costs $4.99/month. There are additional tiers that cost $9.99/month and $24.99/month, though what this will give depends on the channel; it won’t necessarily give you anything different.

A subscription is on a per-channel basis. Your single subscription cost goes towards one channel of your choice. If you want to subscribe to a second channel, that’s a separate cost (so two channel subscriptions at the lowest tier will cost you $9.98/month.)

When you subscribe to a channel, the streamer will receive a percentage of the payment. The rest will go to Twitch. The exact split varies depending on what deal the streamer has with Twitch.

If you have a Twitch Prime membership, you can subscribe to one channel each month for free.

What Are the Benefits of a Twitch Subscription?

The exact benefits you will receive from your Twitch subscription depend on the channel that you are subscribing to and the tier that you choose.

Some common benefits are:

  • Emojis designed specifically for the channel you subscribe to, which you can use in any other Twitch stream
  • Badge displayed next to your name, which can change depending on how long you have been a subscriber
  • During a live stream, you can press a button to alert others to how long you’ve been a subscriber
  • Exclusive subscriber-only streams or competitions
  • No adverts during a stream

You only get these benefits as long as you are a subscriber.

How Do I Become a Twitch Subscriber?

It’s simple to subscribe to a Twitch channel. However, please note that you can only subscribe to Twitch Partners and Affiliates, not every single channel.

Twitch subscribe button

To subscribe to a Twitch channel, go to their stream and click the Subscribe button in the top-right above the video. If you don’t see the button, it means the channel isn’t eligible to receive subscribers.

This will open a window where you can see the subscription benefits and select your price tier. Your subscription will renew automatically each month on the same day.

Some subscriptions offer three- or six-month payments. There is no discount for doing this, so monthly is better.

You can also choose to Gift a membership. You can send this to a specific user or to the community. If you choose the latter, the subscription will be randomly distributed to those watching the stream.

If you have Twitch Prime, look for the Free Subscription with Twitch Prime section. Click Subscribe here and you will receive subscription benefits for a month for free. You will need to manually subscribe to the channel each month, though—there’s no auto-renew with a Twitch Prime subscription.

How Do I Manage My Twitch Subscriptions?

You can manage your subscriptions by going to the Twitch Subscriptions page. To access this page normally, click your display picture in the top-right and then click Subscriptions.

Twitch Subscriptions

Here you can see Your Subscriptions (who you are subscribed to currently) and other sections like Gifted Subscriptions and Expired Subscriptions.

This page shows you how long you have been subscribed to a channel and when your benefits are set to expire.

To adjust your subscription, click the Cog icon next to the relevant channel name and click Change Subscription Tier or Change Payment Method.

How Do I Cancel a Twitch Subscription?

Remember, your Twitch subscription will renew automatically each month, so don’t forget to cancel if you don’t want to pay anymore.

Once you cancel, you will receive subscription benefits until the end of the billing period. After that, you will need to manually resubscribe to get them back.

To cancel, go to the Twitch Subscriptions page (again, access it via display picture and Subscriptions.) Click the Cog icon next to the subscription you wish to cancel and click Don’t Renew Subscription.

Some Twitch subscriptions give you benefits for keeping up a constant subscription “streak.” If you change your mind after cancelling, resubscribe within seven days to maintain that streak.

How Does Twitch Compare to the Competition?

That’s everything you need to know about Twitch subscriptions and how you can support your favorite channels.

However, there are other live-streaming services out there. To find out which is best for you, take a look at our article pitting Twitch versus Mixer versus YouTube Live.

Read the full article: Complete Guide to Twitch Subscriptions: Everything You Need to Know


from MakeUseOf https://ift.tt/3dGkEjQ
via IFTTT

Duolingo ABC Can Teach Kids How to Read

Duolingo has launched a new app designed to help kids learn how to read. Called Duolingo ABC, the app aims to teach young kids aged between three and six how to read. Duolingo ABC is completely free and doesn’t feature ads or in-app purchases.

In 2019, Duolingo, best known for its brilliant language-learning app, started working on a standalone app to teach kids how to read. It has now launched the app, called Duolingo ABC, early to help parents homeschooling due to the coronavirus pandemic.

Duolingo ABC Helps Kids Learn to Read

Duolingo ABC is designed to teach children aged 3-6 how to read. It features 300 short lessons which teach children the fundamentals of reading and writing. In a similar way to how the core Duolingo app works, Duolingo ABC uses a variety of techniques.

Lessons include tracing a letter with a finger, associating an image with a phrase, and tapping objects that begin with certain letters. Also mirroring the main Duolingo app are the gamification elements which reward kids to help keep them motivated.

At launch, Duolingo ABC is available in the US, the UK, Canada, Australia, New Zealand, and the Republic of Ireland. English is the only language currently supported, and the app is only available on iOS, but an Android version is reportedly in the works.

Download: Duolingo ABC on iOS

Instill a Love of Reading in Your Kids

Duolingo is set to continue developing Duolingo ABC, adding more languages and making it available in more countries over time. The ultimate goal is to help kids and adults alike learn how to read using similar techniques to the core Duolingo app.

Duolingo is one of the language learning apps that really work. And given that track record, we suspect Duolingo ABC will be a major help if you’re a parent teaching your kid(s) how to read. The kids can then move onto Google’s free reading app, Rivet.

Read the full article: Duolingo ABC Can Teach Kids How to Read


from MakeUseOf https://ift.tt/2QScPhd
via IFTTT

How Does a Mechanical Keyboard Work?

best-mechanical-keyboards

Most people don’t think much about the keyboard of their computer. But as something you use every day it can really make a difference to how your computer feels when you interact with it.

Many serious tech geeks love mechanical keyboards. This type of keyboard is more expensive than a regular keyboard, but gamers and writers often swear by them. So you might be wondering, what is a mechanical keyboard, and how does it work?

How a Traditional Keyboard Works

Image Credit: Ikostudio/DepositPhotos

Mechanical keyboards are different from traditional keyboards. Traditional keyboards are called rubber dome keyboards, and they consist of layers of plastic membrane. When you press a key, a rubber switch pushes through a hole in the membrane and completes a circuit. This sends an input signal to your computer.

The advantage of this type of keyboard is that they are cheap to manufacture and are somewhat resistant to having liquids spilled on them. They are also easier to make shallow, like the kind of keyboards you find on a laptop.

However, people who type a lot or who game often find rubber dome keyboards feel “mushy.” They lack a distinct clicking sensation when you push a key. Instead, it can feel like you are pushing down through soft material. This means it takes more effort to type and the results are less accurate.

How a Mechanical Keyboard Works

How mechanical keyboards work - mechanical keyboards

This mushiness is why serious users often prefer mechanical keyboards. These keyboards don’t use the rubber dome system. Instead, they have switches under the keys which have springs in them. When you press a key, the spring is pushed down to connect the circuit and register a keystroke.

This is why such keyboards are called “mechanical,” because they have a physical mechanism (the spring) which connects the circuit. A mechanical keyboard might look the same as a rubber dome keyboard, as they can have the same key caps. But the feel of pressing down on a spring is different from pressing down on a rubber dome.

Many people find mechanical keyboards more pleasing to interact with, as well as finding it makes their typing more accurate.

How Mechanical Keyboard Switches Work

How mechanical keyboards work - switches

Mechanical keyboards don’t only come in one style, however. The switches that they use can differ. Different switches have a different feeling when you type on them. Some are light and easy to press; these are good for gamers who need to hit buttons very quickly and want an extremely responsive keyboard.

However, keys which are light and easily pressed lead to more mistakes when typing, as you can accidentally press a key without meaning to. Therefore, people who type a lot often prefer a heavier switch which requires a more deliberate push to register a keystroke.

How difficult a switch is to press is measured in a quality called an actuation force. This measurement, presented in grams, reflects how hard you need to push to activate a keystroke. The higher the actuation force in grams, the harder you need to push.

Another quality which differs between switches is whether they have a tactile bump. Switches which have this tactile bump give a clicky feedback when you press them. Some people like this as it helps them to be more accurate with their typing. Other people find it distracting. It’s up to you which version you prefer.

Finally, one more consideration is how noisy the switches are. Switches generally make an audible click when they are pressed, which is louder than a rubber dome keyboard. But some mechanical switches are louder than others, so you should consider whether the noise will bother you or the people around you.

Types of Switches for Mechanical Keyboards

The best-known manufacturer of mechanical switches is Cherry. This company is well-known for their high quality switches. On most high-end mechanical keyboards, you’ll find they are advertised as coming with “Cherry MX” switches.

Within the category of Cherry MX switches, there are a number of different styles available. These switches have different characteristics and are known by color names. Some of the Cherry MX switches you’ll come across are:

  • Cherry MX Red, a light-feeling switched with a 45g actuation force. These responsive switches are ideal for gamers but writers may find they lack the satisfying click of heavier switches.
  • Cherry MX Blue, a heavier switch with 60g actuation force and a tactile “bump.” The clickiness of these switches make them popular with frequent typists, though gamers will find them rather tiring to play on. These are also the noisiest switches, which may be something to consider if you work or game around family or housemates.
  • Cherry MX Black, which is similar to the MX Blue but lacks the bump so has less tactile feedback.
  • Cherry MX Brown, a middle ground switch with 45g actuation force which makes it suitable for both typing and gaming.

Other Mechanical Keyboard Switch Brands

It used to be the case that if you wanted a high-quality mechanical keyboard, you had to go with Cherry switches. But that’s not the case any more. Several other companies make their own switches, which can be of comparable quality and can be used in more affordable mechanical keyboards.

Other popular brands making switches including Buckling, Topre, Matias, Kailh, Razer’s Mechas, Logitech’s Romer-Gs, and Gateron. Some of these are Cherry clones, meaning they are other brands’ interpretations of the Cherry versions. Others are original switch designs which have slightly different feels and characteristics.

The best way to decide what kind of switches you want for your keyboard is to try out as many as you can. Try out a friend’s keyboard, or go to a computer store and try their sample keyboards. If this isn’t possible for you, then Cherry MX Brown switches are the option which is likely to be most pleasing for most people and use cases.

Is a Mechanical Keyboard Right for You?

Mechanical keyboards are more expensive than regular keyboards. And you need to try out a variety of switches to find the one that suits you. But if you type or game a lot, then the greater accuracy and ease of use can make a mechanical keyboard a worthwhile investment.

Can’t find the exact perfect keyboard for your needs and feeling adventurous? Why not order switches and other components and build your own custom keyboard with mechanical switches?

Read the full article: How Does a Mechanical Keyboard Work?


from MakeUseOf https://ift.tt/33YDoGY
via IFTTT

How to Lock/Unlock an Android Phone With Your Voice Using Google Assistant

Ever wonder if the hands-free capabilities of Google’s voice assistant extend to unlocking your smartphone? Google Assistant can do a whole lot using voice commands—including a smartphone unlock with Voice Match—depending on your version of Android.

We’ll explain this nifty trick, as well as whether your Android device allows it, in this guide on how to unlock and lock your phone with your voice.

How to Get Google Assistant on Android

To use Google’s voice unlock feature, you’ll need to have Google Assistant on your phone.

Newer Android phones (typically with Android 7.0 Nougat and newer) come with Google Assistant already installed. When setting up your new phone, you simply need to enable the feature and grant the Google app the relevant permissions. In case you’re not sure it’s enabled, open your Google app and tap the More button. Choose Settings > Google Assistant to check.

If you have an older version of Android, Google Assistant is delivered through an automatic update. Any phone with Android Lollipop (5.0) or higher can run the app—just download the Google Assistant app from Google Play.

There are a few prerequisites that can hamper or delay the update. If your phone is compatible with Assistant but you haven’t seen a prompt to activate it, you should check a few criteria first.

Firstly, make sure the language you’ve selected for your phone is one of the languages supported by Google Assistant.

If you have the correct language set and you still don’t see Google Assistant, make sure your Google Play Services app is up-to-date. Older, less powerful devices aren’t compatible with Google Assistant; you need at least 1GB (Android 5.0) of memory and a 720p screen resolution.

How to Voice Unlock Your Phone Using Google Assistant

Note: The smartphone voice unlock feature of Google Assistant only works on certain versions of Android: specifically Android 5.0 to Android 7.1.2. Google has removed this feature from Android 8.0 and up.

If you have the right Android version, unlocking your phone with Google Assistant is as easy as saying “OK Google.” To do this, you will first need to set up the following:

  1. Register a trusted voice model with Google Assistant.
  2. Enable voice unlock in Assistant’s settings.

You can do both of these by opening Google Assistant and accessing its settings. To do this, tap the blue Drawer icon in Google Assistant’s interface. Select the three-dot Menu button and choose Settings. Under the Devices heading, tap your phone. Enable both Access with Voice Match and Unlock with Voice Match here.

Once enabled, you’ll be prompted to train a trusted voice model to unlock your phone. This ensures that Google Assistant will only respond to your voice when the phone is locked.

When you enable voice unlocking, the app will prompt you to record a few phrases. If you ever want to retrain the voice model for some reason, you will find the option within the same settings menu under Voice model > Retrain voice model.

You may want to do this if your original recording was at a low volume or in a noisy environment. For security purposes, your phone only stores one trusted voice model at a time. While you can set up multiple voice profiles on Google Home, this doesn’t apply to your smartphone.

Voice Unlock Issues You May Encounter

Unlocking your phone with Google Assistant is not always foolproof, especially if you have other security measures on your lock screen. If your phone requires a fingerprint, pattern, face ID, or PIN, Google Assistant may only be able to wake your phone and turn on the screen, but not get past the security screen. In those cases, you’ll still need to input the security method.

You can get past that hurdle by removing the security screen, but we don’t recommend this. Rather, consider adding a delay timer to prevent your phone from locking immediately after the screen goes to sleep. This means your phone will only lock and require a security method if it is inactive for a certain amount of time.

To change this setting, head to Settings > Security & location. Tap the Gear icon next to the Screen lock entry and choose the delay under Automatically lock.

In the same menu, you can also set up Google Smart Lock. This keeps your phone from locking in trusted locations, when connected to certain Bluetooth devices, and more. You can then wake your device without needing a PIN or other security method in those cases.

With so many brand-specific variations of Android available, voice unlocking is not always consistent across all devices. Some phones that have security locks will automatically unlock for a trusted voice.

The most troublesome issue with some phones is that voice unlocking will not work unless the screen is already on.

How to Voice Lock Your Phone With Google Assistant

lock phone google assistant

Locking your phone with Google Assistant is a much more straightforward affair. However, it requires a bit of setup because the app doesn’t have native functionality to lock your phone.

So how do you get around this? Use a custom command.

In Google Assistant, you can set up custom commands and command chains, called Routines. Setting up custom voice commands with Routines expands the Assistant’s capabilities. Locking your phone is just one of the ways you can use this functionality.

There are a variety of apps that have the sole purpose of locking your phone. You simply need to pair one of these apps with a custom Google command. First, you need to download one.

Two options, both free, include:

Install the apps and grant them the necessary permissions. Whenever you open the app, it will switch off your screen and lock your phone.

Adding a Screen Off Command

To turn this into a hands-free option, you need to get Google Assistant to open the app for you. You can do this by opening Assistant’s Settings menu like earlier, selecting Routines, and adding a new custom command with the Plus button.

Under the header When I say, enter commands such as:

  • Lock my phone
  • Lock screen
  • Go to sleep

Any statement will do, and you can add as many variations as you like. These are personal commands, not ones native to Google Assistant.

Under the header My Assistant should, type in Open [App name]. Include the name of whichever screen lock app you have installed. Make sure to include the whole name of the app as it appears on your phone, else it will just run a Google search. Save the command and you’re good to go.

Now, whenever you say any lock phrase, Assistant will automatically lock your screen.

Using Google Assistant on Your Lock Screen

So what options do you on newer versions of Android to use Google Assistant with your voice while your phone is locked? Voice Match on these devices won’t let you unlock your phone, but you can still use Google Assistant voice commands while your phone is locked.

Like the above method, you must first to train a trusted voice model to do this. Open the Google app and select the More tab. Go to Settings > Voice > Voice Match. Here you can train a voice model so that voice commands work even when your screen is off.

To allow Google Assistant to access more private apps (such as your email and text messages) while your screen is off, you need to go to go back to the Google app. Visit Settings > Google Assistant and switch to the Assistant tab. Scroll down to Assistant devices and select your device.

Enable Personal Results and Lock screen personal results to get Google Assistant to send messages, access your email, and open similar apps when your phone is locked.

Other Voice Commands for Google Assistant

If you didn’t know about unlocking and locking your phone with Google Assistant, you might have missed out on some of the app’s other features. Custom commands and routines open up a whole new world of functionality, if you use the right apps.

Curious about what else Google Assistant can do? Have a look at our guide on how to use Google Assistant to add more convenience to your life. If you use Google Assistant to get past accessibility issues, take a look at these useful Android accessibility apps.

Read the full article: How to Lock/Unlock an Android Phone With Your Voice Using Google Assistant


from MakeUseOf https://ift.tt/2xgILEo
via IFTTT