Thursday 30 April 2020

Risking Your Privacy Is More Fun Than the Librem 5

librem 5 rear of phone
Our verdict of the Purism Librem 5 :
With a solid operating system and privacy-focused hardware kill switches, the Librem 5 is bulkier than expected and eats through battery. While the philosophy behind the phone is sound, Librem 5 is unlikely to be picked up by anyone other than Linux users and privacy advocates.
510

Smartphones deliver untold conveniences into our lives, barely thought of 20 years ago. Mobile internet, email, social networking, gaming, productivity, shopping, even media production. The list goes on—but it comes with a price.

Your phone is tracking you. GPS can detect your position; the mic and camera can eavesdrop; online services record your activity. We’ve traded privacy for convenience at a slow-burning rate that continues to smolder.

Social purpose technology company Purism believes it can change this. It’s developed Librem 5, a Linux-based smartphone with built-in kill switches for internet, Wi-Fi and Bluetooth, as well as the camera and microphone.

It sounds promising, but does the Librem 5 deliver on the promise of a “security and privacy-focused phone” that can replace your Android or iPhone?

What’s Inside the Librem 5?

Two versions of the Librem 5 have been announced: Librem 5, and Librem 5 USA. Purism kindly sent us the original Librem 5 for review.

Inside the phone is a Quad-core Cortex A53, 64bit ARM CPU running at a maximum 1.5GHz. 3GB of RAM is also squeezed in, with a Vivante GC7000Lite GPU. The Librem 5 has 32GB eMMC storage with a microSD card slot for up to 2TB more.

Also behind the 5.7-inch 720×1440 IPS TFT display is a choice of baseband radio (Gemalto PLS8 or Broadmobi BM818), nanoSIM tray, 802.11 a/b/g/n Wi-Fi, and Bluetooth 4. The phone features a TESEO LIV3 multi-constellation GNSS GPS receiver. Note that NFC is not included. However, there is a nine-axis accelerometer, (gyro, accel, magnetometer) and ambient light and proximity sensor.

Librem 5 smartphone from Purism

Two ports are included: a USB-C input for power, data, and DisplayPort, and the “Courage Jack”. This is a 3.5mm headphone jack—Purism states that unlike established competitors, it has “no intention of doing vendor lock-in.”

The Librem 5 features a removable back panel. Here you can access the user replaceable 3,500mAh battery.

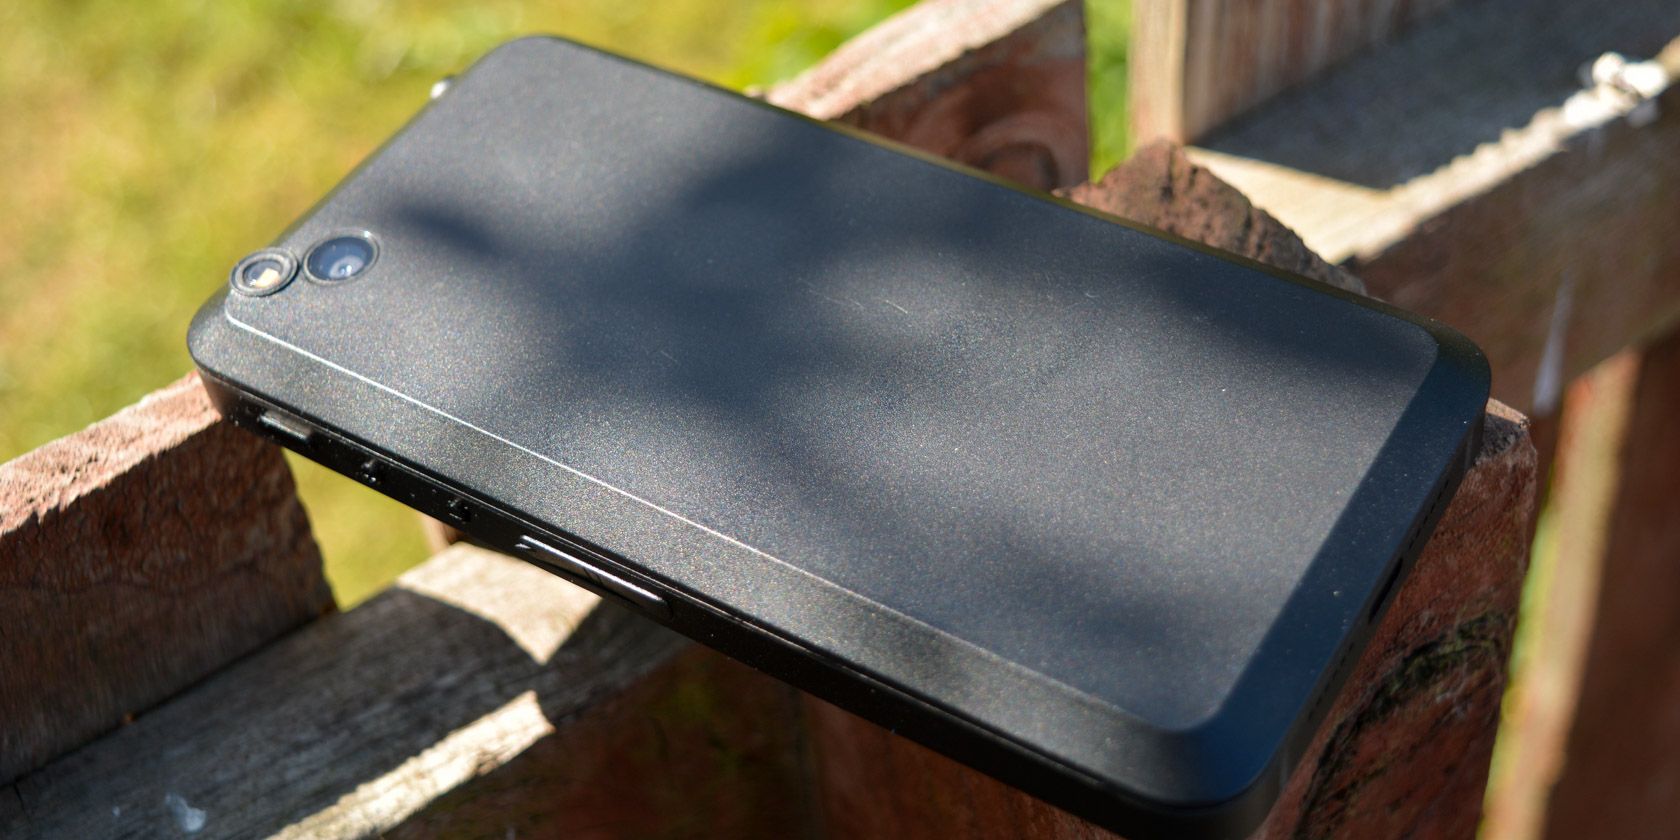
As you look at the phone in your hand, the right-hand side features a power button and volume buttons. The left side features the kill switches. These are for Wi-Fi, cellular, and the cameras and mic. Activating all three kill also disable GPS.

An RGB LED is provided for notifications and the phone features two cameras: a front facing 8MP camera and a 13MP main cam with LED flash.

The review device we received included the Librem 5 phone, a USB-C to USB-C cable, mains adaptor, and earbuds.

Do You Need a Secure Phone?

Your phone is leaking data about you all the time. Either that data is recorded by Google, Apple, Facebook, Amazon, or any number of online entities, or your mobile provider is logging activity. A VPN is a smart way to encrypt internet activity, but that doesn’t stop GPS, cellular and Wi-Fi positioning. Cameras and mics aren’t easily encrypted either.

The Librem 5 is described as “a security and privacy focused phone” and comes with software trackers disabled by default.

Kill switches disable wireless, mobile internet, and GPS

Throw in the kill switches, the Linux operating system, free and open source software, and drivers, and Librem 5 is secure in a way other phones cannot hope to be.

While it’s straightforward enough to disable GPS, cellular and wireless on an Android or iPhone, kill switches simplify it and give peace of mind. These physical switches can enhance security and privacy wherever you are.

Meanwhile, the Librem 5 is almost unique in not relying on any chips compromised by the Meltdown or Spectre vulnerabilities. This alone makes it more secure than many devices.

Operating System and Software

It doesn’t run Android or iOS—so what is running on the Librem 5?

PureOS is a Linux distribution maintained by Purism for its own devices. Based on Debian, this is an operating system with a focus on privacy. For example, the default web browser is Mozilla Firefox with DuckDuckGo providing search.

First impressions are odd. After logging in what you see is a blank home screen. The only indication of what comes next is a single chevron, a keyboard icon, and notification icons at the top. Quick note about the keyboard—having it accessible on every screen is an excellent idea. Sadly, implementation of text entry is terrible, from finger accuracy to access to secondary characters. A software keyboard that works shouldn’t be a big ask.

Librem 5 from Purism

While the app drawer is easy to access via an upward swipe, the Librem 5 is short on apps. Linux apps are available for almost every purpose, but few are suitable for the phone user interface. Happily, HTML5 web apps run the browser. Meanwhile a small number of dedicated apps and games are also available.

In addition, standard Linux apps with ARM compatibility can also run. These are subject to hardware and privacy limitations, however. For example, capturing a screenshot from the Librem 5 proved impossible.

However, a word of warning. The Librem 5’s Linux phone predecessors running on Ubuntu Touch struggled with the reliance on web apps. While in theory web apps are preferable to apps that install on your device demanding resources, they’re slightly less usable. The comparative speed of Firefox limits things further—it’s unclear whether the seemingly slow browser is limited pending optimization tweaks.

Our review of the Librem 5 has taken several weeks, partly due to battery limitations. The review device seemed prone to running dry with just a few hours use. Regardless, I was able to spend more time than usual evaluating the phone and how it feels to use.

Overall, the user experience of the Librem 5 is pleasant—it’s just that using it as a phone is currently limited.

Updates Philosophy for the Librem 5

Purism has clearly spent a lot of time considering the state of the smartphone industry. From the challenge of providing an alternative mobile operating system to working to enhance security and privacy for users, there is much to reflect upon.

Librem 5 camera lens

An issue with iOS and Android (and other platforms) that is often overlooked is that of updates. Consequently, Purism states it will provide security updates, privacy improvements, bug fixes, and new features for the device’s lifetime.

This is a welcome change from the Apple and Google approach of issuing updates that only cover recent releases.

Booting Librem 5

Switching on the phone is as simple as you would expect. Hold the power button for a second, and it boots up—remarkably fast. I timed it at five seconds, which is about as fast as you can expect for any phone.

At times, however, I found that the Librem 5 would not boot. Despite my initial concerns, this wasn’t a power issue; I tried reseating the battery, recharging again, the usual tricks. Fortunately, I was directed to a support page revealing the solution. Within seconds the phone was up and running.

While frustrating, this support issue was nevertheless effectively solved. Having support pages in place for the phone at this stage is good news for all users of the Librem 5.

Back panel on the Librem 5 phone

But this bulky phone gets hot when charging. No doubt an issue for future correction, you basically need to power if off before plugging in to charge.

Using Librem 5 for Calls

With so few options on the software side, the Librem 5 handles calls and contacts reasonably well.

However, call volume is impossible to change while the call is taking place. Meanwhile, speaker mode is… disappointing to say the least. It appears to push the same audio through the main speaker at exactly the same volume as the call.

So while calls are easy enough to make, and the audio quality is good, basic accessibility suffers.

As a phone you can pick up and take with you, the Librem 5 is unsurprisingly chunky. It weighs 230 grams, a good 100 grams more than average, although this is due to the components and build materials. It feels comfortable in the hand, however, which is always a good thing.

A Glimpse of the Future

The Librem 5 promises much, a whole new attitude towards digital privacy. But there is a long way to go. There’s no working camera app at this stage; the browser is slow; battery life is terrible; desktop convergence mode is absent. Call volume is strangely quiet and speaker mode follows suit.

At this stage, the Librem 5 is far from a write-off, however. In terms of using it as a basic phone, the hardware is sound. The privacy aspects are sound. But it feels that PureOS offers less of a mobile experience than Ubuntu Touch did (and UBPorts continues to do).

While the Librem 5 is available to buy today, it is important to appreciate that it remains a work in progress.

An Ultra-Secure Linux Phone With Potential

Open source phones have long been touted as a secure and workable alternative to Android and iPhone. Firefox OS, Meego, and others have been and gone, while previous Linux attempts such as UBPorts have stalled.

The Librem 5 represents an opportunity to change the way we use mobiles. Having the option to physically disable key tracking and surveillance hardware on your phone is obviously a massive advantage.

USB-C port on the Librem 5

For this, however, you sacrifice the convenience that comes with an Android or iOS phone.

Like many others, I really want this phone to shape the future of smartphones and mobile technology. On this showing, it’s at least five years out of step. Purism’s good intentions are clear, but the Librem 5 is a far cry from the quality of its laptops. More worryingly for Purism, there’s a strong chance its efforts could be overshadowed by the PinePhone, another Linux project that is far more affordable.

Do we want a future where we have granular control over privacy? Of course we do. And that’s why Librem 5 must be admired. As a concept, it sounds great on paper, but in practice, it leaves much to be desired.

Ultimately, Librem 5 is a privacy-focused phone that limits you to HTML5 apps and a few bundled Linux tools. There is a lot to like here, but not enough for the Librem 5 to go mainstream.

Read the full article: Risking Your Privacy Is More Fun Than the Librem 5


from MakeUseOf https://ift.tt/2Yi3t2M
via IFTTT

How to Group FaceTime on Your Mac, iPhone, or iPad

no-facetime-for-android

FaceTime offers one of the most secure ways to video call your friends, family, and coworkers. If everyone has an iPhone, iPad, iPod touch, or Mac, you can have group FaceTime chats with up to 32 people for free.

Below we explain everything you need to know about how to use group FaceTime calls. That includes starting a new call, managing your mic or camera settings, and troubleshooting common problems.

How to Start a Group FaceTime Call

FaceTime app on iPad App Store

FaceTime is one of several stock iOS apps that comes installed on your device by default. Its icon looks like a green video camera. If you deleted FaceTime from your iPhone, iPad, or iPod touch, you can download it again for free from the App Store.

Download: FaceTime for iOS (Free)

To start a new call with FaceTime, open the app, tap the Add (+) button, and type the contact you want to call. On a Mac, use the search bar that appears to find your contacts. Add as many contacts to the call as you want; FaceTime supports up to a maximum of 32 people, including yourself.

FaceTime adding contacts

Then tap or click the Audio or Video buttons to start the group FaceTime call. The Audio button starts a call without turning your camera on, but you can turn it on at a later time if you want to. If you definitely don’t want to use video, find out how to run an iPhone conference call using the Phone app instead.

When adding people in the FaceTime app, you can search for their name, phone number, or email address. If someone isn’t saved to your contacts, type out their full phone number or email address instead.

FaceTime only lets you add contacts who show up in blue. This happens when their Apple ID is linked to the contact details you entered and their Apple device is currently online.

Unfortunately, FaceTime isn’t available for Android devices.

Start a Group FaceTime Call From Messages

You can also start a group FaceTime call from the Messages app. This is a much more convenient method if you already have a group chat with everyone you want to call. That’s because it’s quicker to get started and lets people join at a later stage without you needing to add them.

To do so, open the group chat in Messages, then reveal the Details for that chat by tapping the profile pictures at the top of the screen. Tap or click the FaceTime icon to call everyone in the group chat over FaceTime.

FaceTime button from Messages app

If some people decline the call at first, they can join again later by returning to the group chat in Messages. This shows an icon letting you know how many people are currently in the call, with a green button to Join the call as well.

FaceTime active call in Messages app

How to Use Group FaceTime on iPhone, iPad, or Mac

After starting a group FaceTime call, you’ll find yourself greeted with a selection of square video feeds from each of your contacts. If someone turns their camera off, their initials appear in a box instead of their video feed.

FaceTime group call on Mac

FaceTime automatically arranges the video feeds on your screen to let you see everyone at once. When that isn’t possible without making each feed too small, FaceTime dynamically changes the size of each feed depending on who’s talking. The aim is to enlarge the feed when people start talking so you can see them better, but it doesn’t work perfectly.

You can always take control of this manually by tapping or clicking on someone to make their video larger. Doing so also reveals a fullscreen button, which enlarges the feed and moves it to the center of your screen.

Control the Camera, Microphone, and Speaker in FaceTime

On a Mac, hover your mouse over the FaceTime window to show basic FaceTime controls, then click the Sidebar icon to reveal more controls. On an iPhone, iPad, or iPod touch, tapping in a blank space reveals controls at the bottom of your screen; swipe up to expand these controls for more options.

iPhone FaceTime controls

Tap the Mute button (shown by a microphone with a line through it) to mute yourself. This turns off your microphone so other people can’t hear what you’re saying.

Similarly, tap the Camera Off button (shown by a camera with a line through it) to turn off your camera. Unless you also muted yourself, people should still be able to hear you.

On an iPhone, iPad, or iPod touch you also get a Flip and a Speaker option. The Flip button switches from the front-facing to the rear-facing camera on your device. And the Speaker button lets you send the audio to other speakers on your network, like Apple’s HomePod.

Add More People to Your Group FaceTime Call

You can keep adding new people to an existing FaceTime call until you reach 32 participants. To do so on an iOS device, tap in a blank space and swipe up on the control panel that appears. On a Mac, open the sidebar in the FaceTime app.

FaceTime controls sidebar on Mac

This panel shows everyone in the call, including people you called who didn’t pick up. Use the Ring button next to these contacts to try calling them again.

Alternatively, use the Add Person option to search for new contacts to add to the call. Search for their name, phone number, or email address, just like when you started the FaceTime call. Then tap the Add Person to FaceTime button to bring them in.

Add person to FaceTime button from iPad

Add Effects to Your FaceTime Call

If you’re using an iPhone 7 or later, you can add camera effects to your FaceTime calls. These include Animoji, filters, text, shapes, and various stickers. All you need to do is tap in a blank space, then hit the Effects button.

Select the type of effect you want to add from the toolbar at the bottom of the screen. Certain effects, like text or stickers, let you choose where to place them on your video feed using drag-and-drop.

You can add as many effects as you want, even combining your Animoji with a filter and some stickers if you wish. To go back to normal, tap the Effects button again to remove all the effects at once.

What to Do If Group FaceTime Isn’t Working

FaceTime is one of the best ways to start a group video call, but it still isn’t perfect. It’s not uncommon for FaceTime to refuse to call particular contacts or struggle with weak connection issues.

Here’s how to fix some of the most common problems with group FaceTime calls.

Check Your Internet Connection

FaceTime works best over Wi-Fi. Open the Settings app and tap on Wi-Fi to make sure you’re connected to a Wi-Fi network, then try loading a video on YouTube to check that connection is working properly. If you can’t get online, restart your router, run through our network troubleshooting steps, then contact your internet service provider if you need more help.

Wi-Fi network settings on iPhone

To use FaceTime over mobile data on your iPhone or iPad, you need to allow this in the settings. Go to Settings > Cellular, then scroll down to see a list of apps. Turn on the FaceTime toggle to let it use your cellular data.

Turn FaceTime Off and On Again

On an iPhone, iPad, or iPod touch go to Settings > FaceTime, then use the FaceTime toggle to turn the service off. On a Mac, open the FaceTime app and go to FaceTime > Preferences from the menu bar, then uncheck the Enable this account box.

Wait 30 seconds before turning FaceTime on again from the same settings page, then try to call again.

FaceTime settings on iPhone

Update Your Operating System

Outdated software causes all kinds of FaceTime problems. You might find that you can’t call particular contacts, use camera effects, or open FaceTime at all. You can usually fix these issues by applying the latest free software update.

On an iPhone, iPad, or iPod touch go to Settings > General > Software Update. Then download and install any available software updates for your device. On a Mac, open the Apple menu and go to System Preferences > Software Update to check for new updates.

Checking for iOS Software Updates in iPhone Settings

Use a Third-Party App to Call Non-Apple Devices

FaceTime’s biggest problem is that it’s not available on anything aside from Apple devices. You can’t download FaceTime for Android or Windows, which means there are likely lots of people in your life who you can’t add to a FaceTime group call.

Luckily, there are plenty of third-party apps you can use instead. Here’s a list of the best apps for group conference calls. All of them are free, and there are plenty that work across multiple platforms.

Read the full article: How to Group FaceTime on Your Mac, iPhone, or iPad


from MakeUseOf https://ift.tt/2WdqPDZ
via IFTTT

How to Share Your Screen on Mobile Using Skype

Since June 2019, Skype has let you share your screen on mobile. This was a popular feature on desktop, which led Microsoft to add screen sharing to the Skype mobile app for Android and iOS as well. And in this article we’ll show you how to do it.

Microsoft has allowed you to share your screen on Skype on desktop for a long time. This enables Skype users on Windows, Mac, and Linux to share their screen with others while in a video call. However, screen sharing was only added to Skype for mobile in 2019.

How to Share Your Skype Screen on Android and iOS

It’s very simple to share your screen on mobile using Skype. When you’re in a Skype call, whether on Android or iOS, just tap the ... more button followed by the screen sharing button that looks like two screens, one directly behind the other.

On Android, that’s it. However, on iOS, you’ll see a confirmation window where you need to select Skype then Start Broadcasting. To stop sharing your screen on either mobile operating system, simply select the screen sharing button again.

As to why you would want to share your smartphone’s screen, there are various reasons, both personal and professional. Perhaps you want to shop online with friends, or collaborate with work colleagues on the go. Either way, screen sharing can help.

Screen sharing is supported on Android 6.0 and above and on iOS 12 and above. However, some older iOS devices won’t support this feature. Either way, you’ll need to make sure you have the latest version of Skype installed on your device.

Download: Skype on Android | iOS

The Best Free Skype Alternatives

Adding screen sharing to Skype is just the latest in a long line of improvements Microsoft has made in recent years. And we’re sure there’s more to come. However, Skype isn’t for everyone, so if you’re looking to switch here are the best free Skype alternatives.

Read the full article: How to Share Your Screen on Mobile Using Skype


from MakeUseOf https://ift.tt/2zBSaYP
via IFTTT

The 5 Best Headsets for Your Home Office

headsets-home-office

With so many of us now working from home, it makes sense to expand our out-of-office tech. Headsets make taking that important call a lot easier. Many of them come with noise-canceling features and enhanced audio capabilities. This means you can do your work distraction-free.

There are lots of headset options available to you. Here are our top five home office headsets to help keep your work running smoothly.

1. Jabra Evolve2 65

jabra evolve2 65 on charging stand

Jabra certainly knows its onions when it comes to office peripherals. One area in which they continue to excel is in the office headset market. The Jabra Evolve2 65 with desk stand illustrates this claim perfectly, offering superior audio for both calls and music alongside comfort and convenience. The headset is double-sided, so it has speakers for both ears. This is excellent for drowning out distractions.

Jabra has built upon its experience with the Evolve range and added some improvements with the Evolve2 65. These include the addition of three professional microphones. Also on board is Jabra’s advanced chipset, alongside its signal processing tech. This ensures clear calls time-after-time. A quick nudge of the mic to the vertical position even mutes your call in case of interruption.

The Evolve2 65 is wireless, giving you more freedom around your office space. It also comes with a handy desk stand, so you can charge the headset between use. Not that you’ll really need to during your working day; it packs a 37-hour battery life, so you’re not going to drop out of an important call suddenly.

2. BlueParrott B550-XT

BlueParrott B550-XT BlueParrott B550-XT Buy Now On Amazon $199.00

BlueParrott has been in the headset game for a long time, so it’s no surprise to find the BlueParrott B550-XT in our round-up. Long the go-to choice headset for users on the move, BlueParrott serves as a great choice if you want to expand your home office. The B550-XT is a great pick if you’re working from home and you have children.

The company claims that its headset cancels out 96 percent of background noise. So, now you can take that important client call without having to also listen to Paw Patrol on full blast. The wireless nature of the headset is enough to make it convenient, but it also features voice activation. This means you can answer calls just by saying, “Hello.”

BlueParrott’s B550-XT headset is made for comfort, so you can take full advantage of the 24-hour battery life. This means you won’t end up with painfully compressed ears if your call lasts a little longer than expected.

3. Plantronics Voyager 5200

Plantronics Voyager 5200 Plantronics Voyager 5200 Buy Now On Amazon $59.96

The Plantronics Voyager 5200 is the only in-ear headset in our round-up. However, don’t let that fool you as this little headset packs quite the punch. Just because it is small and compact doesn’t make it feature-free. Firstly, the Voyager 5200 boasts Alexa as an integrated voice assistant.

So, you can not only make and take calls with the headset, but you can control smart devices, too. The ability to take an important call while you, say, control your robot vacuum downstairs, is a godsend. Especially as you’re spending much of your time at home working.

The Voyager 5200 even comes with wind-detection tech. This means it will cancel out the noise of any windy gusts when outdoors. At least you can now conduct business from the comfort of your garden!

4. Sennheiser SDW 5016

Sennheiser SDW 5016 Sennheiser SDW 5016 Buy Now On Amazon $255.99

Sennheiser’s audio chops are pretty excellent. They’ve been going since the 1940s, so you can feel confident that the Sennheiser SDW 5016 headset is going to do the job. The Sennheiser SDW 5016 headset is one-sided. If you need to stay aware of your surroundings, these are ideal. Because they’re single-sided, they keep one ear free in case the doorbell rings while you’re in the middle of your call.

Offering premium audio quality, the headset is wireless, keeping your hands free for multi-tasking. It also comes with a desk stand, so you can charge the headphones when they’re not in use. This means that you can quickly pick up the headset and commence a call without getting tangled up in electrical wires.

The SDW 5016 also supports multiple devices, so you can connect it to your smartphone, tablet, and laptop. You can even connect it to a compatible office phone if you have one at home. One of the best things about the SDW 5016 charging base is that it can connect to multiple devices. If you live with someone who is also a business partner, this can make conference calling incredibly easy and efficient.

5. Mpow M5 Pro Bluetooth Headset

Mpow M5 Pro Bluetooth Headset Mpow M5 Pro Bluetooth Headset Buy Now On Amazon

Like the Sennheiser above, the Mpow M5 Pro Bluetooth Headset is a single-sided device. This makes it perfect for multi-tasking, as you can concentrate on your call and still hear when your coffee is fully-brewed. The brand is a firm favorite for truckers, so there is no reason why you shouldn’t invest in this budget headset.

The headset features Active Noise Cancellation (ANC) technology, which means calls will be crisp, clear, and free of undesired noise. The ANC features will eliminate any background chatter. So, you can stay focused on the task at hand yet still maintain an awareness of your surroundings.

The 18-hour talk time means you can pester your clients and colleagues for an entire working day, should you so desire. If you do happen to run low on battery, the M5 Pro comes with a handy desk stand. This doubles up as your charging station, so you’ll never need to miss closing that important deal.

The Right Headset for You

With so many different features on the go, choosing the right headset for your needs can be a bit of a minefield. The selection above covers a wide range of different needs, so you shouldn’t have too much difficulty picking some out.

If your quest for enhanced office space continues, why not take a look at the best cooling pads for your laptop?

Read the full article: The 5 Best Headsets for Your Home Office


from MakeUseOf https://ift.tt/35k5vkq
via IFTTT

The Best Social VR Experiences to Hang Out With Friends

social-vr-experience

When trying to stay in touch with friends, you aren’t limited to video chats. You can actually spend time in the same room as your friends without seeing them in real life.

Do you want to hang out with your friends in a virtual space? Then convince them to invest in a VR headset, and have a blast using one of these fun social VR experiences.

1. Rec Room

Rec Room is one of the best free VR games for Oculus and other major VR headsets. In Rec Room, you and your friends become cartoonish versions of your actual selves.

You can opt to spend some time in the Rec Center, where you can meet other players and interact with the objects in the room (like the frisbee or basketball). If you want to get some virtual sunlight, you can also go to the Park, another public space outfitted with a gazebo, campfire, playfield, and more.

For a more private experience with your friends, you’ll want to head into your own room that you can create using the game’s built-in room builder. Don’t have the time to build a room? Fortunately, you can also choose from the thousands of custom rooms created by other players.

While you can just use these rooms to chill out and chat, Rec Room gets even more fun when you try its minigames. When you’re ready for action, you can play virtual paintball, capture the flag, laser tag, battle royale, dodgeball, disc golf, charades, and more.

Although Rec Room is best played with a VR headset, you can still play it without one using Screen Mode.

Download: Rec Room on Steam | PS VR | Oculus Rift | Oculus Quest | iOS (Free)

2. VRChat

VRChat is one of the most chaotically fun social experiences in VR. This game allows you to create your own avatar from scratch using Unity. If you never used this software, it’s a great time to start looking at some Unity 3D tutorials for beginners.

With a custom avatar, there are no limits on what you can become—embody your favorite cartoon or video game character, or even play as a mythical creature. As you talk and move, your avatar’s mouth and limbs move with you.

Learning Unity also comes in handy if you’re interested in creating worlds in VRChat. However, you don’t have to be an expert at Unity in order to have fun—there are plenty of player-created worlds you can instantly hop into. Whether you want to visit a virtual Japanese shrine, dance inside of a club, or view YouTube videos in a theater, VRChat has the world for you.

As you explore each world with your friends, you’ll get the chance to see and meet tons of other players. For even more fun, you can play capture the flag, rob banks, sing karaoke, go bowling, and more.

Download: VRChat on Steam | Oculus Rift | Oculus Quest (Free)

3. PokerStars VR

When you’re unable to take a trip to a casino (or don’t want to gamble with real money), join your friends on PokerStars VR. While you can play this game without spending real money at all, just keep in mind that the game gives you the option to use real money to buy more chips.

In PokerStars VR, you can enter a luxurious casino, and sit down with friends for an intense game of Poker or Texas Hold’em. This game offers eight exotic casino locations, including a futuristic version of Macau, the Galaxy Space Station, Macau Suite, Showdown Saloon, the Void, PokerStars Arena, a volcanic lair, and the Monte-Carlo Yacht.

PokerStars VR acts just like an actual casino. While you’re busy sliding chips across the table, you can dress up your character, interact with props, order virtual food and drinks, or even smoke a cigar.

Buy It Now: PokerStars VR on Steam | Oculus Rift | Oculus Quest (Free)

4. AltspaceVR

Altspace VR is a hub for virtual meetups. You and your friends can choose to hang out in many different worlds, some of which include hot springs, an enchanted meadow, a cabin on a lake, a space museum, and a Brooklyn rooftop. If you’re feeling creative, you can create your own world as well.

In addition to serving as a great way to hang out with friends and watch YouTube videos together, Altspace hosts a variety of exciting events every day. Spend time with friends at an open mic night, a hilarious improv comedy show, or a relaxing meditation session.

You’ll also find a series of educational classes and presentations, as well as meetups of people who have the same hobbies or interests. To browse Altspace’s list of events, check out the event schedule on Altspace’s site.

Download: AltspaceVR on Steam | Oculus Rift | Oculus Quest | Oculus Go | Gear VR | Windows (Free)

5. vTime XR

After you create your avatar, you can enter the world of vTime XR. The game offers extensive avatar customization options as well as virtual gestures—that way, you can really feel like yourself. Not only can you use this VR experience to hang out with friends, but you can also meet new people from around the world.

In vTime XR, you can step into a variety of constantly changing destinations. vTime XR often swaps out these locations so you’ll never get bored hanging out in the same places over and over again.

Right now, vTime XR doesn’t include support for the HTC Vive or Valve Index. However, vTime XR prides itself on being a “cross-reality social network.” That means you can still hang out with friends in VR, AR, or with no headset at all in Magic Window mode.

Download: vTime XR for Oculus Rift | Oculus Go | Gear VR | Windows | iOS | Google VR | Daydream (Free)

Have Fun With Virtual Hangouts

Who says you need to see your friends in-person to have fun? These social VR experiences prove that hanging out with people from a distance can still be exciting. And they let you play sports, meet new people, and see amazing sights without ever leaving the comfort of your own house.

For even more ways to hang out with friends virtually, here’s how to play board games online with friends.

Read the full article: The Best Social VR Experiences to Hang Out With Friends


from MakeUseOf https://ift.tt/3f87Wec
via IFTTT

Start Your Six-Figure Career in IT With 89 Hours of AWS Training — Now $59.99

Industry experts estimate that 90% of companies rely on cloud-based services. With each passing year, thousands more migrate. For obvious reasons, engineers and developers with cloud computing knowledge are always in demand. If you would like to break into this fast-growing industry, The 2020 Ultimate AWS Certification Training Bundle offers 89 hours of video tutorials working towards top professional exams. You can grab the bundle now for just $59.99 at MakeUseOf Deals.

Start a Six-Figure Career

When it comes to technical jobs, Amazon Web Services is a goldmine right now. AWS has a 32% share of the cloud computing market, and IT professionals with AWS certifications earn over $129,000 on average.

This bundle helps you join this lucrative world, with six courses covering key AWS skills. Through beginner-friendly tutorials, you discover how to develop apps for the cloud, deploy systems, and handle data. Along the way, you discover how to use a range of AWS tools including EC2, S3, Route53, autoscaling, load balancing, and more.

The courses work towards six separate AWS certifications, including AWS Certified Developer Associate and AWS Certified DevOps Engineer Professional. You get full prep for the exams, and the training covers a range of practical skills.

89 Hours for $59.99

These courses are worth $274, but you can get the bundle now for just $59.99.

Read the full article: Start Your Six-Figure Career in IT With 89 Hours of AWS Training — Now $59.99


from MakeUseOf https://ift.tt/3aUdeXw
via IFTTT

Everyone Can Now Use Google Meet for Free

With populations around the world either in lockdown and/or following social distancing rules, video chat has suddenly become much more popular. And Google is responding to that explosive uptick in interest by making Google Meet free for everyone to use.

How to Use Google Meet for Free

In a post on The Keyword, Google announced that Meet is free for everyone to use. Until now, Meet has only been available as part of G Suite, which is aimed at businesses, schools, and organizations. But now, Google Meet is free for everyone.

All you need in order to use Google Meet is a Google account. Which you already have if you use Gmail. Once you have a Google account, you can use Meet for free either on the web at meet.google.com, or via the Google Meet app on Android and iOS.

Google Meet supports meetings for up to 100 people, with meetings limited to 60 minutes. However, this time limit will not be enforced until October 1st to ensure people can use Google Meet for as long as they want while the COVID-19 crisis is still playing out.

Given the security issues surrounding Zoom and Houseparty, Google points out how Meet is “designed, built and operated to be secure at scale.” Meet’s safety measures include the inability of anonymous users to join meetings, and the ability for hosts to boot people out.

Before you rush to try out Google Meet for free, Google is rolling it out over the next few weeks and “gradually expanding its availability to more and more people.” However, you can sign up here to be notified when you can start using Meet for free.

What Happened to Google Hangouts, Anyway?

Google has offered a confusing array of messaging apps over the years, and its lineup is still quite confusing. Google Meet has only been called Google Meet for a matter of weeks, and was formerly Google Hangouts Meet. And that was formerly just Google Hangouts.

Still, Google finally looks to be settling on a direction of travel, with Google Meet and Google Chat replacing Hangouts, and Google Duo (see our beginner’s guide to Google Duo) sticking around as a mobile-friendly option for smaller groups of friends.

Read the full article: Everyone Can Now Use Google Meet for Free


from MakeUseOf https://ift.tt/3f636Oz
via IFTTT

How to Make Your Own DIY Chromecast With a Raspberry Pi

hack-raspberry-pi

A Google Chromecast is an inexpensive piece of streaming kit. The Chromecast Ultra is more expensive, but at under $100 it remains affordable. But some parts of the world are restricted from buying Chromecasts.

The solution? A DIY alternative based on the Raspberry Pi. Costing under $50, you can configure this credit card-sized computer to receive media streamed from an Android app.

Let me explain how to use your Raspberry Pi like a DIY Chromecast with Raspicast.

Install the Raspicast App

Start by installing Raspicast on your Android device. This is a free app that connects to your Raspberry Pi and streams data to it. You’ll find Raspicast in the Google Play app store. Unfortunately, there is no reliable iPhone alternative for this.

Download: Raspicast for Android

It’s important to note that the Android phone and Raspberry Pi need to be on the same network for this. You can’t, for example, stream video from your phone to your TV if you’re sat on the bus. If you’re trying to share a video with someone sat at home, simply message them the link!

Configure Raspbian for Casting

With the app installed, turn your attention to the Raspberry Pi. This should be already connected to your TV via HDMI and powered up. Note that the Pi will require an individual power source—you can’t power it from your TV’s USB port. Even if the power rating was adequate, the Pi should not be shut down without the correct command. Ignoring this will result in the Pi’s SD card corrupting, so use the right power source.

We tested this on a Raspberry Pi 4 running Raspbian Buster Lite. However, you should find it works with other Raspberry Pi models and distributions (although some of the commands may differ).

Before proceeding, ensure omxplayer is installed on your Pi:

sudo apt install omxplayer

As you’ll need SSH enabled, here’s a quick primer. You have three options to enable it:

  1. Via raspi-config. You can run this from the command line using sudo raspi-config, then select Interfacing Options > SSH and use the arrow keys to confirm with OK.
  2. Use the Raspberry Pi Configuration tool. From the Raspbian desktop, open Menu > Preferences > Raspberry Pi Configuration. In the Interfaces tab, find SSH and set it to Enabled.
  3. Finally, if you prefer simplicity, you can enable SSH before you boot up your Pi. Insert the microSD card into your computer, browse to the boot partition, and create a new file. This should be called ssh and have no file extension. Once you replace the SD card and reboot, SSH should be enabled.

The following can be done via a keyboard connected to your Pi or using SSH. You’ll need the Pi’s IP address to connect—open a terminal window and enter

ifconfig

Make note of the IP address that correspond’s with your Pi’s connection. For example, use the IP address that corresponds to the eth0 entry if you use an Ethernet connection; wlan0 for Wi-Fi.

Once the SSH connection is established, run some updates. Open a terminal window on your Pi and enter:

sudo apt update

sudo apt upgrade

These commands will update your Raspberry Pi’s operating system and find and install any software updates.

Install and Build OpenMax

With the updates installed, we need some prerequisite packages:

sudo apt install libjpeg9-dev libpng12-dev

The packages libjpeg9-dev and libpng12-dev are necessary for programs that can handle JPG and PNG images. This will enable images media to be cast to your Raspberry Pi via the Raspicast app on Android!

Now, install OpenMax. This tool is the best option for casting video, audio, and images from Android to a TV-connected Raspberry Pi. It’s available via GitHub, and you can install it by “cloning” the data repository to your Pi. Don’t have git? Install it with

sudo apt install git

Then clone the repository with:

git clone https://github.com/HaarigerHarald/omxiv

This shouldn’t take long.

You’re nearly done; it’s time to build the OpenMax software. Begin by switching to the omxiv directory and using the make command.

cd omxiv
make ilclient
make

This will take a while. Once it’s done, install with:

sudo make install

A few moments later, OpenMax will be ready to use.

Get Ready to Cast to Your Raspberry Pi

Everything you need to cast from your Android device to your Raspberry Pi is now in place. Some configuration of Raspicast is still required, however.

  1. Run the Raspicast app.
  2. In the SSH settings input your Pi’s Hostname or IP address.
  3. Input the username and password for your Pi.
  4. Click OK to finish.

To cast to your Raspberry Pi, you have two options:

  • Browse for the content within the Raspicast app and hit play.
  • Cast from YouTube, find the video in the app and tap Share > Cast (Raspicast).

Meanwhile, to send videos, music and photos to your Raspberry Pi display, simply use the main Raspicast screen and select Cast. This will open a screen listing all videos on your Android device.

Selecting a media file on any of the corresponding tabs will prompt its immediate playback on your Raspberry Pi.

Need to change the IP address within the app (e.g. to cast to a different Pi)? Open the “three dots” menu and select SSH Settings. Simply input the new IP address and credentials.

More Raspicast Options

Also in the Raspicast menu, you’ll find a check box to Repeat the currently playing file. Further down the list, Audio output can be customized, using HDMI (default), local, both, or alsa. This will prove useful for anyone using an external audio solution with their Pi.

You should also check the Advanced options screen. Here, manage a queue of files, volume (audio volume offset), and specify custom commands. You can also switch to using HTTP if necessary (HTTPS is the default), and more.

Meanwhile, on the main Raspicast screen, use the Files button to navigate and play media stored on your Raspberry Pi. This includes streaming audio, thereby turning your Raspberry Pi into a Chromecast audio device!

You Can Also Cast With Kodi!

While you can’t run Raspicast with a Raspberry Pi running Kodi, don’t worry, there is an alternative. With the Kore remote control app for Android you can also cast media to a Raspberry Pi with Kodi installed.

Download: Kore, Official Remote for Kodi

Simply install the app, set it up with the IP address of your Raspberry Pi, and then head to YouTube. As with Raspicast, tap the Share button on the video you want to cast, then Play on Kodi.

This will immediately stream the video to your TV via Kodi!

Other Chromecast Alternatives

The Raspberry Pi isn’t the only alternative to a Chromecast. You might already have a solution that you were unaware of. Your smart TV, game console, or set-top box might have a YouTube app, enabling easy streaming.

In this situation, casting videos from the YouTube app to the TV is usually possible as long as the receiver is on the same network.

While other HDMI streaming solutions exist, if you have a device with an official YouTube app (like the Apple TV), you’ll probably be able to cast to it. And if you don’t own any of these devices or a Raspberry Pi, Miracast is a smart alternative.

Want to go further with media streaming and your Raspberry Pi? Here are the best ways to use a Raspberry Pi as a media server.

Read the full article: How to Make Your Own DIY Chromecast With a Raspberry Pi


from MakeUseOf https://ift.tt/2CLfhMC
via IFTTT

How to Install Linux on a Chromebook

linux-chrome

Did you know you can run Linux on your Chromebook? Installing a traditional Linux environment on your Chromebook is a quick and easy way to unlock your machine’s true potential and improve its functionality.

Because the Chrome OS is a Linux-based operating system, users can install an alternative Linux environment and get a fully-fledged Linux desktop on their Chromebooks. Before you start, please note that if you have an ARM-based machine, some Linux apps will not work, as they are only designed to run on Intel architecture.

So, here’s how you install Linux on your Chromebook.

How to Install Linux on a Chromebook

There are two main options you can use to install Linux on your Chromebook. You can either create a dual-boot environment using chrx, an open-source project that replaces the now-defunct ChrUbuntu project, or in a chroot environment using Crouton.

There is also a third option, which uses Crostini, Google’s Linux virtual machine container project that allows you to run Linux apps on top of Chrome OS. Crostini is similar to chroot, in that it allows for the creation of an environment where you can run Linux programs. The difference between the two is that Crostini doesn’t require you to enter Chromebook Developer Mode.

Each option has pros and cons. Read on for a simple step-by-step installation guide, while also considering their advantages and disadvantages.

Create a Chromebook Recovery

Chromebook create recovery

Before you start altering your Chromebook with a Linux installation, you should create a Chromebook recovery drive using the Chromebook Recovery Utility. If anything horrendous happens to your Chromebook during the Linux installation, you can restore your Chromebook using the drive.

You’ll need a USB flash drive with at least 8GB space that you don’t mind formatting during the process.

  1. Download Chromebook Recovery Utility from the Chrome Web Store.
  2. Use the app to download a copy of Chrome OS onto a removable media with 4GB storage.

That’s it!

If you do run into difficulties and encounter the dreaded “Chrome OS Is Missing or Damaged” message, you’re prepared for the worst. Follow our guide on reinstalling Chrome OS to bring your Chromebook back to life.

How to Put Your Chromebook into Developer Mode

The chrx dual-boot method and chroot installation methods require you to put your Chromebook into Developer Mode. Chromebook’s Developer Mode is a special integrated function that allows you to boot into an unapproved operating system, among other things.

A few words of caution before progressing.

Firstly, putting your device into Developer Mode will wipe all locally stored data, so please ensure you have made adequate backups of everything important.

Secondly, you are removing an important level of Chromebook’s security, as the machine will no-longer verify or authenticate the Chrome OS on start-up, which could leave you open to potential attacks.

Finally, remember any modifications you make are not supported by Google and may void your warranty.

chrome os operating system verification is off

The method for putting your Chromebook into Developer Mode varies depending on the make and model of the machine. Much older Chromebooks have a simple physical switch underneath the battery. Newer versions do not have a removable battery and thus require you follow these steps:

  1. Hold down Esc + Refresh, and while keeping them pressed, hit the power button.
  2. Once the computer restarts, you will enter Recovery Mode.
  3. Press Ctrl + D, which will bring up a prompt asking if you want to enter Developer Mode. Press Enter to proceed.
  4. The Chromebook will start initializing Developer Mode—this may take some time.
  5. When the setup is complete, you will meet a screen that displays an exclamation mark, and the phrase OS verification is OFF. From now on, you will see this screen every time you turn on your Chromebook. If you wait 30 seconds, your Chromebook will start automatically, or you can press Ctrl + D to boot immediately.

How to Dual-Boot a Linux on a Chromebook Using chrx

Chrx is an open-source project that you can use to install a Linux distribution alongside Chrome OS. There are several Linux distros you can choose from. These include the full Ubuntu installation, or GalliumOS, which is derived from Xubuntu and is developed specifically for maximizing performance on Chromebook hardware.

There is one important thing to note before continuing. The chrx dual-boot method does is not compatible with Chromebooks that use ARM hardware. You can check the compatibility list before continuing with the tutorial.

Intel Skylake, Apollo Lake, and Kaby Lake models have varying levels of support and testing. Intel Amber Lake, Gemini Lake, and Whiskey Lake models are new and do not have much support.

The chrx installation is a two-part process. Phase one partitions your storage. Phase two installs the Linux distribution and configures your system.

install linux chromebook chrx dual boot

Using chrx to Install Linux

Here is your step-by-step guide to installing Linux on your Chromebook using chrx. Before proceeding, double-check your compatibility, ensure Developer Mode is enabled, and that you have an active internet connection.

  1. First up, press CTRL + ALT + T to open the Chrome OS terminal, then input shell
  2. You now need to update the Chromebook firmware to allow legacy booting. Input cd; curl -LO https://mrchromebox.tech/firmware-util.sh && sudo bash firmware-util.sh. When the firmware update script loads, press 1, then Enter to Install/Update RW_Legacy Firmware.
  3. Once your firmware update completes, input cd ; curl -Os https://chrx.org/go && sh go. Press N to install to your system storage.
  4. Enter the storage size for the Linux partition, then hit Enter. The default installation option, GalliumOS, requires a minimum 3GB storage. Once the installation completes, press Enter to restart your system.
  5. Once your system reboots, you will encounter a message stating, “Your system is repairing itself. Please wait.” As worrying as this sounds, it is perfectly normal. Wait for this to complete. The time it takes depends on your hard drive. For example, I have a 128GB hard drive in my Chromebook, and the process took nearly 20 minutes.
  6. When you arrive at your desktop, open the Chrome OS terminal, input shell, then cd ; curl -Os https://chrx.org/go && sh go to being the second phase of the installation. When the installation finishes, press Enter.
  7. At the boot screen, press CTRL + L to boot into Gallium OS (or an alternative Linux distro).

install linux chromebook chrx gallium os

The chrx installation process is a little lengthy. Still, the result is excellent and provides you a stable dual-boot environment.

How to Install Linux as a Chroot Using Crouton

One alternative to the chrx method is to use Crouton, an open-source project that installs Linux in a chroot environment.

In practice, this means you can switch between the two operating systems seamlessly by using a simple keyboard command, and the machine will not require rebooting.

Further benefits include sharing the /Downloads folder across both systems. This means that you can easily access files from both environments. Furthermore, removing a Linux operating system installed using Crouton does not require a full system recovery.

The software itself was developed by a former Google employee and is, therefore, optimized to run extremely quickly, even on older machines. The two environments also share drivers, so they should work immediately and without problems.

Installing Linux With Crouton

The process of installing Crouton is very simple. Please check you have a connection to a Wi-Fi network, and you have Developer Mode enabled. Now, follow the steps below to install Ubuntu with Crouton.

  1. Download the latest version of Crouton to your Chromebook hard drive
    Download: Crouton (Free)
  2. Press CTRL + ALT + T to open the terminal, then input shell
  3. Input sudo install -Dt /usr/local/bin -m 755 ~/Downloads/crouton to turn the installer into an executable file
  4. Now, run the installer using sudo crouton -t xfce
  5. Towards the end of the installation, you will receive a prompt to enter and username and password for your Linux installation. Choose something suitable, press Enter, and the installation will compete.

Once the installation is complete, head back into the Chromebook shell (from your desktop press Ctrl+Alt+T, type shell, press Enter), then type sudo startxfce4 and press Enter. After you have done this once, the new OS will continue to run until you either turn off your computer or log out of the Linux desktop environment.

install linux chromebook crouton xfce4

The default installation option, as above, installs Ubuntu 16.04, which is now reasonably out of date. Crouton does support other Linux distros. If you want to check out the other Linux distros Crouton supports, run sh -e ~/Downloads/crouton -r list before starting the installation. Swap out the name of the Linux distro you want to install in step 4 of the tutorial.

Controlling and Customizing Your Linux Crouton Environment

The following keyboard shortcuts enable you to switch between the original Chrome OS and your new Linux environment:

  • ARM-based machines: Ctrl+Alt+Shift+Forward and Ctrl+Alt+Shift+Back
  • Intel-based machines: Ctrl+Alt+Back and Ctrl+Alt+Forward then Ctrl+Alt+Refresh

Once you have successfully installed your new environment, there are a couple of actions you should take to improve your experience.

  1. Enable your keyboard’s brightness and volume keys to work inside the new OS. To do this, access the Chrome OS shell (from the Chrome OS desktop, press Ctrl+Alt+T, type shell, and press Enter).
  2. Next, type sudo sh -e ~/Downloads/crouton -r precise -t keyboard –u and press Enter.
  3. Remove the new environment’s screensaver as it has been known to cause graphics errors. You can do this from the terminal inside Linux by typing sudo apt-get remove xscreensaver then pressing Enter.
  4. Install Ubuntu Software Centre and Synaptic (both used for installing additional apps). Do this by entering the terminal inside your new Linux installation, typing sudo apt-get install software-center synaptic and pressing Enter.

How to Remove a Crouton Installation

There are two principal ways to remove a Linux environment installed using Crouton.

The first is to enter the shell on your Chrome OS (press Ctrl+Alt+T, type shell, press Enter) and do the following.

  1. Type cd /usr/local/chroots and press Enter
  2. Type sudo delete-chroot * and press Enter
  3. Type rm -rf /usr/local/bin and press Enter

The alternative is to reboot your Chromebook and press Space when you see the initial OS verification is OFF screen. This will take your device out of Developer Mode and wipe all local data, including any new environments you have installed.

As always, ensure you have made backups of any important data before taking this step. If you want to enter Developer Mode again after this point, you’ll have to repeat the process explained earlier.

How to Install Linux Apps Using Crostini

Now, onto the third and final method for running Linux apps on your Chromebook. Crostini allows you to create a virtual container for a Linux app. The Linux app runs on top of your existing Chrome OS installation, so there is no need to enter Developer Mode or make tweaks to the existing operating system.

The only downside is that Crostini is not available on many Chromebook models. At least, not many at the time of writing—and none that I currently own. Check out the full compatibility list to see if your Chromebook model can run the Linux (Beta) and, in turn, Crostini.

If you’re thinking of waiting around for Crostini to come to your Chromebook, owners of certain models should consider using one of the alternative methods. The list of Chromebook models that will not receive Crostini is lengthy.

How to Use Linux Apps on Your Chromebook With Crostini

The process of loading and using Crostini on a compatible Chromebook is simple. On your Chromebook:

  1. Open the Settings menu
  2. Scroll down to find Linux (Beta), then turn the option on
  3. Follow the on-screen instructions. The setup process can take up to 10 minutes.
  4. Once Linux finishes installing, a Linux terminal will appear. Update the Linux installation using the sudo apt update command, then sudo apt update upgrade.
  5. On completion, open your Chrome browser and type chrome://flags. Type crostini in the Flags search bar, then search for the Crostini GPU Support
  6. Switch it to Enabled.

chrome os turn on linux beta chromebook

After you complete the Linux (Beta) and Crostini installation, you can install Linux packages to your Chromebook. You will find a new option in your Chrome OS file menu for Linux apps, too, allowing you to launch Linux apps as if it were a Chromebook app.

3 Ways to Install Linux on a Chromebook

There are three options for you to start using Linux on your Chromebook. The main limitations of selecting a method come from your hardware type and its compatibility. ARM-based Chromebook models should opt for Crouton, whereas Intel-based Chromebook models have a wider range of options.

Are you getting into the Chrome OS terminal? Check out our list of the most important Crosh commands every user should know.

Read the full article: How to Install Linux on a Chromebook


from MakeUseOf https://ift.tt/3aQRUCn
via IFTTT

Wednesday 29 April 2020

9 Essential Amazon Kindle Tips: Key Benefits to Take Advantage Of

kindle-tips

Despite what fans of physical books may say, the Amazon Kindle has modernized the reading experience. It has offered people new ways to read books, and being able to carry hundreds of novels on a device you can keep in your bag is a Godsend.

However, most people don’t realize that there are benefits to owning a Kindle beyond the ability to buy an ebook on Amazon. So, in this article, we list some of the many Kindle benefits that let you take full advantage of your Amazon ereader.

1. The Benefits of Kindle Unlimited

Benefits of Kindle Unlimited

While Kindle Unlimited can have its ups and down in terms of quantity over quality, this program is a heavyweight in terms of reading options. It’s also one of the overwhelming benefits of owning a Kindle device.

For a nominal subscription fee, you’re granted access to Amazon’s massive digital library, which contains over 1 million ebooks. Its cheap price and huge library put it on a par with streaming services like Netflix, and Kindle Unlimited is basically a Netflix for ebooks.

So long as you’re subscribed, you can read as many novels as you want every month.

Still think that Kindle Unlimited is too expensive? Consider the fact that most bestselling ebooks sell for $10 a pop. This means that Kindle Unlimited is a steal even if you only enjoy one book per month.

When it comes to Kindle advantages and disadvantages, this is definitely the former.

2. Join the Amazon First Reads Program

Advantages of Kindle First Reads

Most people subscribe to Amazon Prime for the free two-day shipping and access to Prime Video. However, there are other Amazon Prime benefits you’ve probably overlooked.

One of those benefits is the Amazon First Reads program (formerly known as Kindle First).

With Amazon First Reads, Prime members get early access to one free Kindle book each month. You can pick a book of your choice from a pre-selected showcase of soon-to-be-released novels. In other words, you get one-month early access to one book every month of the year!

While most people can be picky over what they read, each month’s offerings are spread across multiple genres and categories. As such, there’s a good chance that something will catch your eye.

As an added bonus, you can also buy one of six pre-selected hardcover novels for a discounted price. Specific details can be found on the Amazon Prime benefits page.

Overall, Amazon First Reads is definitely one of the benefits of owning a Kindle.

3. Use the Kindle Owners Lending Library

Kindle Owners Lending Library KOLL

The Kindle Owners Lending Library (KOLL) is another one of the benefits of owning an Amazon Kindle. It’s accessible to anyone who has a full Amazon Prime membership connected to Amazon.com, Amazon.co.uk, Amazon.de, Amazon.fr, or an Amazon.co.jp account.

With KOLL, you can borrow one book per month from Amazon’s vast library. You must return that book in order to borrow a new one the month after that. Once you borrow a book, however, you can read a particular book as many times as you’d like before returning it. Think of it like a modified library.

Note: KOLL is different from the Lending for Kindle feature, which we will detail next.

4. Lend Books With the Lending for Kindle Feature

Lend Your Kindle Ebook

Did you know that you can also lend books you’ve bought to family and friends?

The ability to lend books through Kindle was a feature that was advertised when Amazon released the first device. However, the Kindle Book Lending feature has seemingly been forgotten.

While this program does have its benefits, there are some major limitations. The biggest being that you can only lend a book once.

Once your ebook is loaned, the borrower has 14 days to read the ebook before it must be returned. While loaned, the ebook cannot be read by the lender.

Note: This feature is only available to Kindle books purchased directly from Amazon.com.

5. Use the Kindle Public Library

Benefits of a Kindle Public Library

You may be asking yourself, “Why should I get a Kindle when I have access to the library?”

Because you can use your Kindle as a literal library, too.

One of our favorite Kindle features is the ability to check out eligible ebooks from public libraries. This lending service becomes invaluable if you’re too busy to go into a library to grab a new book.

How does this Kindle Public Library service work?

  • This feature is only available in the US. Everyone else is out of luck.
  • The ebooks are offered through a service called OverDrive.
  • Through OverDrive, you can search for your library to see if it’s part of the program.
  • If it is, all you have to do is get a free library membership card at your library to start borrowing ebooks.

Specific instructions on how to borrow a library book can be found on the Kindle Public Library page.

Note: Not all public libraries participate in the Kindle Public Library program. For those that do, every library will have its own unique selection of books to offer. Once borrowed, you will need to return those books within a specific time period.

6. Read Kindle Newspapers and Magazines

Kindle Newsstand

If you like monthly nonfiction updates, Amazon Kindle also offers a unique service where you can subscribe to periodicals like newspapers and magazines.

This feature, called Kindle Newsstand, is somewhat niche but surprisingly convenient. Essentially, you can subscribe to individual newspapers through Amazon. Each periodical will have its own price tag attached, and each issue will be delivered to your Kindle when made available to the public.

7. Add Your Device to a Kindle Family Library

How to Share Books Amazon Household

One of the lesser-known advantages of Kindle is the fact that Kindle users can benefit from a Kindle Family Library.

Basically—when two Amazon accounts are linked—they can share their media using a feature called Amazon Household. Each account can designate whether they want to share all of their media, or only select items.

So what can be shared through the Kindle Family Library?

  • Audiobooks.
  • Kindle books with Amazon First Reads.
  • Kindle books with Prime Reading.

And what can’t be shared through the Family Library?

  • Kindle newspapers.
  • Kindle magazines.

If you have a close-knit family and you share the same tastes in books, then this might be a good option for you.

8. Try a Kindle Book Sample Before You Buy It

Kindle Book Samples

One of the best built-in features found in Kindle devices is the ability to download and read “samples” of ebooks prior to buying them.

There is no deadline for reading this sample, nor any payment up front. The samples are 100 percent free and can be easily deleted from your Kindle once you have read them. This allows you to dramatically decrease the risk of buying something that you don’t like.

How does it work?

  • When you browse the Kindle store through your device and click on a book’s info page, you should see a button beneath the book cover and price that says Try a Sample.
  • When you click on that button, the sample will be downloaded to your device, free of charge.

Samples are typically very short, usually no more than the first chapter (or two) of a book. Essentially, they’re long enough that you can decide whether the writing style within the book will be something that you’ll enjoy.

If you buy the book directly through your Kindle device, the sample will automatically convert itself into the full version of the novel.

9. Use Tools to Keep Your Kindle Books Organized

Create a Book Collection on Kindle

Lastly, one of the best ways that you can take advantage of your Kindle is not through some lending service, but through the organizational tools located on your Kindle itself.

While it’s great that each individual Kindle can carry tons of books, this collection can become unmanageable once you buy your first hundred or so novels.

To make it easier to browse through your books, you can organize your Kindle downloads into custom folders, which Amazon calls Collections. These folders can be named according to your personal tastes.

For example: I have two folders on my Kindle called “Complete” and “Currently Reading.” I use these two folders to sort through the books I’ve paid for and read, versus those books I’ve paid for but haven’t finished.

Additionally, you can organize the way that your Kindle Library displays these collections by clicking on Your Library > Filter through the Kindle homepage.

Basically, if you manually adjust how your Kindle organizes your files, it will make buying, finding, and reading those books a breeze.

Take Full Advantage of Your Amazon Kindle

All of these features are a great way to take advantage of your Kindle, even if you prefer printed books over digital ebooks. If you don’t have a Kindle, we also think these are great reasons to buy a Kindle, too.

And if you’ve already decided to buy a Kindle, be sure to check out our guide detailing how to choose the right Kindle for you.

Read the full article: 9 Essential Amazon Kindle Tips: Key Benefits to Take Advantage Of


from MakeUseOf https://ift.tt/2FhYeEv
via IFTTT