Wednesday, 31 October 2018
How to Watch Amazon Prime Video on Your Apple TV

Amazon Prime Video really gives Netflix a run for its money. Series like Transparent and The Marvelous Mrs. Maisel are excellent examples of binge-worthy Amazon Originals you probably haven’t heard of.
You can watch the Amazon Prime video service on a number of different connected devices, including the Apple TV 4K and fourth-generation Apple TV. Here’s the complete guide to watching Amazon Prime Video on your Apple TV.
1. Subscribe to Amazon Prime
The first and most important task to start watching the streaming video service is to subscribe to Amazon Prime. There are a few options to select from.
The best way is probably the $119 annual membership. If you’re looking for a month-to-month option, you can also subscribe for $12.99/month. If your only interest is Amazon Prime Video, there is also an $8.99/month video-only plan.
With a full subscription, you’ll get much more than just the streaming video service. Easily the most well-known perk is free, two-day shipping on millions of items from the online giant. But there are many other features as well which we detail in our guide asking, “Is Amazon Prime worth the money?”
Use this link to get started with a free 30-day trial of Amazon Prime!
2. Download Amazon Prime Video for Apple TV
Next, you’ll need to download the Amazon Prime Video app to the Apple TV 4K or fourth-generation Apple TV.
Here’s a quick way to download the app:
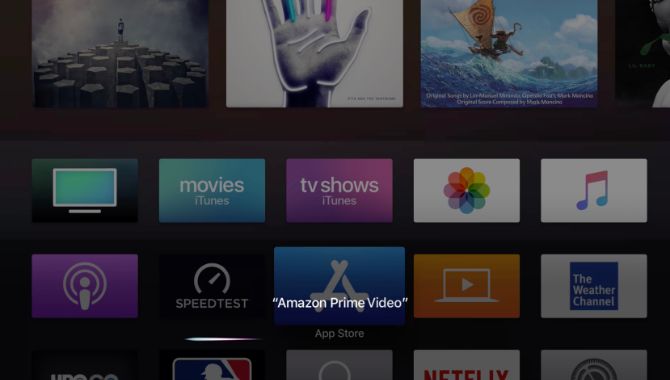
- Turn on your TV and Apple TV.
- Make sure you’re on the Apple TV homescreen by pressing the Menu button on the Siri Remote.
- Select the App Store icon in the main menu.
- Head to the Search section.
- Use the on-screen keyboard to type “Amazon Prime Video”.
- On the main app page select Install.
Another way to quickly download the app is using the Siri Remote. As we detail in our Siri Remote tips and tricks, the remote allows you to navigate the UI quickly and easily with a small touchpad and even with your voice.
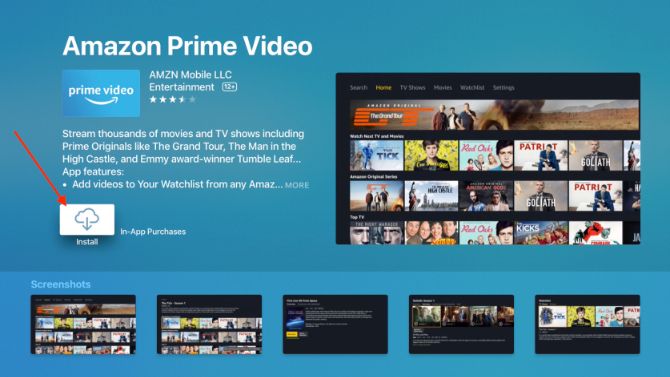
Using the remote, hold down the microphone button and then say “Amazon Prime Video.” The app page will then appear on the screen. Just use the touchpad on the remote to download the app.
3. Open the Amazon Prime Video App
After opening the app, there are two different ways to sign in with an Amazon Prime account. First, you can enter the complete email and password information using a Siri Remote. It’s also possible to register the Apple TV on the Amazon site and then input a quick numerical code in the app.
Once you have completed this step, you can start watching any content available. Just to note, you can browse content without signing in. That can give you a better idea if you want to subscribe to the streaming service before handing over any money or even starting a free trial.
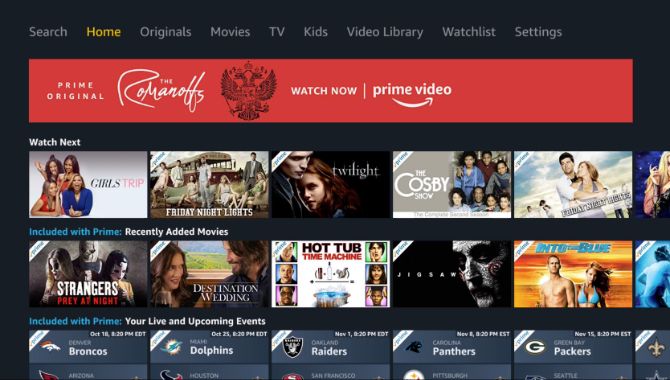
The app is easy to navigate with the Siri Remote. On the main navigation bar is a search bar to find specific content. There are also sub-sections to view TV shows, movies, Amazon Originals, and content for kids.
In the main section, you can also access any Amazon Prime Video channels. Those are additional premium options, like Showtime, that you can subscribe to via Amazon.
Viewers can also take a look at movies or TV shows they’ve been watching and jump right back in where they left off.
If you have an Apple TV 4K, there is also a specific section highlighting 4K shows and movies available to watch. The newest Apple TV also supports Dolby Atmos playback from Amazon Prime Video. So, using a compatible Dolby Atmos sound system, which includes our favorite Dolby Atmos soundbars, you can add another layer to your viewing experience.
Other Ways to Watch Amazon Prime Video on Apple TV
As long as you have an iPhone or iPad handy, you don’t even need to install the Amazon Prime Video app on your Apple TV to watch the streaming service on a big screen.
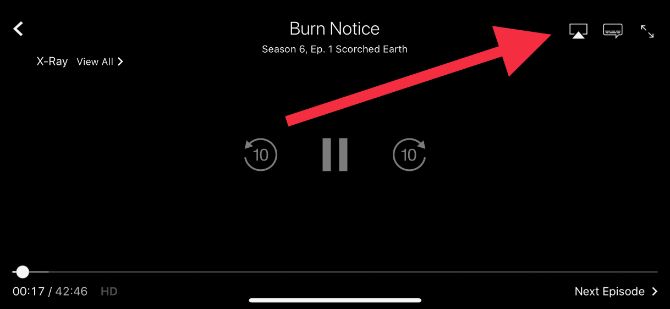
First, you’ll need to make sure that your iOS device and Apple TV are on the same Wi-Fi network. Open up the Amazon Prime Video app on an iPhone or iPad and start playing your content. In the upper right-hand portion of the screen, select the AirPlay logo. Then choose the Apple TV you want to play the video on.
Instead of the Siri Remote, you’ll have to rewind and fast forward using the iOS device screen. But to conserve battery power, the video will keep playing even if the iPhone or iPad is locked with the screen off.
You can also use AirPlay to watch Amazon Prime Video from any Mac on the Apple TV. The AirPlay logo is located in the Mac’s menu bar. Find the Apple TV you want to send the video to and enjoy.
Let the Binge Watching Begin!
Streaming services can bring a unique and exciting blend of movies and TV shows into your home at the touch of the button. They have changed the entertainment landscape for the better as they continue to evolve.
And by using the Amazon Prime Video app on the Apple TV, you can watch all the content the service has to offer in the comfort of your living room and on your big screen television.
Now you just need to find the right content. So if you want to dive right into watching Amazon Prime Video on your Apple TV, take a look at the best movies to watch on Amazon Prime.
Read the full article: How to Watch Amazon Prime Video on Your Apple TV
from MakeUseOf https://ift.tt/2AC0QN0
via IFTTT
What Are Facebook Shadow Profiles?

Facebook spends an awful amount of time defending its data practices. The social network’s hunger for users’ personal information has led to it adopting any means necessary for harvesting as much data as possible.
This means that even if you never sign up to Facebook, the social network will have some information on you. And it’s all thanks to shadow profiles. But what are Facebook shadow profiles? And do you have one? Read on to find out…
What Are Shadow Profiles and Do You Have One?
To understand what shadow profiles are, consider this analogy. Say there are two friends, Becky and John. Neither of them are on Facebook.
But Becky gives in and signs up. She creates an account, installs the app, and gets to work building her profile. While setting up, Facebook asks if Becky would like to provide her contacts to help Facebook locate her existing friends on the website. Becky thinks it’s a great way to kickstart her life on Facebook and grants Facebook permission.
As soon as she does so, Facebook combs through Becky’s contacts and scoops all the available information such as phone numbers, email addresses, and other data.
This enables Facebook to figure out the Facebook users Becky might know already. It uses this data to populate the “People You May Know” feature, helping Becky quickly and easily add friends to her social network.
While this may sound harmless enough, while gathering data from Becky’s phone, Facebook’s algorithms also collect details on some of her friends who don’t have a Facebook account.
Facebook takes this opportunity to build profiles based on the preliminary data it has acquired. This includes a name, phone number, email address, and more besides. Hence, even if you’ve never signed up for Facebook, the company could have your information on file, and a rudimentary sense of who you are.
To know more about what data Facebook has collected, here’s how to find out what Facebook knows about you.
This bank of data comes in handy later when Becky convinces John to join Facebook as well. As soon as he does that, Facebook is already aware of which profiles to recommend to John.
And that’s just one source of John’s shadow profile. Hundreds of people, irrespective of their relationship with John, might have signed up for Facebook and allowed it to access their contacts list.
Has Facebook Disclosed These Activities?
Yes, Facebook has updated its Privacy Policy for reflecting the fact that it does use local information from phones.
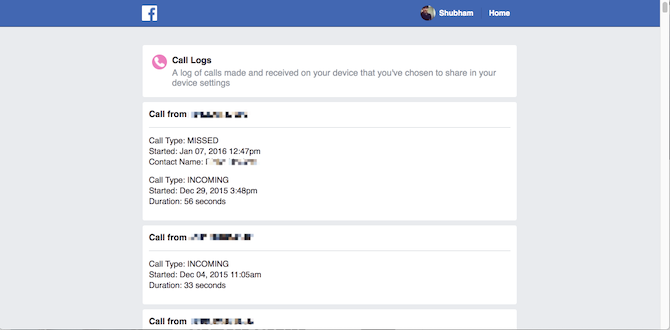
Under Networks and Connections, you will find an excerpt that says “We also collect contact information if you choose to upload, sync or import it from a device (such as an address book or call log or SMS log history), which we use for things like helping you and others find people you may know and for the other purposes listed below.”
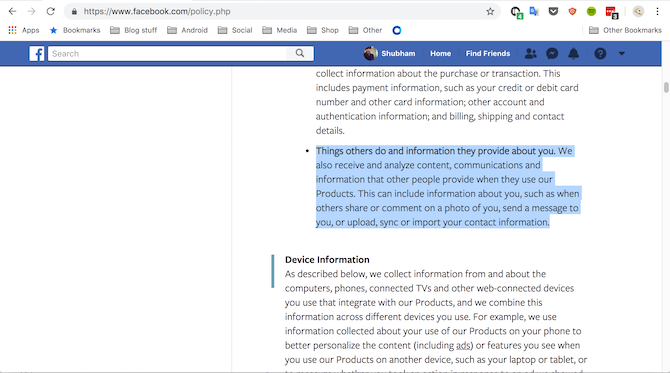
Plus, there’s another section called “Things others do and information they provide about you” that states “We also receive and analyze content, communications, and information that other people provide when they use our Products. This can include information about you, such as when others share or comment on a photo of you, send a message to you, or upload, sync or import your contact information.”
The last part which reads “sync or import your contact information” directly points at shadow profiles and how Facebook uses the information it collects.
Is There Anything You Can Do About It?
Unfortunately, you don’t have any direct control over shadow profiles. Whenever a Facebook user who has you as a contact on their phone signs up to Facebook, your personal information will be added to your shadow profile.
Therefore, unless you’re comfortable with switching to a new phone number and email address, you can not do anything about your shadow profile.
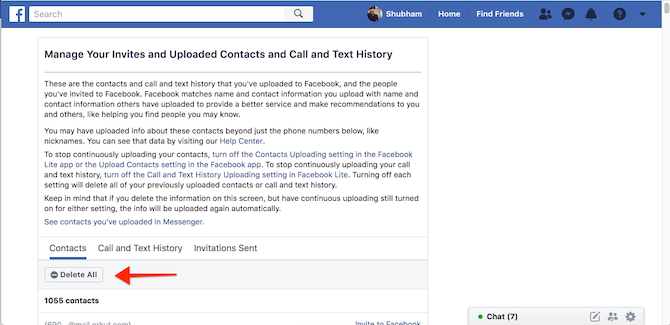
You can also request your friends who actively use Facebook to delete the contacts they’ve uploaded. They can do so by heading over to the Manage Contacts page on Facebook. Of course, they will have to keep the sync settings turned off after this. Unfortunately, this is not really practical since you’ll have to ask everyone you know who is on Facebook and has your contact details to follow the procedure.
If you do end up getting a new phone number and email address, the best thing then is to not give it out to everyone. Only to people who you know understand personal security and are understand Facebook’s privacy settings. And before you even consider that you should read our guide to Facebook Privacy so you too understand what’s going on.
Will Facebook Ever Backtrack on Shadow Profiles?
We suspect Facebook will never give up on shadow profiles, as, even after the Cambridge Analytica scandal, shadow profiles still exist.
Facebook clearly believes they’re crucial for the social network so that no one feels lost when they sign up for the first time. It is undoubtedly a matter of worry, and the weakest link in Facebook’s defense of your private data.
All you can do is educate yourself. So, read up on how to limit how much of your personal data is being shared or perhaps consider switching to one of these Facebook alternatives which don’t steal your data.
Read the full article: What Are Facebook Shadow Profiles?
from MakeUseOf https://ift.tt/2qiCH82
via IFTTT
Apple Unveils a New MacBook Air, Mac Mini, and iPad Pro
Apple has hosted yet another “special event”, six weeks after the last one. In September, Apple unveiled the new iPhone Xs, Xs Max, and iPhone XR. Now, one month on, Apple has unveiled slightly upgraded versions of the MacBook Air, Mac Mini, and iPad Pro.
Apple Announces New Old Products
The New MacBook Air
Apple has finally updated the MacBook Air for the first time since 2015. The new MacBook Air has a Retina display on a 13.3-inch screen, thinner bezels, two USB-C ports, and a 3.5mm headphone jack. At 2.75 pounds, it’s also slightly lighter than the previous model.
Unfortunately, there’s no Touch Bar, USB-A ports, or SD card reader. There are various versions available, with the base model boasting 8GB of RAM and a 128GB SSD. For that you’ll pay $1,199, with the new MacBook Air available to buy from November 7.
The New Mac Mini
Apple has also updated the Mac Mini for the first time since 2014. The new Mac Mini boasts a quad-core 8th Gen Intel processor and up to 64GB of RAM and up to 2TB SSD storage. You get a generous four USB-C ports, plus USB-A ports, HDMI, and Ethernet.
The new Mac Mini actually looks very similar to the old Mac Mini, but the changes have all been made under the hood. The base model includes an Intel Core i3 processor, 8GB RAM, and 128GB of SSD storage. That will set you back $799 and be available from November 7.
The New iPad Pro
Last but not least is the new iPad Pro. This has been redesigned inside and out. Design-wise, the new iPad Pro has smaller bezels and a screen which run closer to the edge. Apple has also added Face ID, but removed the Home button and the 3.5mm headphone jack.
The new iPad Pro boasts impressive specs. It’s powered by the A12X Bionic chip, which has an 8-core CPU and 7-core GPU which Apple claims compares to an Xbox One. The 11-inch iPad Pro starts at $799, with the 12.9-inch base model priced at $999.
But Where Are the New NEW Products?
This is the fourth special event Apple has hosted in 2018. However, they’ve all been about introducing slightly better versions of existing products, including the iPhone, the iPad, the Apple Watch, and operating systems for all of the above and more besides.
But where are the brand new, never-seen-before products that once helped Apple stand out from the crowd? And why aren’t more Apple fans calling out the company for playing it safe? Unfortunately, this is what happens when you’re worth $1 trillion and counting.
Read the full article: Apple Unveils a New MacBook Air, Mac Mini, and iPad Pro
from MakeUseOf https://ift.tt/2Rki5aY
via IFTTT
Tuesday, 30 October 2018
5 Critical eBay Online Shopping Tips You Must Know

Welcome to eBay Online Shopping 101. You are the select few, chosen to be trained as sharp-shooting eBay bidders, capable of finding the best deals and winning every auction. So pull up a chair and let’s get started.
Shopping on eBay isn’t really like shopping on Amazon or any other shopping site. On most sites, you search for the product you like, find it, and if there are enough left, you buy it at the best fixed price you can find and then wait for it to arrive in the mail. On eBay, not so much.
Is eBay Safe?
There are a few important things you need to know when you buy something on eBay.
It’s important to do your research before you ever press the Place bid button.
- End of the auction timing
- Seller details
- Product details
eBay is a great place to buy some really cool stuff at amazing prices, but you’ve got to be careful.
When it comes to eBay online shopping, in most cases you aren’t dealing with a major business with a reputation and a brand to protect. You’re usually dealing with someone selling stuff right out of their own home.
There’s nothing wrong with that, but it means that you have to go about doing business a little more carefully.
Searching for Things to Buy on eBay
Lesson number one is this—you really shouldn’t bid on just anything on eBay.
If you do, you’re far more likely to lose your money and not get the product that you want. On the other hand, if you search carefully for products, you’ll have very low odds of ever losing your money, getting a bad deal, or or even getting scammed on eBay.
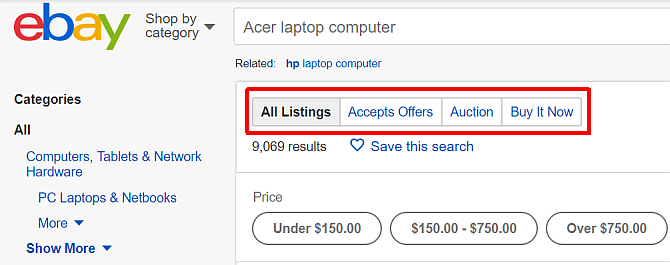
When you’re searching for what you want, listings have options at the top to switch between listing type. “All Listings”, “Accepts Offers”, “Auction”, or “Buy It Now”.
- All Listings: No filter is applied and you’ll see a mix of auction-style and buy-it-now listings.
- Auction: Most people prefer straight auction sales because you can get much better deals.
- Buy It Now: If you’re in a hurry and want more of an Amazon experience, then you can go with a “Buy It Now” sale.
- Accepts Offers: This will show listings where the seller is willing to entertain offers lower than the current listing price.
Pro-tip #1: If you are a collector and find yourself searching for the same sorts of items on eBay over and over, you can click on “Save this search” as a convenient way to quickly see new items that show up.
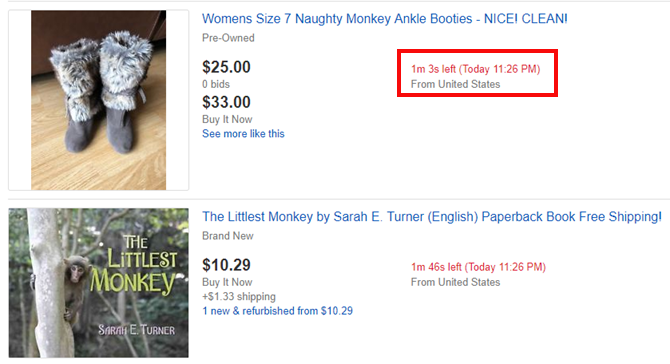
Pro-tip #2: If you’re new to eBay, sorting by Time: ending soonest or Ending Soon is one of the best ways to get the lowest price. This depends on the time of day you’re able to do the search. There are prime hours to be a buyer when prices are lowest. In the left navigation, click on Completed Items under Show only, to get an idea of what time and day of the week is the prime time for buyers.

Once you sort the items by when they are ending, it’s time to scroll down the list and find the item you want that’s about to end in just a few minutes—or up to 30 minutes from now.
Waiting 30 minutes to bid on something isn’t such a bad thing if you get a smoking deal out of the wait.
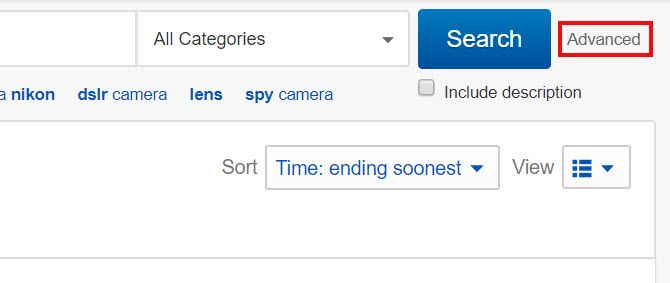
Advanced eBay Search Tips
Using eBay’s advanced search is the best tool in your arsenal for finding the best deals when you’re shopping online at eBay. Hit the Advanced link next to the search box to get started.
Here, you’ll see the sorts of things you’d expect: a search field, search terms to exclude (which is good if you’re looking for something very specific), the option to include searching descriptions as well as titles (do this!), different buying formats, and so on.
Use as many of these options as you need to find the exact listings you’re looking for.
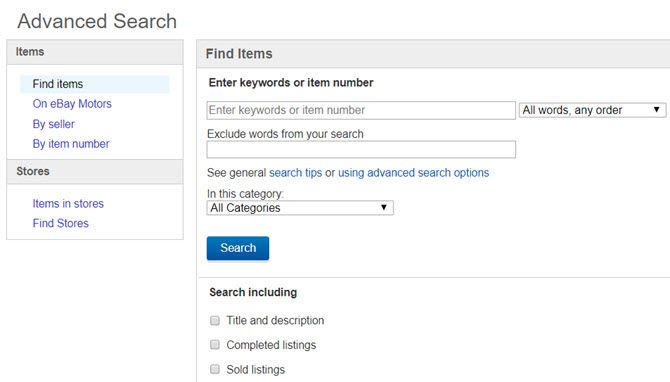
Some of the most useful options in the advanced search are:
- Search including title and description
- Condition
- Listings ending within [time]
- Best offer
- Free shipping
Which ones you select will depend on how specific you want your search to be.
One more quick search tip has to do with categories. When you search for an item, eBay automatically selects and searches a specific category.
When I searched for Fury of Dracula, a board game, eBay selects “Board games > Contemporary manufacture”.
Be sure to set this drop-down to “All categories” to find items that have been listed in the wrong category, as they might have better prices.
Once you find the item that you want, then it’s time to move on to the next phase of your research before you place a bid.
Researching the Seller on eBay
Pro-tip #3: When you find the perfect item, don’t just bid on it immediately.
You need to do your homework or else you’ll end up in a bad situation. Make sure you know everything there is to know about the seller.
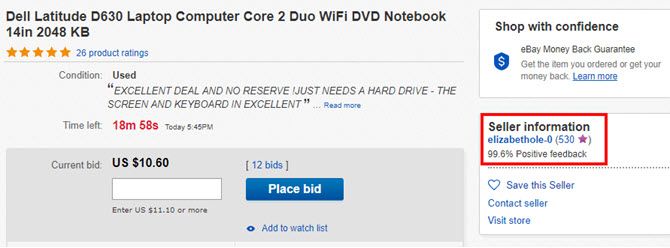
See the seller information just off to the right of the “Current Bid:” area of the auction.
Make sure you pick an item with at least 15 minutes or so remaining so you have the time to do your seller and item research.
First, click on the number next to the seller name. That’ll take you to the seller feedback page.

I know a lot of people who are heavy into eBay online shopping who only buy from sellers that have 100% feedback rating for the last 12 months. That might give you nearly perfect odds to never have any issues with anything you purchase on eBay, but it can also really limit what you can bid on.
The truth is, there are a whole lot of fantastic sellers who, through no fault on their part, ended up getting negative feedback from bad buyers.
You can identify patterns like this pretty quickly when you examine the feedback ratings for buyers, which are broken up into 1 month, 6 month and 12 month sections. For example, this buyer had only two negative feedback ratings within the last 12 months.
Of course, it’s always a good idea to scroll down and see what those were all about. In this example, it looks like the feedback ranking for this particular seller is pretty stellar despite the fact that the overall rank score is 99.6%.
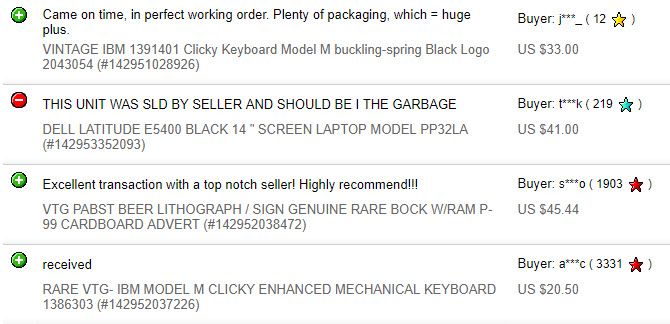
Given the overwhelming number of positive feedback rankings, I think it’s safe to say that this particular negative score was probably the fault of the buyer, not the seller.
Researching the Item on eBay
Once you’re satisfied with the seller, it’s time to research the item.
Pro-tip #4: Don’t just scan the item quickly, because there may be some details about the item that you want to know about before you buy it. Remember, this is likely someone selling a used item right from their home—so it’s probably not going to be perfect. Make sure you know about every imperfection.
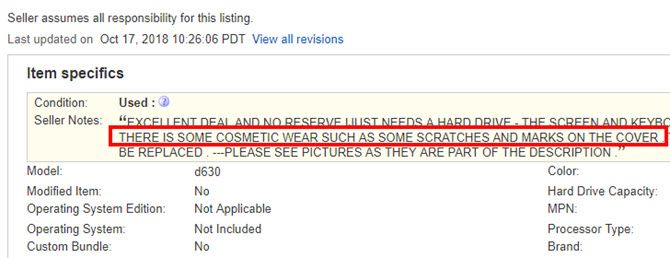
Most good sellers will make sure to note any imperfection.
Another important factor to check is the shipping. You’ll find this when you scroll down to the description area. Just click on the Shipping and Payments tab.
Different sellers have different methods of shipping—and sometimes they might actually overcharge.
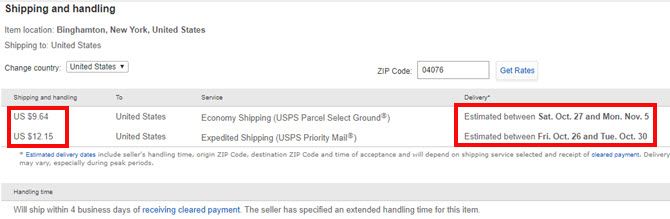
Beyond the shipping cost, check out where the item location is (at the top of the shipping page) so you have some realistic idea of how long it’ll take to get to you.
You’ll also want to scroll down a little further to Payment Details. Make sure the seller accepts the form of payment you want to use.
How to Snipe on eBay and Win Every Time
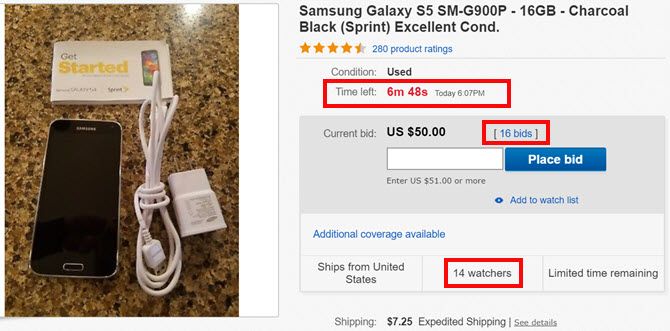
Pro-tip #5: If you bid in a certain way, you’re nearly guaranteed to win the auction.
This is especially important if the item is being closely followed by a lot of interested people, like the one shown here.
The first thing to do is make sure you’re properly logged into eBay. The last thing you want is a login-request at the last second when you want to bid.
Then, right click on the “Place bid” button and open it in a new window.
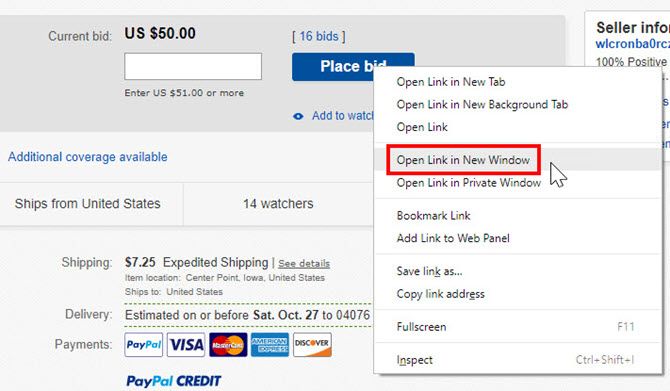
Move that window over to the side. Even better, to a different screen so you can watch the timer countdown on the item page itself.
Type in your maximum bid in the “Your max bid:” field.
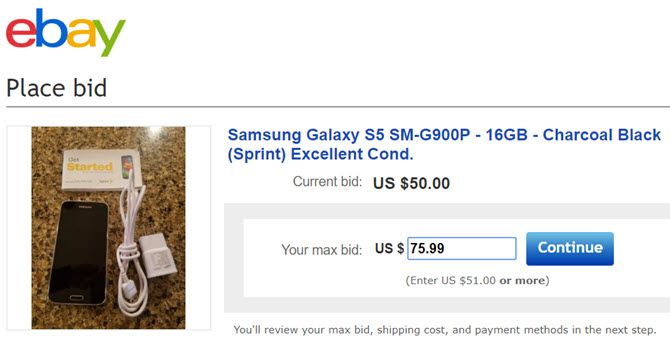
Don’t mess around here. Stretch yourself as far as you’re willing to go.
For example, in the case above, I only wanted to bid $75 at the most. Now, sure I could bid exactly $75, but if there’s anyone else looking for the laptop at the same price, they’re likely going to bid $75, $75.01, or $75.50. These are the most common ways people try to win at a certain price. To outbid all of those folks, bid $75.99. Then click Continue.
Now that you’re on the “Confirm Bid” page, it’s just time to wait for the countdown.
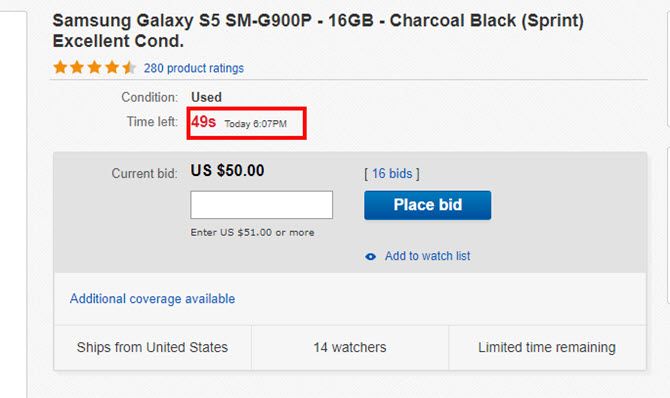
This is the important part, and it’s where most people freak out and bid too early.
On the very last confirmation page, you’re just one step away from officially placing your bid. Wait until the very last moment, providing only enough time for computer and Internet lag—about 3 to 4 seconds.
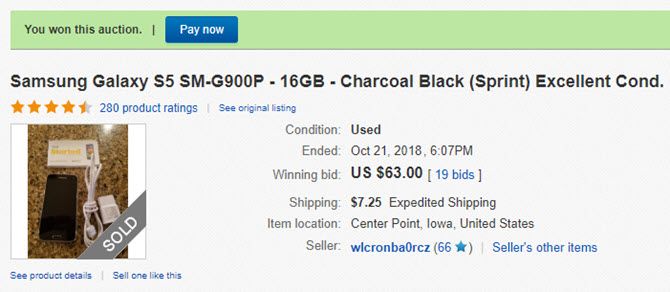
When the clock clicks down under 15 seconds or less, just go ahead and click the “Confirm Bid” button. Wait for the confirmation page that you’re the winner of the auction. Congratulations!
For even more success, check out our full article on using automatic bids and snipes to win auctions on eBay.
Image Credits: gpointstudio/Shutterstock
Read the full article: 5 Critical eBay Online Shopping Tips You Must Know
from MakeUseOf https://ift.tt/2RpN6dU
via IFTTT
WhatsApp Video Calling Guide: Everything You Need to Know

WhatsApp connects over a billion users around the world. They’re able to communicate through text messages or by using WhatsApp voice calling. And like any instant messenger, WhatsApp has a robust video calling feature as well.
What to Know About WhatsApp Video Calls
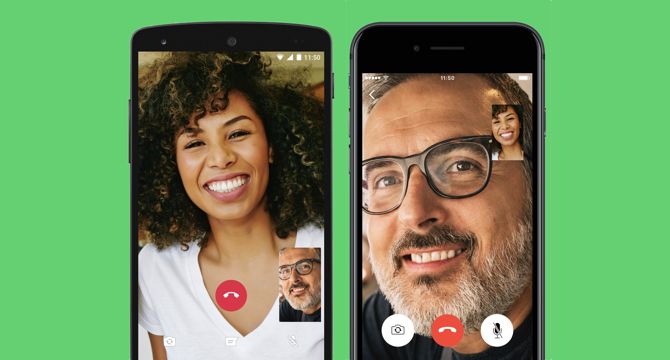
Video calling is exactly what it sounds like. You “call” a contact you have on WhatsApp, and both of you can see each other on your smartphone screens. It’s what Skype has been doing for years.
WhatsApp video calling works across both Android and iOS. This makes WhatsApp one of the best smartphone apps for cross-platform video calls.
WhatsApp video calling is technically free, in the sense that WhatsApp isn’t charging you any money to make the call. However, video calls require an internet connection, so they will be consuming data from your phone’s data plan. If you are using WhatsApp to call someone over a Wi-Fi connection, your phone’s network carrier (e.g. AT&T, Vodafone, etc.) won’t charge you anything. A quick reminder, you can check how much data WhatsApp is using thanks to these WhatsApp tricks everyone should know.
To ensure you get all the features, download the latest version of WhatsApp.
Download: WhatsApp for Android | iOS (Free)
This is the only official way to get WhatsApp video calling. Don’t fall for WhatsApp scams that offer other ways to get the feature.
What You Can Do With WhatsApp Video Calls
WhatsApp video calls are part of the existing voice calls feature. Placing a video call is pretty simple. Tap the contact you want to talk to, and tap the video camera icon next to their name.
The other person can answer the call (swipe up the blue button), reject the call (swipe up the red phone button), or reject the call and send a text instead (swipe up the message button). If they answer, you’re ready to go.
By default, WhatsApp video calls use the front-facing camera of your phone. However, you can switch this to the rear camera at any point with a tap on the screen. It’s seamless and just works.
You can also mute the microphone, so the other person can see you but not hear you. To mute the audio from the speakers, use your phone’s volume buttons.
Better Internet Speeds for WhatsApp Video Calls
Whenever you make a video call, WhatsApp does not assume any internet speed. So it will calculate your speed each time, and adjust the video quality accordingly. This makes a remarkable difference to how good the video looks.
One Redditor made a short video (linked above) comparing WhatsApp video calls with Apple’s FaceTime. WhatsApp looks far better in that particular battle.
We tried WhatsApp video calling on 4G, 3G, and 2G networks, and it worked on all three. The 2G network’s video quality was poor and pixelated, but it was still smooth enough to know what was happening on screen. The lack of lag was refreshing.
Multitasking While on a WhatsApp Video Call

The second highlight of WhatsApp’s video calls is the multitasking feature. Most smartphone video calls force you to use the video call and nothing else. You can’t multitask. However, WhatsApp has no such restrictions.
You can tap the “Message” button at any point to check other messages that someone has sent you on WhatsApp, and even reply to them. To return to your video call, just tap the green bar at the top of the app.
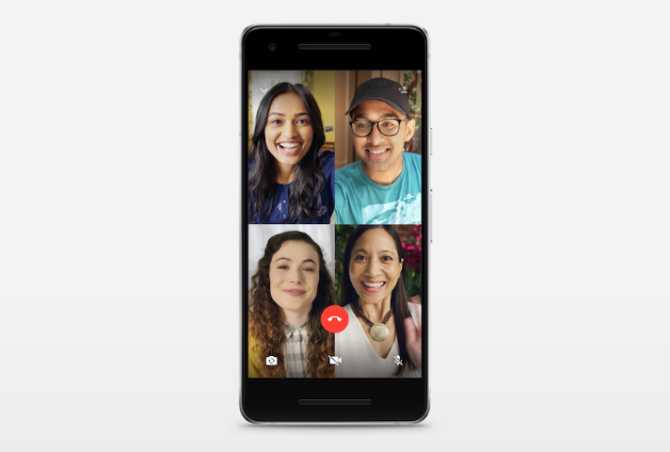
Group WhatsApp Video Calls
You can make a WhatsApp video call with up to four people at the same time. Group video calls obviously consume more data as well.
To place a group video call, first start a one-on-one call with anyone in your contact list. Then tap the “Add Participant” button (it looks like a person’s icon, with a plus sign next to it) in the top-right corner of the screen. Now choose another person to invite, and repeat the process for up to four people in total.
It’s simple and easy, but the four-person restriction is annoying. Plus you need everyone else to have WhatsApp too. While it’s good for an informal chat, we still think Appear.in is the best option if you want to talk to more people, without any sign-ups or app requirements.
No WhatsApp Web or Desktop Support

Currently, WhatsApp video calls are not supported on WhatsApp Web or the desktop app.
While WhatsApp requires a smartphone and an active internet connection, you can still use it on a computer. You can do it via the WhatsApp desktop client or the WhatsApp Web client. However, neither of these support video calls.
On the other hand, apps like Skype or FaceTime are available on both computers and phones, and can make video calls between a computer and a phone.
How Much Data Do WhatsApp Video Calls Use?

WhatsApp’s focus is to make the video call look as good as possible. So if it can give you higher quality, it’s going to do that. And that results in high data usage. If you’re not on Wi-Fi, this can quickly eat through cellular data caps.
On average, we found a minute’s call to use 5MB of data on 4G, 3.75MB on 3G, and 3MB on 2G. This isn’t bad at all, and much less than what we expected. A few Twitter users also recorded similar numbers.
10 minute WhatsApp video call on 4G LTE = 50.9MB data
Isn't this too much? @BandwidthBlog pic.twitter.com/d5iO3BOArp
— kabelo ? (@Kabelo_Moagi) November 2, 2016
WhatsApp’s settings have an option to reduce the data used on voice calls. If you’re worried about data usage, you can try this option to see if it also reduces video call data.
There’s Much More to WhatsApp
Video calling is an essential tool in any instant messenger, and WhatsApp has done a great job with it. The service is only improving with every passing day, and getting more stable and reliable.
That said, voice calling is just one small part of WhatsApp. There is so much more that the app offers, which makes it more than an instant messenger and actually turns it into a social network in its own right. In case you’ve missed some over the years, check out our list of the best new WhatsApp features.
Read the full article: WhatsApp Video Calling Guide: Everything You Need to Know
from MakeUseOf https://ift.tt/2Ptxbhe
via IFTTT
The Facebook Image Size Guide for 2018

Whether you’re trying to drive social traffic to your site or simply want your personal profile to look its best, you really need this Facebook image size guide.
From your profile banner to your holiday snaps, visuals really matter on the world’s largest social network. So we’re here to help you find the best image sizes to use on Facebook.
Unfortunately Facebook doesn’t make things easy, with some images appearing differently on mobile and desktop versions. But this Facebook image size guide should help you figure it all out.
Picking the Right Facebook Cover Photo Size

Size on Mobile: 640 x 360 pixels
Size on Desktop: 851 x 315 pixels
Best Size: 820 x 462 pixels
Since you can only use one size of image for both mobile and desktop, the ideal minimum cover size is: 820 x 462 pixels (an aspect ratio of 1.77:1). This size displays nicely on both mobile and desktop, and you can position your image precisely when you upload it using Facebook’s own tools. If you use a larger image that still conforms to the same aspect ratio, desktop and tablet users will see an improvement in quality.
The cover photo is the banner at the top of your Facebook page. It’s the first thing visitors will notice when they land on your profile or page, so it’s important to create a unique Facebook cover photo. Things work a little differently for personal profiles and business pages.
For personal profiles, your cover forms a background for your personal profile. On mobile your profile picture appears in the center of the cover photo. For pages, the two are entirely separate. Your cover photo is a chance to say something bold about your brand, while your profile image provides a small snippet of identity.
What’s the Best Facebook Profile Picture Size?

Mobile and Desktop: 180 x 180 pixels
Profile pictures are easy, since they’re square images. The image will display at 160 x 160 pixels, but Facebook asks for 180 x 180 pixels to scale down. You can basically use any square image you like, whether it’s large at 900 x 900 pixels or small at 200 x 200 pixels. Facebook will automatically resize and compress your image to fit.
Facebook Event Cover Image and Photo Sizes

Best Event Cover Photo size: 1920 x 1080 pixels
Photos in Event Feed: (up to) 470 x 470 pixels
Facebook displays event cover images differently on mobile and desktop, so an aspect ratio of 16:9 is recommended to avoid cropping. An image at full HD resolution will also give your cover enough clarity should anyone click on it from the event page. Feel free to go to an even higher resolution to pack in the pixels.
After checking a whole load of event pages out, it seems event organisers use slightly different sizes but ensure the important content (names, dates, venues) appear somewhat toward the center of the image. Images displayed on your event wall can go up to 470 pixels wide and high, depending on the shape of your image.
The Best Facebook Group Cover Photo Size

Best Cover Photo Size: 820 x 462 pixels
Despite only displaying at 820 x 250 pixels in the desktop news feed, the mobile version of Facebook shows the full 820 x 426 pixels group cover photo size. This is an aspect ratio of 1.77:1, so provided you stay within those boundaries you can create a higher resolution image which will fit perfectly.
Facebook Groups are an increasingly popular way to connect with friends, communities, and customers. And there are some awesome ways to discover new Facebook Groups. As always if you have any really important information that you don’t want hidden from view on desktop, make sure you account for the clipping that will occur at the top and bottom of the image.
What Is the Best Facebook Link Image Size?
Size on Mobile: 560 x 292 pixels
Size on Desktop: 470 x 246 pixels
Best Link Image Size: 1200 x 629 pixels
The link image is the image pulled from any link you happen to share on Facebook, such as a blog post or a news story. If you have control over the source medium (your personal blog, for instance) you can design your “featured” image to conform to the 1.9:1 ratio at a size of around 1200 x 629 pixels for the best results.
Other image sizes will be cropped to fit this template. Assuming your image is purely illustrative, and doesn’t require 100 percent accurate reproduction on Facebook (like text, or a logo) this shouldn’t worry you too much. If you’re looking for a good image for an article, check out the best websites for free stock images.
Choosing the Right Facebook Ad Size
Single image ads: 1200 x 629 pixels
Carousel ads: 1080 x 1080 pixels
Single image ads follow the same precedent set by link images, at a 1.9:1 ratio. If you just want to promote your product with a link to your product page or blog post, 1200 x 629 pixels is fine. For carousel ads, which let you run up to 10 images in a scrolling carousel, stick to the 1:1 image ratio at 1080 x 1080 pixels or higher.
Remember that promoted posts are different to adverts. If you click the “Boost Post” button on your Facebook page to boost a post, you aren’t bound by the same restrictions and don’t require a Facebook ad manager account.
This allows you to do things like create a new post with a square image, put a link in the body of the text, and promote it like you would an advert.
Facebook Is Always Changing
Like Google, nobody knows what Facebook is thinking. And it changes things up regularly. With that in mind it’s best to keep up with the news in order to keep ahead of any changes. The social media giant’s influence continues to grow, and growing with the service is something users will just have to get used to.
However, popularity can cause problems too. The social network’s biggest hack saw 50 million accounts compromised, so make sure you know what to do if your Facebook account has been hacked.
Image Credit: ifong/Depositphotos
Read the full article: The Facebook Image Size Guide for 2018
from MakeUseOf https://ift.tt/2RoGqfQ
via IFTTT
How to Disable Access to the Settings App and Control Panel in Windows 10

The PC Settings app and the Control Panel allow you to change many different settings in Windows 10. But you may not want all users of a computer to be able to change the settings once they’re set.
For example, you may change specific settings for a child account and then prevent them from accessing settings to reverse your changes. Or maybe you’re setting up computers in a networked environment and you want to set default settings and prevent users from changing them.
Today we’ll show you how to disable access to both the PC Settings app and the Control Panel using the Registry Editor and the Local Group Policy Editor.
First, Change the User Account Type
To disable access to the Settings app and Control Panel, the account you’re changing this for must be an Administrator account. You can temporarily change the account to an Administrator account if it’s a Standard account. But don’t forget to change it back to a Standard account to prevent the user from re-enabling access to the Settings app and Control Panel.
Method 1: Using the Windows Registry
You can use this method of disabling the Settings app and the Control Panel no matter which edition of Windows 10 you’re using. If you’re using Windows 10 Pro or Enterprise, and you’d rather use the Local Group Policy Editor, see the next section.
Making changes to the registry can be risky. The change we talk about here is simple if you stick to our instructions. But it’s a good idea to back up the registry before making changes. You should also make sure you back up your data and consider creating a system restore point.
To revert changes you’ve made to the Windows registry, you can reset the registry to the default values.
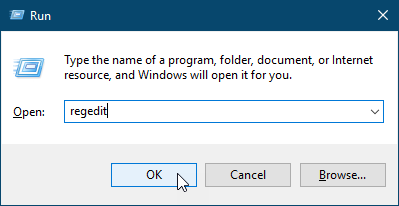
To disable the Settings app and the Control Panel, press Windows key + R to open the Run dialog box. Type regedit in the Open box and click OK.
If the User Account Control dialog box displays, click Yes to continue. You may not see this dialog box, depending on your User Account Control settings.
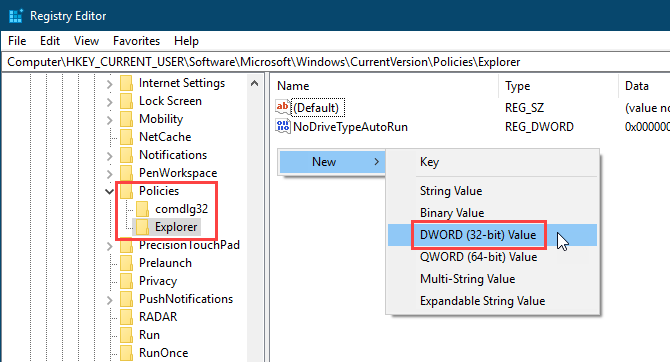
In the tree structure on the left side of the Registry Editor window, navigate to the following key:
HKEY_CURRENT_USER\Software\Microsoft\Windows\CurrentVersion\Policies\Explorer
Then, right-click on the right side and go to New > DWORD (32-bit) Value.
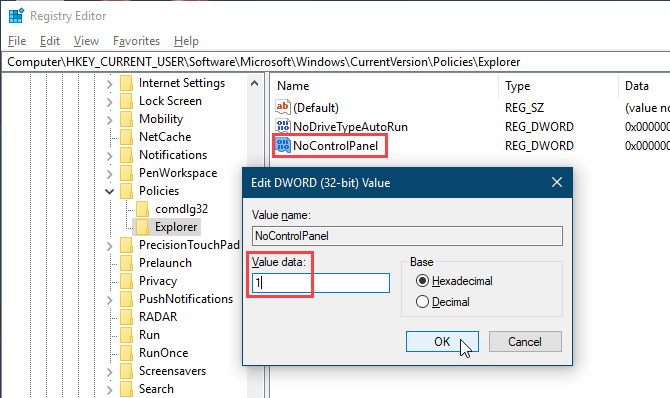
Name the new key NoControlPanel and double-click on it.
On the Edit DWORD (32-bit) Value dialog box, type 1 in the Value data box and click OK.
Sign out and back in or reboot your computer to finalize the change.
To revert the change, open regedit, go back to the key mentioned above, and change the NoControlPanel value to 0, or delete the NoControlPanel value.
Download Our Ready-Made Registry Hack
If you’re running Windows Home, and you’re not comfortable making changes to the registry yourself, you can download our ready-made registry hack (ZIP File). We’ve included one REG file for disabling access to the Settings app and Control Panel and another REG file for enabling access again.
Simply double-click the appropriate REG file and click Yes on the User Account Control dialog box (if it displays). Then, click Yes on the first dialog box and OK on the second.
Make sure you sign out and back in or reboot your computer.
Method 2: Using the Group Policy Editor
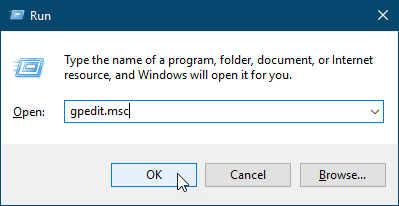
If you’re using Windows 10 Pro or Enterprise, you can use the Local Group Policy Editor to disable access to the Settings app and Control Panel.
Press Windows key + R to open the Run dialog box. Type gpedit.msc in the Open box and click OK.
In the tree list on the left side of the Local Group Policy Editor window, navigate to the following path:
User Configuration > Administrative Templates > Control Panel
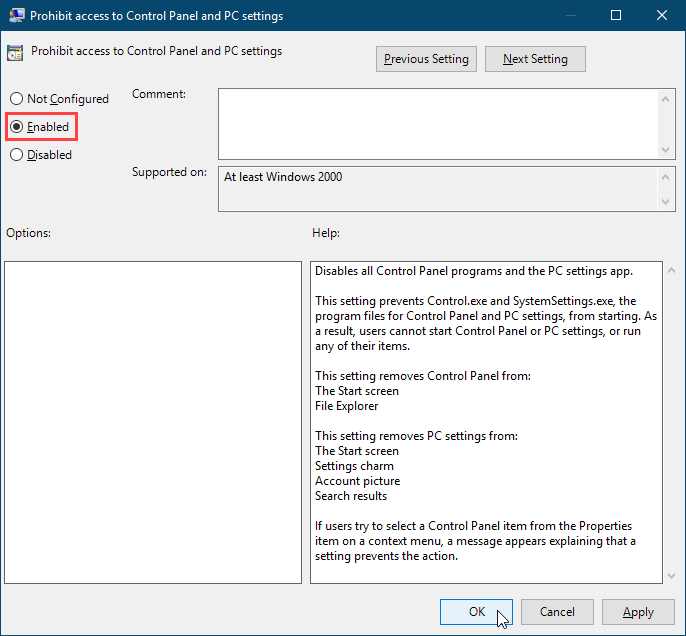
On the right side, double-click Prohibit access to Control Panel and PC settings.
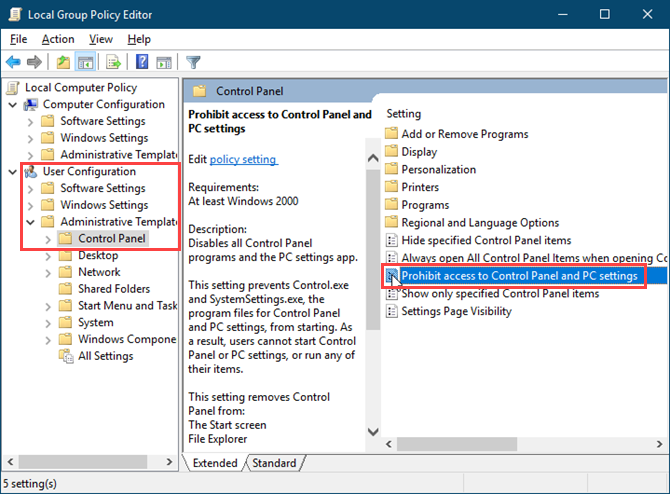
Select Enabled at the top of the Prohibit access to Control Panel and PC settings dialog box and click OK.
To enable access to the Settings app and Control Panel again, open the Local Group Policy Editor and navigate to the path mentioned above again. Then, select either Not Configured or Disabled.
Protect Your Windows Settings Even Further
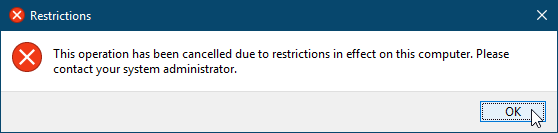
Once you use either of the above methods in a user account, that user will not be able to open the Settings app. Also, if they try to access the Control Panel, they’ll see the following dialog box.
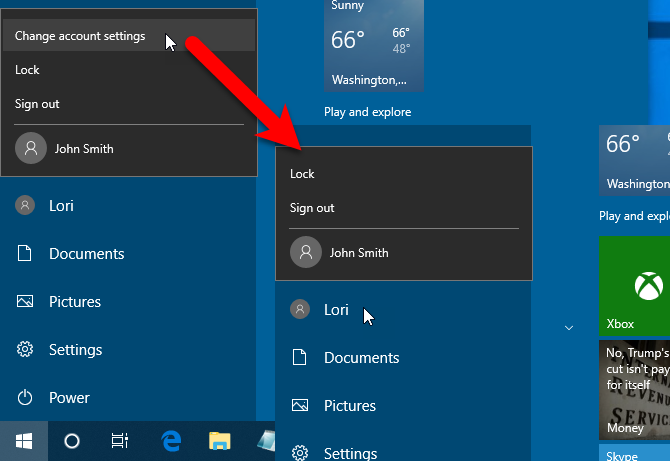
Windows also removes the Change account settings option on the Start menu’s user menu.
The ability to disable access to the PC Settings app and Control Panel is especially useful in a network environment where you want to have consistent settings on all the machines on the network and prevent users from changing them.
But, it’s just as useful if other people, like friends and children and other family members, use your computer. There are also other ways you can lock down user accounts in Windows 10.
Read the full article: How to Disable Access to the Settings App and Control Panel in Windows 10
from MakeUseOf https://ift.tt/2Dg4tuy
via IFTTT
Protect Your Privacy with 66% off Private Internet Access VPN
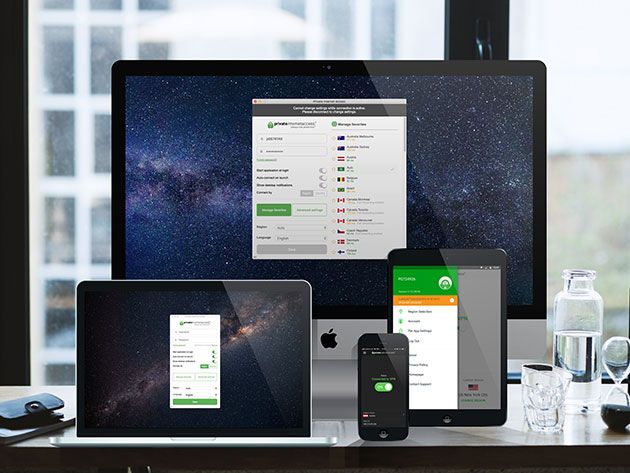
Keeping some kind of control over your personal data has become really challenging in recent times. If you value your privacy, it might be worth trying Private Internet Access VPN. This highly-rated service provides complete online protection, with advanced encryptions and zero browsing logs. Right now, you can get two years of service for $55.55 at MakeUseOf Deals.
Private Internet Access
As the name suggests, Private Internet Access is all about privacy. This VPN has a network of 3,160 masking servers around the world, helping you stay truly anonymous. When you’re connected, no-one can trace your IP address or physical location.
In addition, Private Internet Access VPN uses secure Blowfish CBC encryption to protect your data. As a consequence, you should be able to use public Wi-Fi networks with complete confidence.
As an added bonus, this VPN lets you bypass local restrictions and enjoy content from around the world. With servers in 33 countries, you can literally “pop up” anywhere. From Hulu to iPlayer, streaming just got a whole lot better.
Private Internet Access VPN has many other great features to offer, such as ad blocking and malware protection. The service works on macOS, Windows, Linux, iOS, Android, and many other platforms.
Two Years for Under $60
Worth $166, two-year subscriptions are now just $55.55. The price includes unlimited bandwidth on up to five devices.
Read the full article: Protect Your Privacy with 66% off Private Internet Access VPN
from MakeUseOf https://ift.tt/2Q1TqrD
via IFTTT
5 Best Diabetes Apps to Track Blood Sugar, Calculate Food, and Write Logbooks

About 425 million people in the world have diabetes, with 30 million in the US itself. Whether you’re newly diagnosed or you have lived with diabetes for years, these apps and resources can help you take care of yourself.
There are a few essentials to diabetes management that most of the top apps cover. For example, they will monitor blood sugar, create a logbook of your insulin dosage, track meals, and so on. Even if they’re sounding similar, try out the different apps because you never know which one is perfect for you.
Warning: When it comes to any medical topic, it’s important that you don’t rely solely on websites like MakeUseOf, or search for medial info online. Instead, you need to seek the help of medical professionals who can guide you. Based on the doctor’s advice, use the information in our article to make the best choices for you.
MySugr (Android, iOS): The Best Diabetes Management App
MySugr is the most recommended app for diabetics today, and a huge hit among Reddit communities about health. It has all the features you would need from a diabetes tracker.
The app is mainly a logger for blood sugar, medicines, meals, and other data. It’s a simple matter of keying in the data every time you do any diabetes-related activity, like checking your sugar level. The app includes reminders to check blood sugar so that you don’t forget about the task or about filling the data.
The ease of use is what sets MySugr apart from the rest. It’s easy to understand how to add things to the app. It’s easy to see your data in the form of charts. The app even distills it into simple English for you.
MySugr also has several other features, like a bolus calculator, which figures out how much of an insulin dose you should take. But the free version of the app only lets you calculate this five times before paying for future calculations. Try it out and see if such features are worth paying for.
Download: MySugr for Android | iOS (Free)
Diabetes:M (Android, iOS): Easy App for New Patients
As easy as MySugr is, it’s a little sad that it puts the bolus calculator behind a paywall. For those who are newly diagnosed with diabetes, figuring out the right insulin dosage is a major struggle. Diabetes:M is an all-in-one app that makes life easier for new diabetics.
The logbook tracks all your data, especially the glucose level, at multiple points of the day. You’ll need to add it manually, of course. This is helpful for the bolus calculator too.
To figure out the right insulin dose, you’ll need to add what you’re eating, how much you’re eating, and the measured blood glucose. Diabetes:M uses a database of food products with pre-determined levels of carbs, proteins, fats, and calories. It’s not perfect, but it’s decent enough, much like how fitness apps count calories. Once it has the data, it will calculate the best insulin dose.
Using it for the bolus calculator also has the additional benefit that you track everything you are eating, which is always useful for a doctor. You can view that data in the form of simple charts for free on the phone. But if you want to export them into Excel or PDF for the doctor, you’ll need to buy the premium version of Diabetes:M.
Download: Diabetes:M for Android | iOS (Free)
Center Health (Web, Android, iOS): Smart AI for Diabetes-Related Warnings

Center Health is fairly new on the market and so it has bugs and issues to fix, but with time, it could end up becoming the best app for diabetes management. It has everything that MySugr and Diabetes:M offer, but adds two more elements.
The one you should care about is Aria, a smart AI to analyze your logbook and warn you of trends. It’s more than just a reminder. For example, it will send you alerts when the injection you took might lead to you being hypoglycemic. Or it will look for patterns in your usage and point out when something is off. These are the types of things that might one day help AI diagnose health issues.
The other part that makes Center Health impressive is an add-on glucometer called the Nano, which plugs into your phone. The glucometer tests your blood sugar level and records it directly in the app. You no longer need to log it each time. But of course, this is a paid gadget, and you pay for the strips too.
Center Health also does one other thing right that we love: it plays nice with other apps. Whether you use Dexcom, Medtronic, Fitbit, Google Fit, Apple Health, or any other system, Center Health supports all of them to ensure your data is tracked and synced across platforms.
Download: Center Health for Android | iOS (Free)
AADE’s Checklists and Guides (Web): Printouts to Manage Your Diabetes

The American Association of Diabetes Educators is largely meant for medical professionals seeking to help patients manage the disease. But the site has a few resources for the patients directly, and they’re invaluable. There are two pages you should check.
The AADE Self-Care Behaviors page is a series of guides for people living with diabetes. The guides are divided into Healthy Eating, Being Active, Monitoring, Taking Medication, Problem Solving, Reducing Risks, and Healthy Coping. Go through each for valuable information that you can trust.
Then, check the Tools and Resources page. The AADE has a series of checklists and handouts to navigate common diabetic issues. This includes everything from medicinal checklists to printouts for healthy holiday eating. These small steps will help in living a better life.
We recommend you always seek out a medical professional for health advice, or only refer to trusted medical organizations like the AADE. If you have a small query that you don’t want to bother a doctor for, then here’s how to safely research health issues online.
Diabetes Daily (Web): The Best Forum for Diabetes Discussion and Help
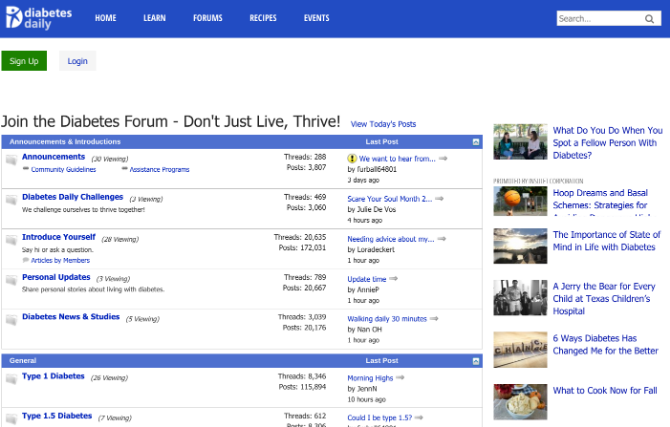
With any chronic disease, it’s best to get yourself a support group for the long haul. Seek help in real life, and seek help online through communities and forums. Diabetes Daily has made a name for itself as one of the best forums for diabetics.
There are different sub-forums to discuss the different types of diabetes, as well as specific parts about the experience, such as daily living factors, complications, non-traditional treatments, money, and insurance, etc. Hop on, be polite, and follow the general rules of asking strangers for help on the internet. You’ll gain some cheerleaders and supporters in no time.
Apart from the forum, the Diabetes Daily website also has essential information about the disorder. You can read the latest news about things related to diabetes, get beginner’s guides and resources, and plenty of information related to diabetic diets.
Make Sure You’re Eating Right
Apart from monitoring your health statistics, the biggest daily task of living with diabetes is managing your food intake. What you eat, and when you eat it, is going to affect your health more than any other aspect.
That’s why we put together a simple guide to cooking for diabetics. Here, you will find websites and apps that give you diabetic-friendly recipes, as well as YouTube channels and tips. Don’t miss this one.
Read the full article: 5 Best Diabetes Apps to Track Blood Sugar, Calculate Food, and Write Logbooks
from MakeUseOf https://ift.tt/2AyXslT
via IFTTT