
The PC Settings app and the Control Panel allow you to change many different settings in Windows 10. But you may not want all users of a computer to be able to change the settings once they’re set.
For example, you may change specific settings for a child account and then prevent them from accessing settings to reverse your changes. Or maybe you’re setting up computers in a networked environment and you want to set default settings and prevent users from changing them.
Today we’ll show you how to disable access to both the PC Settings app and the Control Panel using the Registry Editor and the Local Group Policy Editor.
First, Change the User Account Type
To disable access to the Settings app and Control Panel, the account you’re changing this for must be an Administrator account. You can temporarily change the account to an Administrator account if it’s a Standard account. But don’t forget to change it back to a Standard account to prevent the user from re-enabling access to the Settings app and Control Panel.
Method 1: Using the Windows Registry
You can use this method of disabling the Settings app and the Control Panel no matter which edition of Windows 10 you’re using. If you’re using Windows 10 Pro or Enterprise, and you’d rather use the Local Group Policy Editor, see the next section.
Making changes to the registry can be risky. The change we talk about here is simple if you stick to our instructions. But it’s a good idea to back up the registry before making changes. You should also make sure you back up your data and consider creating a system restore point.
To revert changes you’ve made to the Windows registry, you can reset the registry to the default values.
To disable the Settings app and the Control Panel, press Windows key + R to open the Run dialog box. Type regedit in the Open box and click OK.
If the User Account Control dialog box displays, click Yes to continue. You may not see this dialog box, depending on your User Account Control settings.

In the tree structure on the left side of the Registry Editor window, navigate to the following key:
HKEY_CURRENT_USER\Software\Microsoft\Windows\CurrentVersion\Policies\Explorer
Then, right-click on the right side and go to New > DWORD (32-bit) Value.
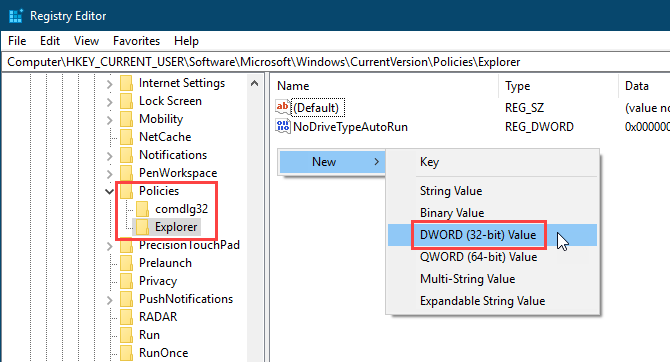
Name the new key NoControlPanel and double-click on it.
On the Edit DWORD (32-bit) Value dialog box, type 1 in the Value data box and click OK.
Sign out and back in or reboot your computer to finalize the change.
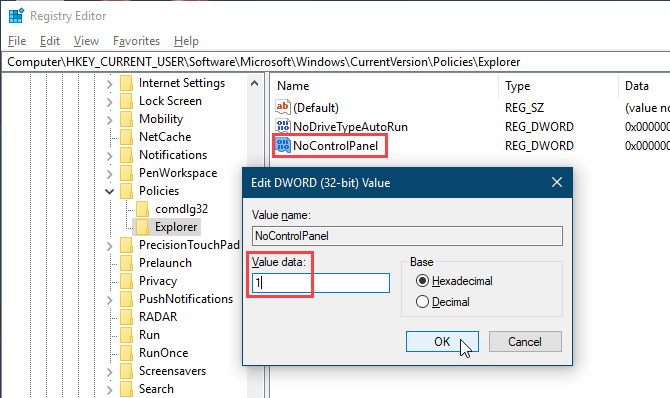
To revert the change, open regedit, go back to the key mentioned above, and change the NoControlPanel value to 0, or delete the NoControlPanel value.
Download Our Ready-Made Registry Hack
If you’re running Windows Home, and you’re not comfortable making changes to the registry yourself, you can download our ready-made registry hack (ZIP File). We’ve included one REG file for disabling access to the Settings app and Control Panel and another REG file for enabling access again.
Simply double-click the appropriate REG file and click Yes on the User Account Control dialog box (if it displays). Then, click Yes on the first dialog box and OK on the second.
Make sure you sign out and back in or reboot your computer.
Method 2: Using the Group Policy Editor
If you’re using Windows 10 Pro or Enterprise, you can use the Local Group Policy Editor to disable access to the Settings app and Control Panel.
Press Windows key + R to open the Run dialog box. Type gpedit.msc in the Open box and click OK.

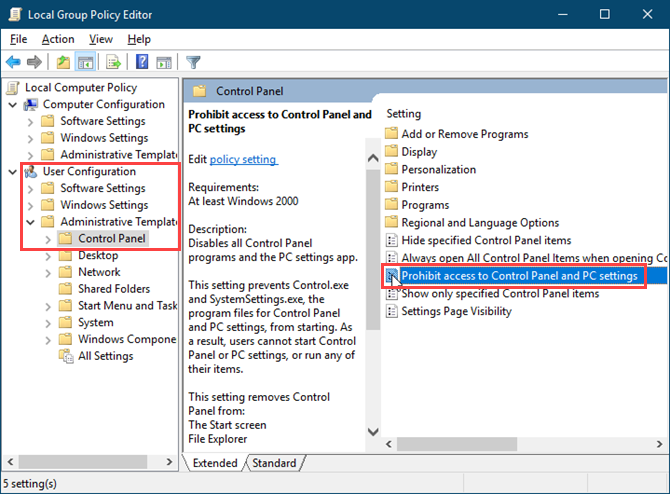
In the tree list on the left side of the Local Group Policy Editor window, navigate to the following path:
User Configuration > Administrative Templates > Control Panel
On the right side, double-click Prohibit access to Control Panel and PC settings.
Select Enabled at the top of the Prohibit access to Control Panel and PC settings dialog box and click OK.
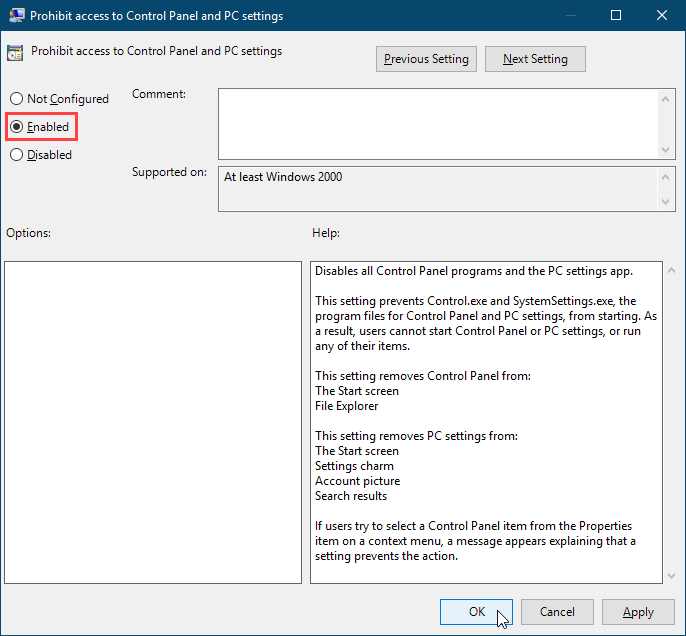
To enable access to the Settings app and Control Panel again, open the Local Group Policy Editor and navigate to the path mentioned above again. Then, select either Not Configured or Disabled.
Protect Your Windows Settings Even Further
Once you use either of the above methods in a user account, that user will not be able to open the Settings app. Also, if they try to access the Control Panel, they’ll see the following dialog box.

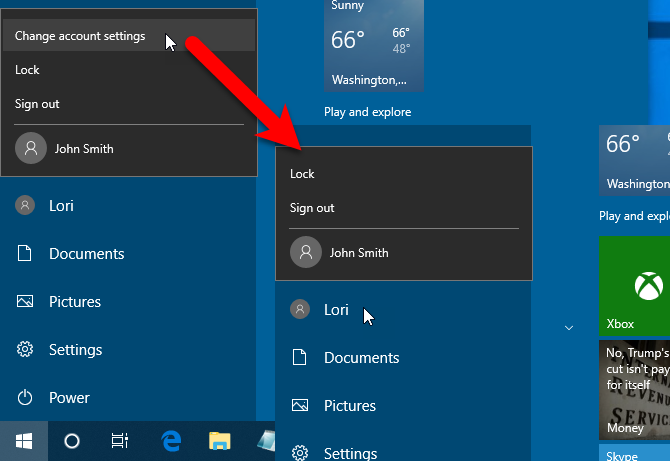
Windows also removes the Change account settings option on the Start menu’s user menu.
The ability to disable access to the PC Settings app and Control Panel is especially useful in a network environment where you want to have consistent settings on all the machines on the network and prevent users from changing them.
But, it’s just as useful if other people, like friends and children and other family members, use your computer. There are also other ways you can lock down user accounts in Windows 10.
Read the full article: How to Disable Access to the Settings App and Control Panel in Windows 10
from MakeUseOf https://ift.tt/2Dg4tuy
via IFTTT
No comments:
Post a Comment