While you can perform plenty of tweaks without it, experienced Windows users know that modifying the Registry can unlock many new features in Windows. And while the Registry gives you a lot of control over your system, it’s not the easiest utility to navigate.
If you often edit the Registry, chances are that you’ll find yourself visiting similar paths often. With a free utility called Registry Shortcuts, you can quickly jump to your most-visited Registry keys.
Just remember to be careful in the Registry so you don’t mess anything up.
How to Create Shortcuts to Registry Keys in Windows

- Visit the Registry Shortcuts homepage. Under the Download installer, download the 64-bit or 32-bit version depending on your system.
- Install the program. It doesn’t offer any options or third-party junk, so it should be ready in seconds.
Unlike most software, Registry Shortcuts has no interface you can open by searching for it. Instead, it adds a new entry to the right-click menu in File Explorer that only appears when you hold Shift to avoid clutter. - Open the Registry Editor by typing regedit into the Start Menu.
- Browse to a key you want to bookmark.
- Right-click the key in the left sidebar, and select Copy Key Name.
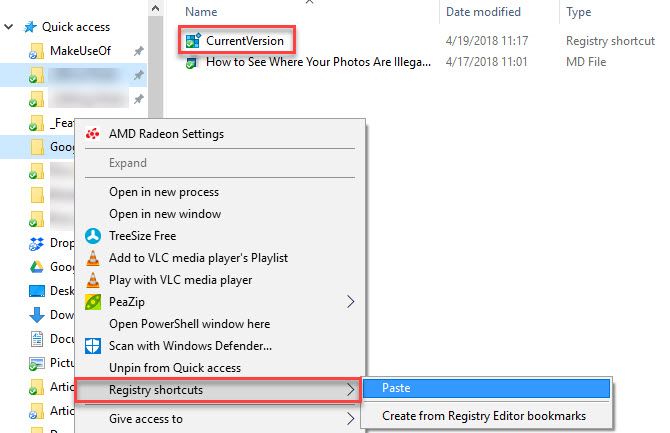
- Open a File Explorer window, then hold Shift and right-click any folder. You should see a new Registry shortcuts entry.
- Mouse over Registry shortcuts, then click Paste. This will add the key you copied as a new shortcut inside that folder.
- Now you can move that shortcut anywhere and use it for easy access to your favorite Registry keys.
If you select Create from Registry Editor bookmarks instead, you can easily create shortcuts to keys you’ve added to the Favorites menu in the Registry Editor.
For more, check out the best tools for working in the Registry.
from MakeUseOf https://ift.tt/2HOEj1B
via IFTTT
No comments:
Post a Comment