Friday, 31 August 2018

7 Ways to Customize Cortana in Windows 10

new-cortana-commands

Cortana is Microsoft’s virtual assistant that helps you improve your productivity. You can use it for many purposes like searching the internet or your computer, finding answers to questions, setting reminders for yourself, and managing your tasks.

Cortana can organize your life and you can ask it all kinds of things. You can also customize the look and behavior of Cortana. Today, we’ll show you seven ways to do just that.

Edit and Back Up the Windows Registry

For several of these customizations, you must make changes to the registry by adding and changing keys and values in the registry.

You should also back up the registry before making changes to it.

To revert changes you made to the Windows registry, you can reset the registry to the default values.

Restart the Explorer.exe Process

After making the changes to the registry that we talk about here, you must restart Windows Explorer. To do so, press Ctrl + Shift + Esc to open the Task Manager.

If a File Explorer window is currently open, select Windows Explorer under Apps on the Processes tab. If not, scroll to the bottom of the Windows processes list on the Processes tab and select Windows Explorer there.

Then, click Restart.

1. Add or Remove the Submit Button in the Cortana Search Box
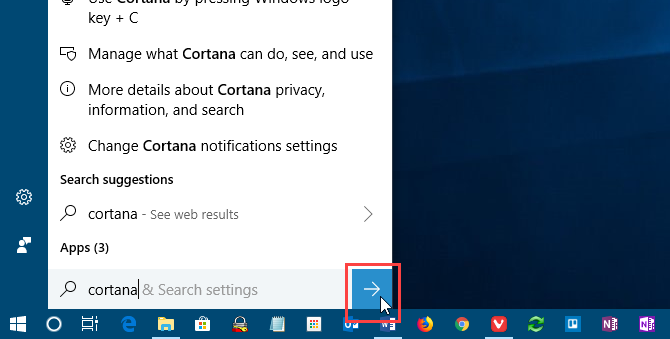
Cortana submit button

When using Cortana, you can enter your question or search term and press Enter to get results. But if you prefer using the mouse, you can display a Submit button on the right side of the Cortana search box and click that to get results.

Open the Registry Editor, navigate to the following key, and select Flighting.

HKEY_CURRENT_USER\Software\Microsoft\Windows\CurrentVersion\Search\Flighting

On the right, you’ll see two values, Current and RotateFlight. Make sure they are both set to 0 in the Data column.

Next, look for a key named ShowSubmitButtonRightOfSearchBox under the following key in the left pane. If it’s not there, create it.

HKCU\Software\Microsoft\Windows\CurrentVersion\Search\Flighting\0

Then, create a new DWORD (32-bit) Value named Value. Set Value to 1 to add the Submit button to the Cortana search box.

Close the Registry Editor and restart Windows Explorer.

To remove the button, change the Value for the ShowSubmitButtonRightOfSearchBox key to 0.

2. Change or Remove the Cortana Search Box Text
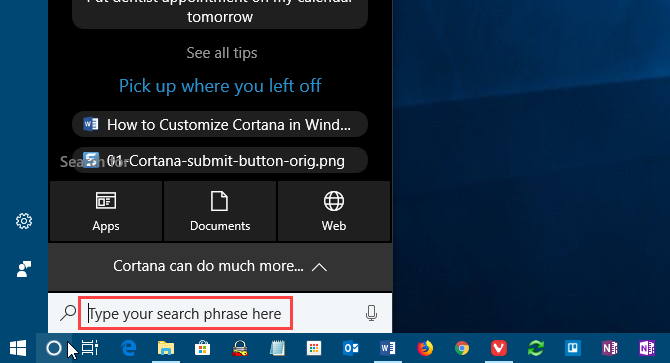
Change the text in the Cortana search box

Cortana shows some default text in the search box. It was “Ask me anything” at one point. Now it’s “Type here to search”. You can change this text or remove it if you’d rather see a blank search box.

Open the Registry Editor, navigate to the following key, and select SearchBoxText.

HKEY_CURRENT_USER\Software\Microsoft\Windows\CurrentVersion\Search\Flighting\0\SearchBoxText

Change the value of the Value key in the right pane to the text you want to see in the search box. To remove the text from the search box, change Value to just a space.

Close the Registry Editor and restart Windows Explorer.

3. Change the Cortana Search Box Background Transparency
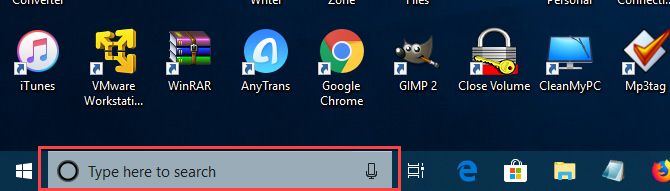
Cortana search box background transparency

By default, the background of the Cortana search box is semi-transparent. You can change this to opaque (white) or fully transparent. When the search box is fully transparent, the color of the Taskbar shows through it.

Open the Registry Editor, navigate to the following keys. If they don’t exist, create the SearchBoxTransparencyBackground key under both the 0 key and the 1 key under the Flighting key.

HKEY_CURRENT_USER\Software\Microsoft\Windows\CurrentVersion\Search\Flighting\0\SearchBoxTransparencyBackground

HKEY_CURRENT_USER\Software\Microsoft\Windows\CurrentVersion\Search\Flighting\1\SearchBoxTransparencyBackground

Then, create a new DWORD (32-bit) Value named Value. Set Value to one of the following values. Make sure you select Decimal as the Base on the Edit DWORD (32-bit) Value dialog box before entering the value.

  • 0 = Transparent
  • 60 = Semi-transparent (default)
  • 100 = Opaque (solid white)

Or enter any other value between 0 and 100 or a custom transparency level.

Close the Registry Editor and restart Windows Explorer.

To return to the default of semi-transparent, change the Value for the SearchBoxTransparencyBackground key to 60 or delete the SearchBoxTransparencyBackground key you added under both the 0 key and the 1 key under the Flighting key.

4. Change the Cortana Search Box Highlight Transparency
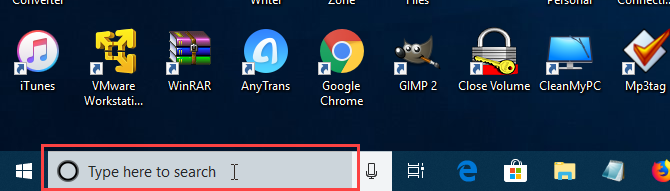
Cortana search box highlight transparency

When you move your mouse over the Cortana search box, a semi-transparent highlight displays on the box. You can change this highlight to be opaque (white) or fully transparent so the color of the Taskbar shows through.

Open the Registry Editor, navigate to the following keys. If they don’t exist, the SearchBoxTransparencyHighlight key under both the 0 key and the 1 key under the Flighting key.

HKEY_CURRENT_USER\Software\Microsoft\Windows\CurrentVersion\Search\Flighting\0\SearchBoxTransparencyHighlight

HKEY_CURRENT_USER\Software\Microsoft\Windows\CurrentVersion\Search\Flighting\1\SearchBoxTransparencyHighlight

Then, create a new DWORD (32-bit) Value named Value. Set Value to one of the following values. Make sure you select Decimal as the Base on the Edit DWORD (32-bit) Value dialog box before entering the value.

  • 0 = Transparent
  • 80 = Semi-transparent (default)
  • 100 = Opaque (solid white)

Or enter any other value between 0 and 100 or a custom transparency level.

Close the Registry Editor and restart Windows Explorer.

To return to the default highlight color of semi-transparent, change the Value for the SearchBoxTransparencyHighlight key to 80 or delete the SearchBoxTransparencyHighlight key you added under both the 0 key and the 1 key under the Flighting key.

5. Change the Cortana Search Box Text Transparency
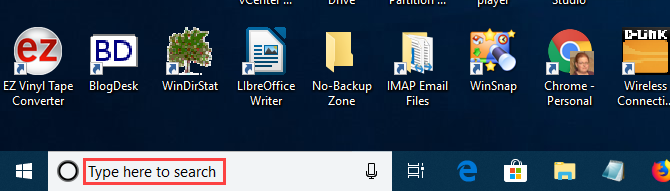
Cortana search box text transparency

The default text in the Cortana search box is semi-transparent. You can change this to opaque (white) or fully transparent. If you make the text fully transparent, it appears hidden.

Open the Registry Editor, navigate to the following keys. If they don’t exist, create the SearchBoxTransparencyForeground key under both the 0 key and the 1 key under the Flighting key.

HKEY_CURRENT_USER\Software\Microsoft\Windows\CurrentVersion\Search\Flighting\0\SearchBoxTransparencyForeground

HKEY_CURRENT_USER\Software\Microsoft\Windows\CurrentVersion\Search\Flighting\1\SearchBoxTransparencyForeground

Then, create a new DWORD (32-bit) Value named Value. Set Value to one of the following values. Make sure you select Decimal as the Base on the Edit DWORD (32-bit) Value dialog box before entering the value.

  • 0 = Transparent
  • 30 = Semi-transparent (default)
  • 100 = Opaque (solid white)

Or enter any other value between 0 and 100 or a custom transparency level.

Close the Registry Editor and restart Windows Explorer.

To return to the default highlight color of semi-transparent, change the Value for the SearchBoxTransparencyForeground key to 30 or delete the SearchBoxTransparencyHighlight key you added under both the 0 key and the 1 key under the Flighting key.

6. Change the Cortana SafeSearch Setting
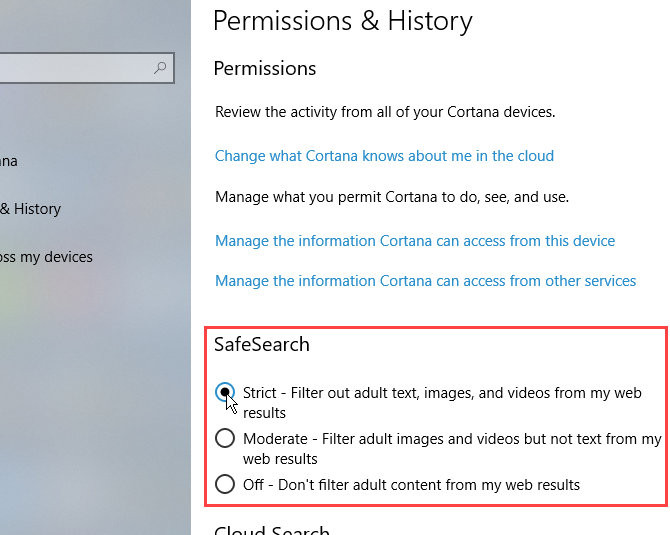
Cortana SafeSearch settings

Search engines like Google, Bing, and Yahoo have settings you can adjust to help keep your kids safe online. Cortana also has a SafeSearch feature.

By default, SafeSearch is set to the Moderate level. To change this setting, open the Start menu and click PC Settings.

Then, click Cortana, or Cortana & Search if you’re running the Windows 10 Insider Preview Build 17623 or later.

In the left pane, click Permissions & History. On the right, select Strict, Moderate, or Off under SafeSearch.

7. Show Cortana Web Search Results in Microsoft Edge or Internet Explorer
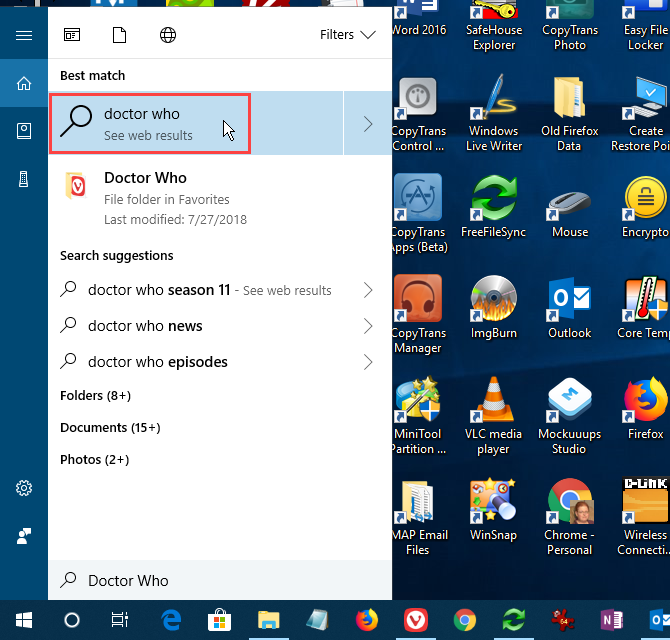
Open Cortana search results in Internet Explorer or Edge

When you do a search in Cortana and click on a web results option, those Bing search results are displayed in Edge by default. If you use a screen reader, you may want to open web search results from Cortana in Internet Explorer instead, where the results are optimized for screen readers.

To have Cortana web search results open in Internet Explorer, open Microsoft Edge.

Then, click the menu button (three horizontal dots) in the upper-right corner of the window and click Settings.

Scroll down to the bottom of the Settings pane and click View advanced settings under Advanced settings.

Click the Optimize taskbar web search results for screen readers slider button to turn it On.

Close Microsoft Edge. The next time you click on web search results in Cortana, they will open using Bing in Internet Explorer.

You can also force Cortana to use Google and Chrome, if you don’t like Bing and Edge or Internet Explorer.

Customize Cortana Further With Settings

Continue to work with Cortana and it will become a part of your workflow. Now that you’ve customized Cortana the way you want, try out some cool Cortana commands, or you can even create your own custom Cortana skills.

Read the full article: 7 Ways to Customize Cortana in Windows 10


from MakeUseOf https://ift.tt/2NxH35p
via IFTTT

Thursday, 30 August 2018

3 Ways to Edit the boot/config.txt File on Raspberry Pi

edit-config-raspi

You’re in the middle of a Raspberry Pi project, when all of a sudden you realize there’s something wrong: fixing it means editing the config.txt file, which is found in the /boot/ directory.

But what is the easiest way to access this file while the Raspberry Pi is still running? And if you have to shut down to retrieve the microSD card, how should you edit it? Here’s everything you need to know.

Why You Need config.txt on Raspberry Pi

Edit config.txt on the Raspberry Pi

The Raspberry Pi’s default operating system (and most of the alternatives) rely on some configuration parameters that are read when the computer boots from the microSD card. These are stored in the config.txt document, found in the /boot/ folder.

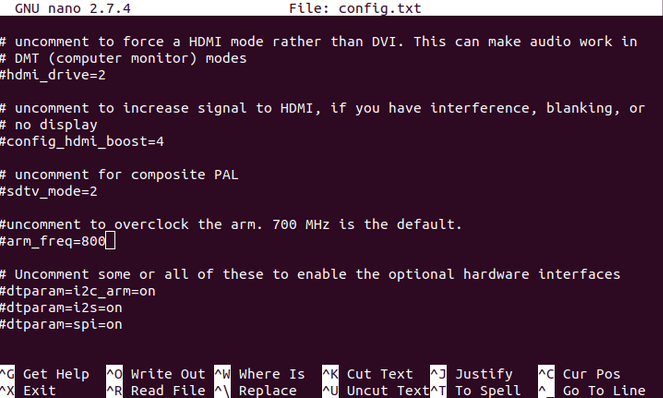
Such instructions might adjust the way the display is detected and the desktop displayed; config.txt can even be used to overclock your Raspberry Pi (or return to default clock settings).

Both of these settings are logged in config.txt as neither can be changed on a running Raspberry Pi. If the display isn’t detected, you cannot alter any desktop settings.

Similarly, if the Pi has been overclocked and won’t boot, or repeatedly restarts, you won’t be able to access raspi-config to reset it. Instead, config.txt is provided to give you the option of resetting your Raspberry Pi’s clock speed.

It’s also possible to alter the USB boot mode from within config.txt, just as it is to tweak audio settings.

1. Access config.txt From Within Raspbian

If you need to edit the config.txt file while Raspbian is running, you should be able to browse to it. You’ll find the /boot/ folder in the root directory of the microSD card. Once you’ve found it, simply double click to open, and edit it in your default text editor.

However, if you’re planning to edit the file, it’s a good idea to retain the original. Make a copy of the file using your file manager, giving it a different, but descriptive name. Once you’ve done this, you’ll easily be able to restore the original should run into trouble with the edited version.

You can also create a copy in the terminal using

mv config.txt backupconfig.txt

Again, give your copy a meaningful name. Note that when editing the config.txt file, no changes will be applied until you reboot your Raspberry Pi.

2. Edit config.txt Remotely

Rarely connect a keyboard to your Raspberry Pi? As long as the computer is on the network, you should be able to edit the config.txt file remotely. Do this by connecting via SSH (or VNC or RDP) and browsing to the /boot/ directory. You’ll need to use the

cd /

command to step up a level from the default /home/ directory in Raspbian. Here, use

ls

to list the contents of the root directory. Find /boot/ then

cd /boot

open it, again listing the contents. Here, you should find config.txt. To read or edit the text file, use the nano text editor, which comes preinstalled (although others are available).

sudo nano config.txt

Once the changes have been made, press Ctrl + X to save and exit. Remember to reboot your Raspberry Pi after making changes.

sudo reboot

3. Edit config.txt on Your PC

Linux, Windows, and macOS computers should be able to access the config.txt file via the microSD card. This means shutting down your Raspberry Pi (safely, in order to avoid data corruption) and ejecting the SD card. Insert it into your computer’s card reader to check the contents.

Edit config.txt on Linux PC

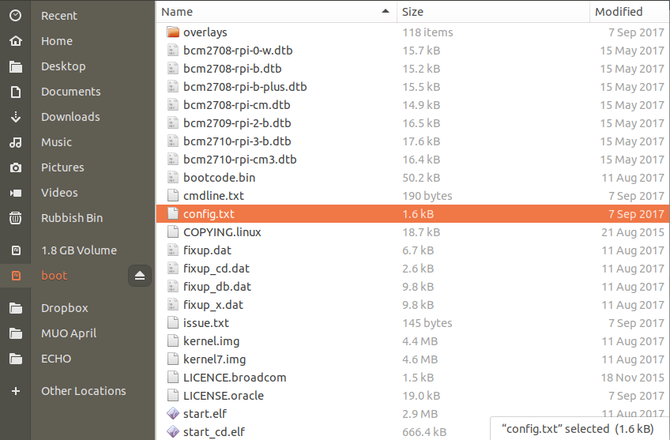
If you need to edit the config.txt file on a Linux PC, find the disk listed in your default file manager when inserted. It should be listed as two devices, the main volume (typically “1.8GB Volume” as per the size of the default Raspbian partition), and boot.

Edit Raspbian's config.txt file on a Linux PC

As you might have guessed, this is the volume you need to access. It is essentially the /boot/ directory mounted as a drive. Open this to find config.txt. Save any changes you make in your default text editor, then use the Eject button in the file manager to safely eject the SD card.

Edit config.txt on Windows 10

Inserting the Raspberry Pi’s SD card on a Windows computer should result in it being instantly mounted, and accessible via Windows Explorer. However, while two partitions will be displayed on the device, only one, boot, will be accessible in Windows.

Select this, then find config.txt. Use the default Notepad text editor to make edits (or an alternative, such as Notepad++), then save and exit when you’re done.

To safely eject the SD card, right-click the drive in My Computer, and select Eject.

Edit config.txt on macOS

If you’re using a Mac, you should find the card appears on your desktop when it is detected. Use the Finder to browse the contents, looking for a file called config (without the TXT file extension). Read and edit the file in the TextEdit app, ensuring that any changes you make are saved when you exit. To eject the card, drag the desktop icon to the Trash, or click Eject in Finder.

Whichever method you use to edit the config.txt from the microSD card read on your PC, remember to safely eject the device before returning it to your Raspberry Pi.

Tweaking Your Raspberry Pi Even Further

The config.txt file is just one of several ways to edit your Raspberry Pi’s general configuration. You’re probably already aware of the raspi-config screen, accessed via the terminal. There’s even a desktop-based Raspberry Pi Configuration Tool, found in the Preferences menu on Raspbian Jessie and Raspbian Stretch.

Tweaking the Pi’s configuration can save a lot of time if you get it right. To help ensure the computer is set up as you intend, why not take a look at the PiBakery? This is a software tool that uses a block-based approach to help you preconfigure various Raspberry Pi settings in Raspbian, from the Wi-Fi SSID and password to running custom scripts.

Read the full article: 3 Ways to Edit the boot/config.txt File on Raspberry Pi


from MakeUseOf https://ift.tt/2wGg6FB
via IFTTT

The Best Ultrabooks for Lightening Your Load

10 Hidden Features of Microsoft Outlook That Are Rarely Used

declutter-outlook

If you use Outlook, you already know it’s a useful program for managing your email and includes a lot of great features. Today we’re going to cover some lesser known Outlook features that could help improve your workflow.

1. Change the Number of Lines in Message Previews

Outlook Message Preview

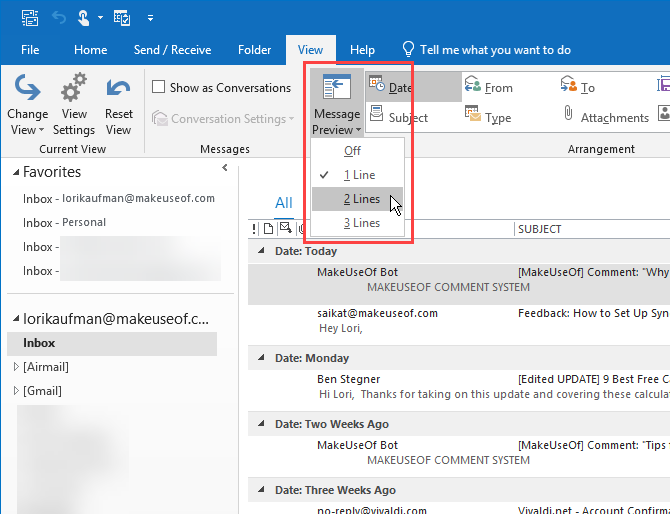
In the list of email messages, Outlook displays a preview of each message. This includes the sender and the subject line on the first line and then one line from the email message body below that by default.

You can change the number of lines from the message that displays in the list of messages.

Go to the View tab and click the Message Preview button. Then, select 1 Line (default), 2 Lines, or 3 Lines. Or select Off if you don’t want any of the email message displayed in the list.

You’ll be asked if you want to apply this setting to only This folder or All mailboxes.

The number of lines you select does not include the sender and subject line. So if you select 2 Lines, you ‘ll see three lines total: the sender and subject on the first line and then two lines of the email message body below that.

2. Choose Which Folder Displays on Outlook Launch

Change which folder opens when you start Outlook

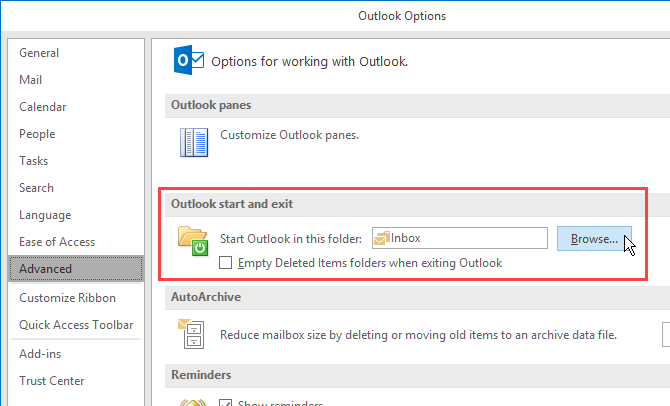
If you have multiple email accounts in Outlook, you can select which email account inbox you want displayed by default when you open Outlook. Or you can select another folder besides the inbox if you want.

Go to File > Options and click Advanced in the left pane on the Outlook Options dialog box.

In the Outlook start and exit section, click Browse. On the Select Folder dialog box, find the account you want and select the Inbox, or other folder you want to start Outlook in.

We found that this setting doesn’t always stick. Let us know in the comments if it worked for you.

3. Create a Search Folder

Outlook Search Folder

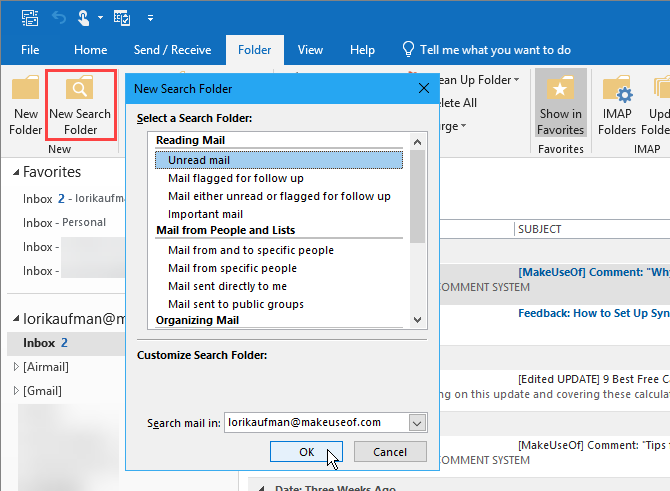
If you search for the same words and phrases in Outlook often, you can set up a virtual Search Folder that shows you a list of all items that match certain search criteria. Outlook provides some templates for Search Folders or you can create your own.

For example, the Unread Mail Search Folder shows you all your unread mail in one folder, even if they’re in different folders in your email account. The messages are not moved to the Search Folder, they’re only shown there. The original messages remain in their respective folders.

To create a new Search Folder, click New Search Folder in the New section on the Folder tab. Select a ready-made Search Folder template from the list or select Create a custom Search Folder under Custom at the bottom of the list.

If you’re creating a custom Search Folder, click Choose on the New Search Folder dialog box.

Then, enter a Name for the Search Folder on the Custom Search Folder dialog box. Click Criteria and specify the details of the search on the Search Folder Criteria dialog box.

If this is not working for you, we have some methods you can use fix Outlook Search.

4. Clean Up a Folder

Clean Up Folder in Outlook

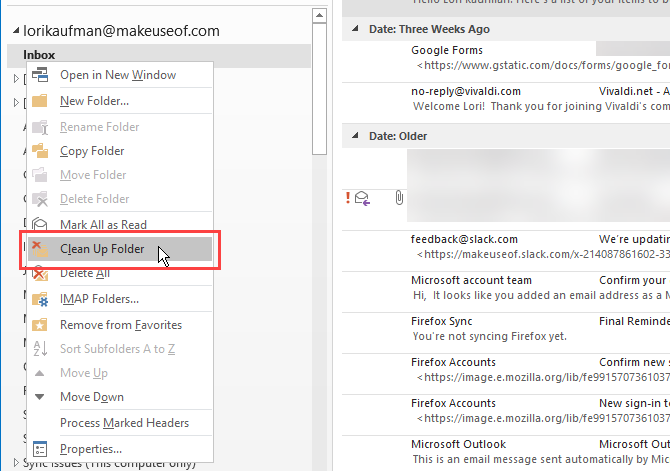
Outlook’s Clean Up Folder feature removes redundant messages in a thread or folder. Redundant messages are previous messages in a thread also quoted in the replies. Long email threads could end up with several copies of earlier messages that are quoted in each reply.

The Clean Up Folder command moves the redundant messages in the selected folder and its subfolders to the Deleted Items folder by default.

To use this command, right-click on the folder you want to clean up and select Clean Up Folder.

You can set the options for the Clean Up Folder command by going to File > Options > Mail > Conversation Clean Up. Select the folder you want the cleaned-up items to be moved to and enable or disable any other clean-up options you want.

5. Send an Email at a Future Date

Delay Delivery of an email in Outlook

Sometimes you need to write an email but not send it until a later time. Outlook’s Delayed Delivery feature allows you to easily do this.

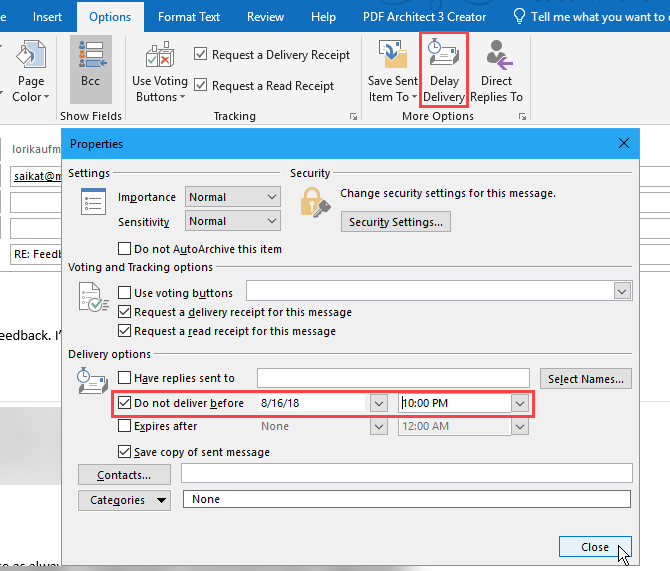
First, write your new email or reply to an email. Then, click Delay Delivery in the More Options section on the Options tab in the message window.

Under Delivery options, check the Do not deliver before box and select a date and time.

Select any other options you want and click Close.

Outlook stores scheduled email messages in your Outbox until they are sent when they are moved to your Sent folder.

If you change your mind and need to cancel the delayed delivery or change it to a different date and time, go to your Outbox and open the email message. Click Delay Delivery on the Options tab again and change the date and time for the Do not deliver before option or uncheck the box to disable delayed delivery.

6. Use Quick Steps

Quick Steps in Outlook

The Quick Steps section of the Home tab in Outlook provides one-click access to common actions. Microsoft provides some initial Quick Steps to start with, but you can also create your own.

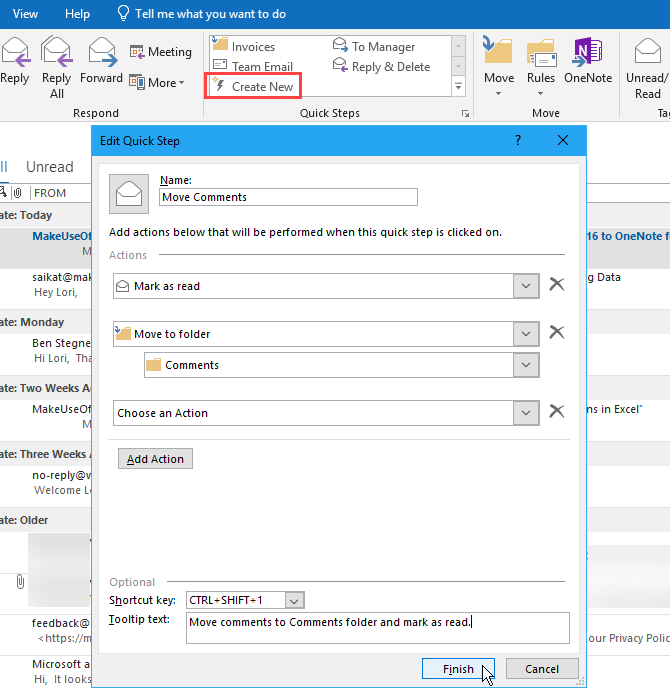
To create a custom Quick Step, click Create New in the Quick Steps section. On the Edit Quick Step dialog box, Name your Quick Step.

Then, select an action from the dropdown list and click Add Action. Keep adding other actions you want to take in the same Quick Step, clicking Add Action after each one.

For example, you can set up a Quick Step to mark selected email messages as read and then move them to a certain folder.

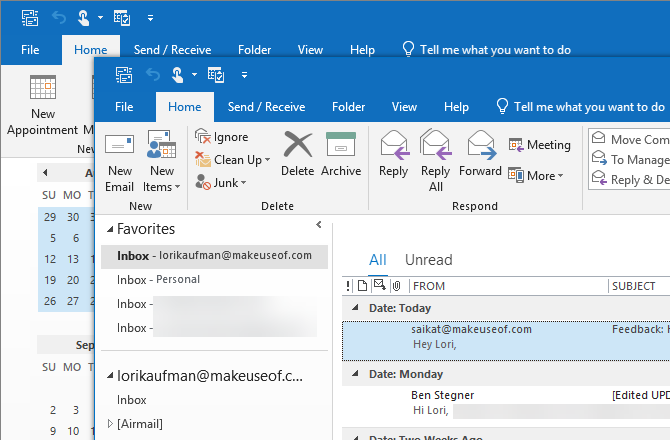
7. Open Multiple Outlook Windows

Multiple Outlook windows

If you use Outlook for email, scheduling, and tasks, you might want to open multiple Outlook windows. That allows you to see your email, calendar, and tasks at the same time instead of using the navigation buttons to keep switching views.

To open another Outlook window, right-click on the Outlook icon on the Taskbar and select Outlook 2016. Position the windows how you want.

When you close Outlook, go to File > Exit on any of the open windows. Do not click the X in the upper-right corner of any of the windows. Outlook will open the next time with the same number of windows and in the same position they were in when you exited Outlook.

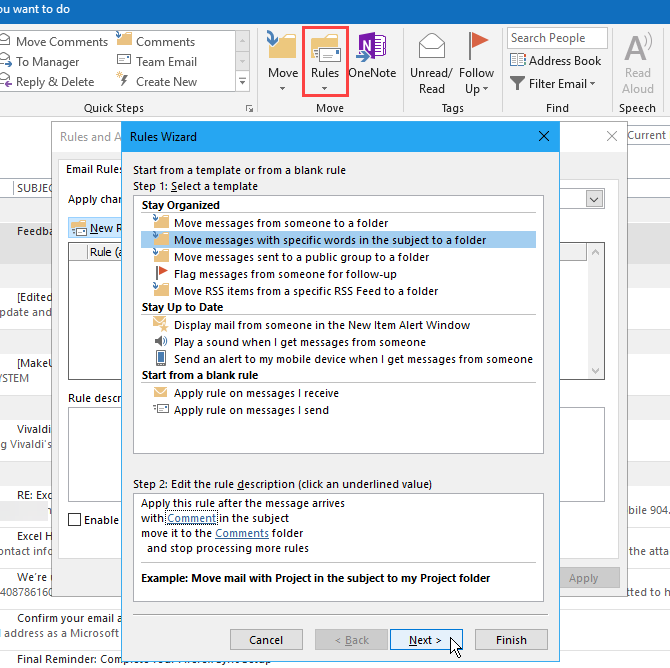
8. Create and Manage Rules

Outlook Rules Wizard

You may not always like playing by the rules, but rules in Outlook can be very useful. They allow you to set up specific events to happen automatically based on actions that occur.

For example, you may want to move messages with specific words in the subject line or from a specific person to a folder and mark the messages as read at the same time. You can create a rule to do all that at once as you receive messages.

To create or manage rules, click Rules in the Move section on the Home tab and select Manage Rules & Alerts. The Rules and Alerts dialog box allows you to create, change, and manually run rules.

Click New Rule to create a rule and then follow the steps in the Rules Wizard.

One feature lacking in Outlook is the ability to automatically BCC yourself on emails. But you can get around this limitation using rules.

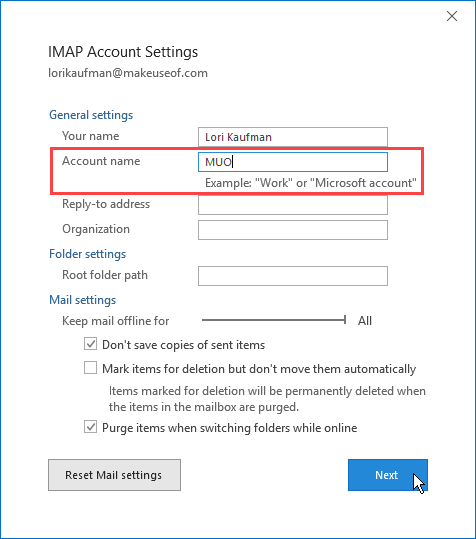
9. Change Your Account Name

Change an account name in Outlook

When you add an email account to Outlook, the default name for the account is your email address, which displays in the left pane. But you can change the account name to a more descriptive one that would make it faster to spot the account you’re looking for. Helpful if you have a lot of email accounts in Outlook.

To change an account name, right-click on the current account name in the left pane (not the Inbox for the account) and select Account Properties. Or go to File > Info (the Account Information screen).

Then, go to Account Settings > Account Settings and make sure the Email tab is active on the Account Settings dialog box. It should be by default.

Select the account in the list you want to change the name for (if it’s not already selected) and then click Change.

Change the Account name under General Settings on the Account Settings dialog box. Click Next and then click Done.

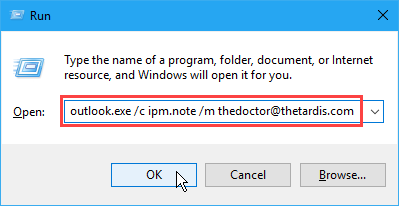
10. Use Outlook Command Line Switches

Outlook command line switches

Outlook provides command line switches that allow you to perform various operations. If you prefer using the keyboard rather than the mouse, you can speed up operations in Outlook using the command line switches. They can also help you troubleshoot problems in Outlook.

We’ve covered 25 Outlook 2016 command line switches you should know.

For example, you can create a new email message with a recipient by opening the Run dialog box (Windows key + R) and entering the following command in the Open box, replacing the email address with your recipient’s address.

outlook.exe /c ipm.note /m thedoctor@thetardis.com

Tools to Make Outlook Even More Useful

If all the great features in Outlook, even the lesser known ones, are not enough for you, we’ve covered some useful third-party Outlook tools that add functionality to Outlook or improve existing features.

Also, don’t forget that alongside the great features there are many Outlook shortcuts that can help you save time.

Read the full article: 10 Hidden Features of Microsoft Outlook That Are Rarely Used


from MakeUseOf https://ift.tt/2N9Rwap
via IFTTT

How to Find Insanely Cheap Flights Using a VPN

cheap-flights-vpn

Planning a trip aboard has never been easier. You can check out car hire, hotels, excursions, and importantly, your flights, all online. Most of us now head to a flight comparison site, plug in our destination and begin poring over results; everyone likes insanely cheap flights.

You check the flights once, and the fare seems good. But each time you check again, the price has crept up. It’s almost like the airlines are tracking your interest and raising the prices.

Is it just a trick of the mind? Or is it real? Read on to find out how you can use a VPN to find those super cheap airline tickets.

Airlines Don’t Use Cookies to Increase Prices

The idea that airlines and the comparison sites are using cookies to track our interest in specific routes isn’t new. Understandably, no airline has ever confirmed that this practice is real. Similarly, no price comparison site will confirm that they actively gouge their customers—it would be a savage act of terrible PR.

In fact, the world’s most popular flight comparison sites, Momodo, and Skyscanner both maintain documents stating the opposite. You can read the Momondo page here, and the Skyscanner page here. Both pages comprehensively deny that they use cookies to refine flight prices. Other sources corroborate the flight comparison sites.

“If the airlines were to raise prices because of browser cookies (targeted individually) there would be air travel whistle-blowers and senators running to microphones for legislation to prevent it,” says FareCompare CEO Rick Seaney. “What people see when they shop multiple times, and prices are changing is a reflection of inventory changes, data caching techniques and the fact that prices generally get more expensive closer to departure date, even within a day.”

It doesn’t always feel like that though. Prices appear to change within minutes, much to the chagrin of consumers on the hunt for insanely cheap flights.

Airlines Do Use Dynamic Pricing and User Profiling

For all the airlines like to deny how cookies are used against potential customers, there are some strong indications otherwise.

For instance, in 2018, airline revenue management software provider, PROS, confirmed that many of their clientele now use dynamic pricing. Dynamic pricing structures do consider user location, customer accounts, previous flight data, shopping trends, and more, to create specialized individual flight prices that differ from customer to customer. PROS clientele includes Lufthansa, Virgin Atlantic, Qantas, Emirates, Southwest, and many more.

Currently, each airline has just 26 fare classes. That’s one for each letter of the alphabet (literally). Airlines can update the prices for each fare class four times per day for domestic flights, and hourly for international flights. The current flight pricing structure was put into place in 1978, after The Airline Deregulation Act. However, airlines are finding it difficult actually to shift from that system—but that time is now.

“2018 will be a very phenomenal year in terms of traction,” said John McBride, director of product management for PROS. “Based on our backlog of projects, there will be a handful of large carriers that move toward dynamic pricing science.”

Flight Route Profiling

Flight route profiling has existed for a long time. For instance, a flight from London to Lanzarote is primarily marked for leisure. Airlines know that demand during school holiday periods will dramatically increase. They also know that parents will look to find the best deals months in advance and as such, prices around those periods remain high, despite the number of available seats and current demand.

A switch to dynamic profiling is unlikely to change this scenario. It could, however, impact in other ways. If you’re checking out flights on a high-end Mac, in San Francisco, the dynamic pricing might assume you have higher income and show you higher prices. How about checking prices for a return overnight trip from New York to Chicago? Dynamic pricing might assume you’re a business person, check your previous flight purchase history, and show you price knowing that you will pay it regardless of cost.

Using a VPN to Find Cheaper Flight Prices

If the airlines use dynamic profiling, you can fight back by using a VPN to change your location. For instance, you can use ExpressVPN (save 49% on ExpressVPN using this link) to change your IP address as to appear from one of 94 countries.

Here are a few examples of price differences I found using ExpressVPN, with the locations and the differences. I ran the same price comparisons using a fresh Lubuntu Linux installation, with a completely new browser.

Our test flights are:

  • New York JFK to London Heathrow
  • Miami International to Paris Charles de Gaulle
  • Tokyo Narita to San Francisco International

All departing on September 11th and all returning on September 18th, using the exact same flights for each flight price check site. Check out the difference in price between Skyscanner, Momondo, and Google Flights using the scenarios. (Note: I had to use Google’s ATX Matrix for the ExpressVPN Hong Kong server as Google Flights are unavailable in Hong Kong—it returns the same prices though.)

Prices below are from Skyscanner, Momondo, and Google Flights, respectively.

Round 1: Lubuntu VM, Firefox Browser

  • New York JFK to London Heathrow: $343 | $347 | $366
  • Miami International to Paris Charles de Gaulle: $666 | $738 | $754
  • Tokyo Narita to San Francisco International: $1,369 | $1,384 | $1,393

Round 2: Lubuntu VM, Firefox Browser, ExpressVPN

ExpressVPN location set to “Netherlands—The Hague.”

  • New York JFK to London Heathrow: $350 | $345 | $366
  • Miami International to Paris Charles de Gaulle: $654 | $661 | $752
  • Tokyo Narita to San Francisco International: $1,321 | $1,327 | $1,391

Round 3: Lubuntu VM, Firefox Browser, ExpressVPN

ExpressVPN location set to “Hong Kong – 4.”

  • New York JFK to London Heathrow: $348 | $348 | $366
  • Miami International to Paris Charles de Gaulle: $718 | $707 | $753
  • Tokyo Narita to San Francisco International: $1,364 | $1,383 | $1,391

Round 4: Lubuntu VM, Firefox Browser, ExpressVPN

ExpressVPN location set to “Norway.”

  • New York JFK to London Heathrow: $328 | $328 | $366
  • Miami International to Paris Charles de Gaulle: $729 | $725 | $752
  • Tokyo Narita to San Francisco International: $1,344 | $1,343 | $1,391

Does Using a VPN Make Your Flights Cheaper?

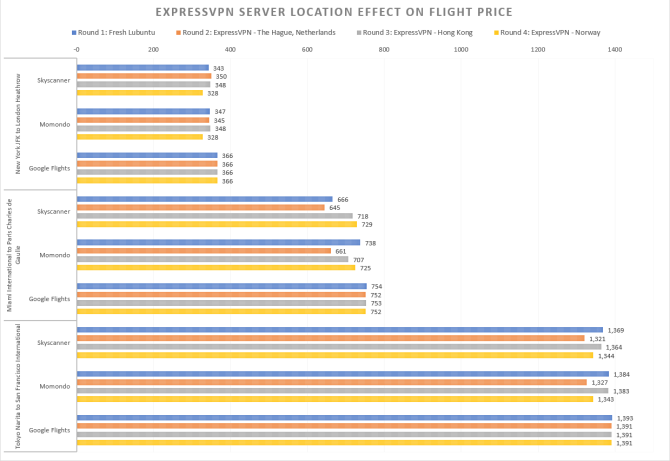
You can see the data above, but it’s a little difficult to read through. Check out the chart below for a better overview of the experiment.

expressvpn flight price

There are a few things immediately clear.

  1. Google Flight prices remain extremely constant regardless of location.
  2. Using a VPN uncovered significant discounts when booking cheap airlines flights from the Netherlands.
  3. For the most part, discounts are only in tens of dollars, with one or two notable exceptions. However, if you’re booking cheap flights for several family members, these savings do add up.
  4. Using a VPN doesn’t always create a discount situation.

What do you conclude from this? Check all of your options, at all times, and always double-check across the cheap flight ticket comparison sites. Otherwise, you should check out our rules for finding cheap airline tickets—it’s guaranteed to help!

Read the full article: How to Find Insanely Cheap Flights Using a VPN


from MakeUseOf https://ift.tt/2omKX67
via IFTTT