Tuesday, 3 July 2018

Sick of the iOS 12 Beta? How to Return to iOS 11

ios-12-whats-new

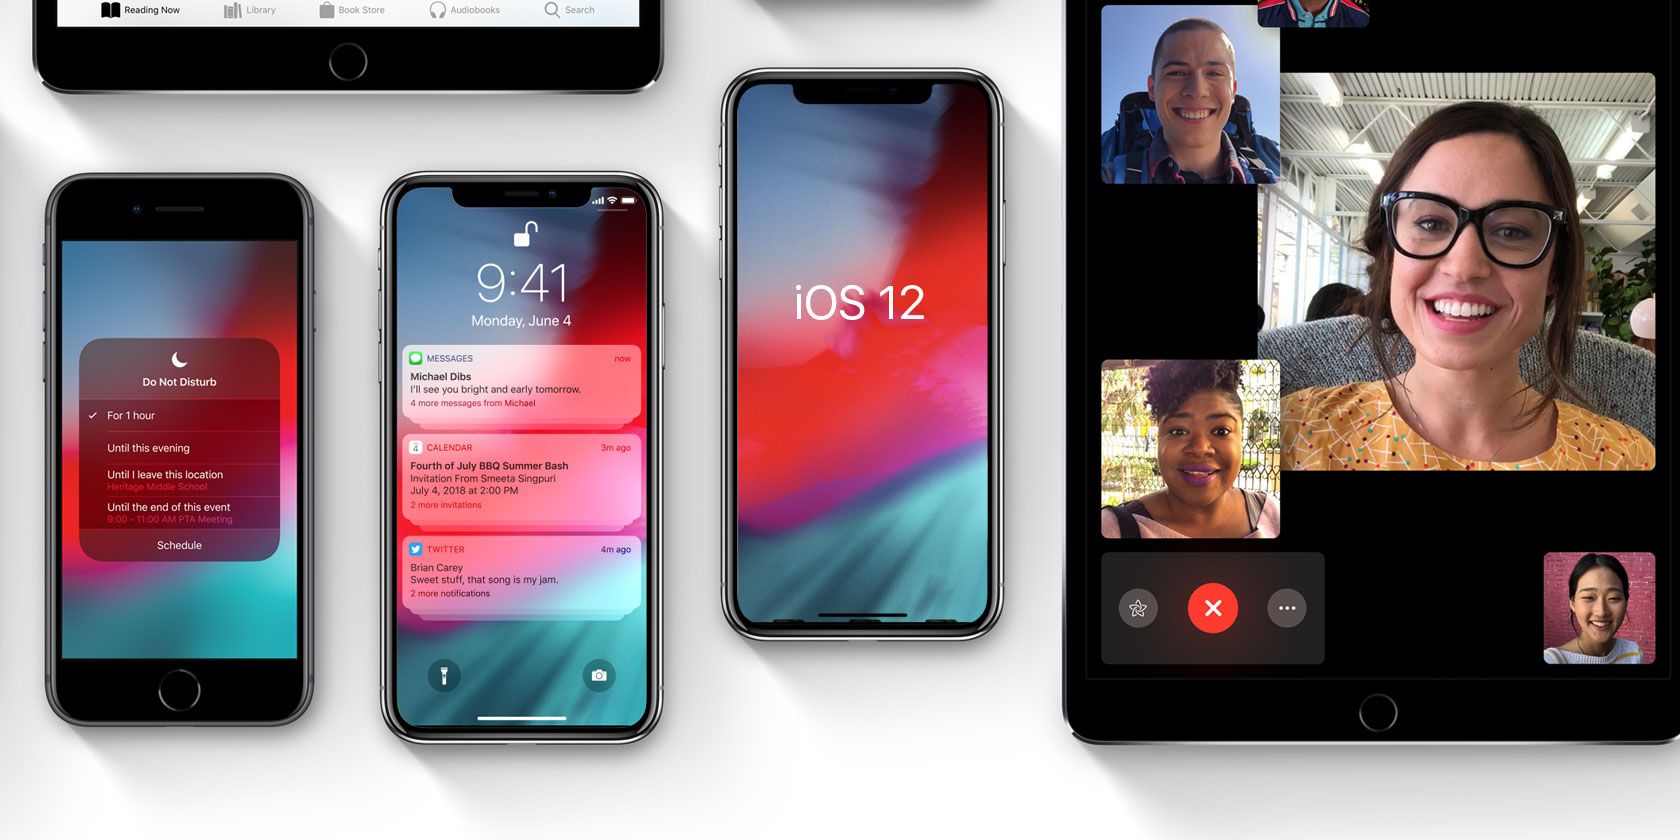
iOS 12 is due out this fall, with all sorts of new features packed in. If you don’t want to wait, you can always install the iOS beta to test the new version early.

Maybe you already have.

And maybe you’ve figured out why it’s still considered beta software.

Beta versions of software are often rough around the edges and have unpatched bugs, making them a poor choice for everyday use, especially on your primary devices. If you’ve installed the iOS 12 beta and want to go back to iOS 11 until it’s properly ready, here’s what you need to do.

How to Revert the iOS 12 Beta and Return to iOS 11

Whether you can jump right back into where you were on iOS 11 or have to start fresh depends on if you have an iTunes backup from iOS 11. Since iCloud backups aren’t backwards-compatible, you can’t restore a backup from the cloud.

To restore the backup you made earlier, follow these steps:

  1. Open iTunes on your PC or Mac and plug your iPhone into your computer.
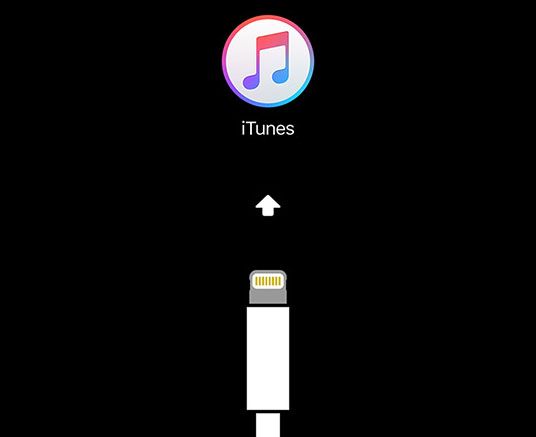
  2. Enter Recovery mode on your iPhone. How to do so depends on your device. Perform the following until you see the iTunes logo on your phone’s screen:
    1. On the iPhone X or iPhone 8, quickly press and release the volume up button, then the volume down button, followed by the side button.
    2. For the iPhone 7, press and hold the side button and volume down button together.
    3. If you have an iPhone 6S or earlier, press and hold the Home button and the power button at the same time.
      recovery_mode_screen
  3. You’ll see an iTunes popup on your computer asking if you want to Restore or Update your phone. Click Restore, then Restore and update to continue. If your phone reboots before this completes, do the above again.
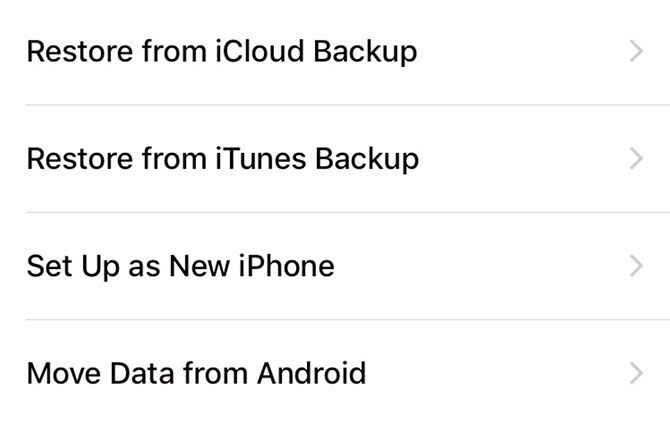
  4. Once the reinstall process completes, use the Restore from iTunes backup option if you have a backup from iOS 11. If not, you’ll need to select Set up as New iPhone and proceed as if it’s a new device.

restore_ios

Check out the new features arriving in iOS 12 to look ahead to fall.

Read the full article: Sick of the iOS 12 Beta? How to Return to iOS 11


from MakeUseOf https://ift.tt/2KqhcyN
via IFTTT

Get Lifetime Online Protection for Your Whole Family With VPN Unlimited

It’s easy to become lured into a false sense of security on the web. But lurking beneath the surface, there are many threats to your privacy and security. VPN Unlimited is an award-winning service that provides complete online protection on all your devices. It also helps you bypass restrictions and access great online content. Right now, lifetime subscriptions are just $39.99 at MakeUseOf Deals. Keep reading to find out more.

Online Protection

The best way to protect yourself online is by being stealthy. It’s impossible for anyone to track your browsing history or hack your connection if they can’t find you.

You can think of VPN Unlimited as your digital invisibility cloak. The service routes your data via masking servers to hide your real IP address and location. In addition, all your data is protected by strong AES-256 encryption. This ensures that your connection is secure, even when you’re connected to public Wi-Fi.

The other major benefit of using a VPN is that you can get around restrictions. VPN Unlimited helps you maintain net neutrality and access great content from anywhere in the world, with 400 servers in 70 nations. You also get unlimited bandwidth and fast browsing speeds.

Lifetime Service for $39.99

VPN Unlimited is available on Windows, Mac, Android, iOS, and other platforms. You can protect up to five devices at one time, with 24/7 support.

Order now for $39.99 to get your VPN Unlimited lifetime subscription, worth $499.99.

Read the full article: Get Lifetime Online Protection for Your Whole Family With VPN Unlimited


from MakeUseOf https://ift.tt/2KEcVnr
via IFTTT

5 Fast and Free Web Apps to Transfer Large Files Locally or Online

web-apps-transfer-files

Need to share a file quickly? These five sites let you transfer files either on Wi-Fi or online. You don’t need to install anything, and they’re completely free.

There are several ways to transfer files between computers. Our most recommended app is Send Anywhere, which works on all platforms. But other apps have their own methods that make them worth a look, from torrent-like transfers to fully no-internet-needed sharing.

Firefox Send: Private File Sharing, Deleted After 24 Hours

In an age where you want to be sure that any private data isn’t stored on some company’s servers, something like Firefox’s Send is the order of the day. It’s a simple file-sharing site for those who want to protect their data.

Go to the site, upload your files, and share the unique link with any friends. The files will be downloadable for 24 hours from the time of upload. And yes, it works the same on desktop or mobile. This is like one of those no-installation apps to transfer files quickly.

The extra reassurance is from the makers behind the app, as Mozilla Firefox puts a premium on privacy and security of Internet users. And no, you don’t need be on Firefox to use Send, it’ll work on any modern web browser.

NoFile.io: Previews, Encryption, and Dropbox Saving

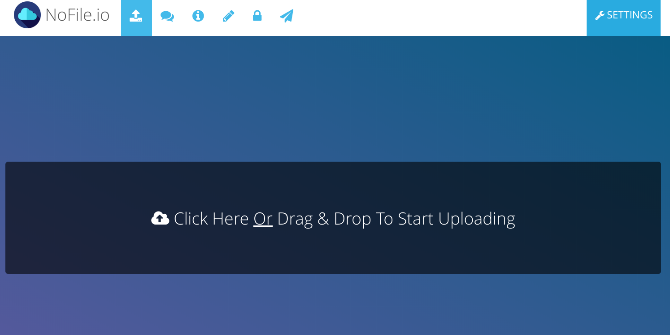
free web apps transfer large files

There are several apps like Firefox Send, where you upload a file and share a link. NoFile takes this standard file-sharing template ands adds just enough extra features to turn it into a powerhouse.

For starters, you can preview any file before download. This is especially useful for images and videos, so that you know exactly what you want to save. NoFile also encrypts files during all transfers, adding that little extra security layer.

And for extra-sensitive files, you can even encrypt before uploading so that no bot can check the file before your recipient downloads it.

Finally, in case you don’t want to download a file but still save it somewhere, NoFile offers to let you download it to your Dropbox directly.

Fastest Fish: Transfer Without Waiting for Upload

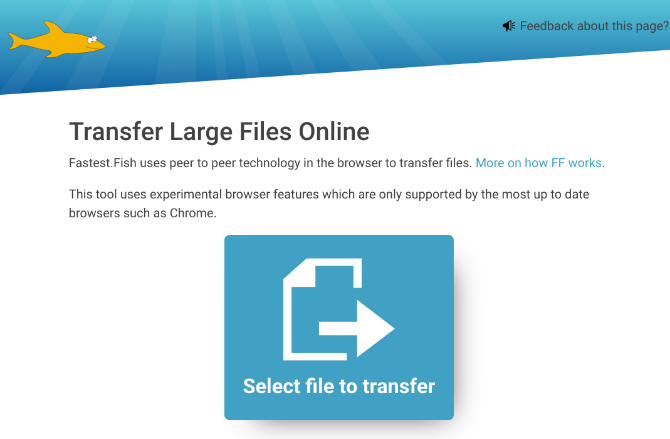
free web apps transfer large files

Most transfers like Firefox Send require you to fully upload your file to a server. Then it generates a URL, and someone can download the files with that URL. For large files, this is a lot of time-wasting.

Fastest Fish uses peer-to-peer file sharing technology so that the upload and download is simultaneous. Think of it as all those piracy-oriented apps you grew up with, except this time, you’re using it for your own transfer needs.

Fastest Fish requires a few things though. You need to ideally use Google Chrome, and both the sender and receiver have to be online at the same time. A simulated network loss on the sender’s side didn’t kill the whole transfer; when I resumed network connectivity, the file transfer picked up where it stopped.

Instant.io: Private Sharing via Web Torrents

free web apps transfer large files

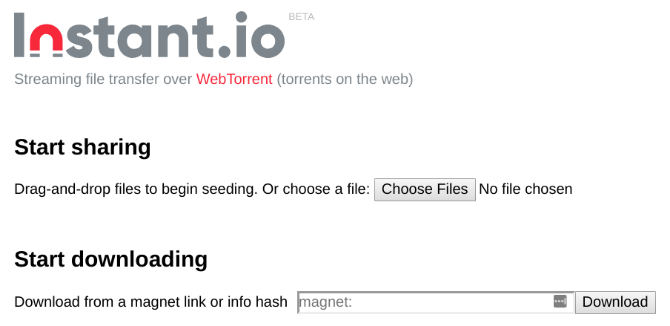
Instant.io combines the best features of Fastest Fish and Firefox Send into one app. This app is a private torrent-maker, letting you create a torrent with your own files.

Once you’ve added the files to Instant.io, share the torrent file or the Magnet URL with anyone who has to download it. They can put the URL in Instant.io and start the download immediately. Again, you’ll have to use Chrome, and all uploaders and downloaders will need to be online at the same time.

Instant.io is great for sharing large files when you’re in a large, distributed team, and is a perfect example of surprising legal uses for torrents.

FileRoom.io: Share Files With Anyone on the Same Wi-Fi

free web apps transfer large files

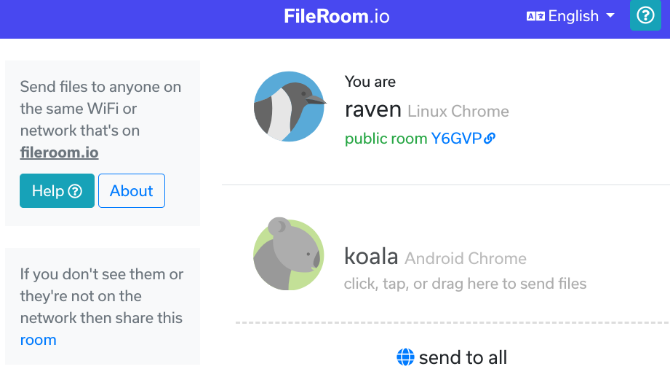
When you’re working in a coffee shop or a shared workspace, the entire network isn’t at your disposal. But if you and your teammates want to transfer files quickly and privately, hop on to FileRoom.

This is basically a place where one person can send files to many others, as long as you are all connected to the same Wi-Fi network. FileRoom gives each individual the name of an animal, which can get confusing if you’re in a large team. But for teams of three or so, the app is perfect for quick file-sharing.

There is no chat room, comments, or other paraphernalia here. The idea is that you are all next to each other, so you can talk in person. Use FileRoom only when you need to share a file.

If You’d Rather Install File Sharing Apps…

All of the above options are for for quick, last-minute transfer, so it helps those who want to use a web browser and avoid installing another app on their phone or computer.

But if you transfer files between computers regularly, you’re better off with one of these awesome apps for sharing large files.

Read the full article: 5 Fast and Free Web Apps to Transfer Large Files Locally or Online


from MakeUseOf https://ift.tt/2z58vog
via IFTTT

The 6 Best Free Tools to Fix Any Problem in Windows 10

tools-fix-windows-10

Windows 10 is Microsoft’s final operating system. That is to say, the Windows 10 operating system is a continually evolving platform, as opposed to older Windows versions. Since its launch in July 2015, Windows 10 has gone from strength to strength and now, in June 2018, accounts for some 34 percent of all computers around the world.

It isn’t without fault, though. There are still plenty of issues with Windows 10, and the frequent nature of updates and fixes perfectly illustrates that. However, you can attempt to fix the majority of Windows 10 problems using nothing more than a few free tools. Let’s take a look.

First, Ensure Your PC Is Updated

Before you start installing these best programs to fix Windows 10 problems, make sure you have done something vital: update your Windows to the latest version. I know, I know, I just said updates can introduce unexpected issues. But that isn’t always the case. More often than not, Windows updates can obliterate a swath of annoying bugs.

Press Windows key + I to open the Settings panel and head to Update & Security > Windows Update. If there is an update waiting, save your work, bookmark your browser tabs, and hit Restart now.

Aside from updating your system, you should also check out our list of the best computer security and antivirus tools, closing off another common source of issues when using Windows 10 (i.e. malware).

Now, on to the best programs to fix almost any problem in Windows 10.
1. IOBit Driver Booster

Windows 10 tries to handle driver updates, but it isn’t perfect. Sometimes it’ll leave some essential driver updates behind. So, when a hardware issue strikes, it’s always worth checking if you need to update your drivers.

One of the best ways to check the status of your Windows drivers is using a free driver update tool, and IOBit Driver Booster is one of the best Windows 10 driver update tools, claiming to fix and update over 1,000,000 drivers.

  1. Download and install Driver Booster, making sure to deselect any additional software offered to you.
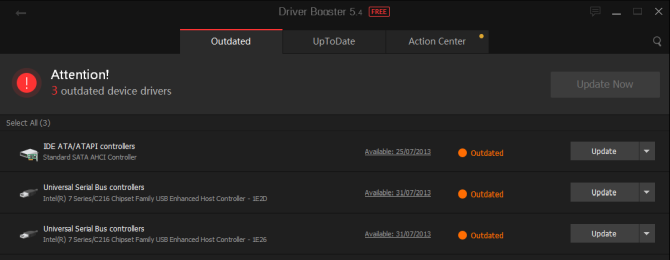
  2. Open Driver Booster. You’ll spot three tabs: Outdated, UpToDate, and Action Center. The first two are fairly self-explanatory, containing the lists of your system drivers and their status. The Action Center tab contains download links for other IOBit utilities.
  3. Select the Outdated tab. You can choose to Update Now using the big red button, or head down the list and update individual drivers as you see fit. You can also choose to ignore specific drivers, roll them back to their previous state, or uninstall them entirely. Driver Booster automatically downloads and applies the drivers to your system, but you may require a system reboot to finish the installation process.

Driver Booster creates a system restore point before updating your drivers, as well as including options for automatic shut down or reboot after the driver installation process completes—handy for leaving the tool running just before bed!
Alternative: Snappy Driver Installer

Snappy Driver Installer (SDI) is a free and open source driver updater with a vast driver collection for offline use. Microsoft keeps Windows 10 up-to-date, but sometimes your drivers get left behind—and outdated drivers can often cause weird issues.

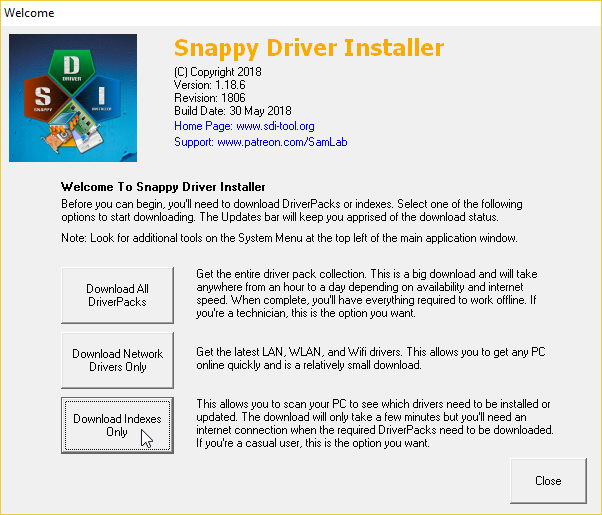
Head to the Snappy Driver Installer download page. Download and unzip the SDI Lite version, then run the SDI application. Select Download Indexes Only to let SDI to quickly scan your computer to see which drivers need updating or installing (and then marvel at the “grass” theme, and change it if you see fit!).

After SDI scans your system, it offers a list of potential new drivers. Head down the list and select the drivers you want to install (or click Select all in the left-hand option menu), make sure to select Create a new restore point, then select Install. The download and update process can take a while depending on how many drivers need updating.

Once the download and installation process completes, restart your system.
2. FixWin 10

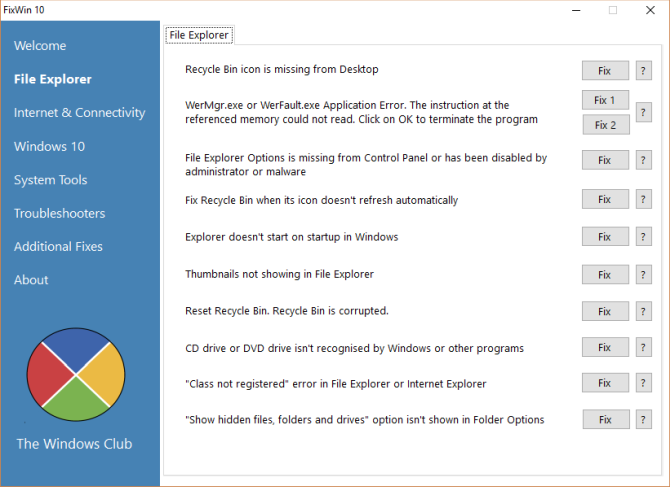
FixWin 10 isn’t just one of the best Windows 10 repair tools, it’s portable! You can use FixWin 10 to repair a huge variety of operating system issues.

The program is divided into six neat sections, each representing problems with a specific component (File Explorer, System Tools, etc.). Each section contains at least ten fixes (see the full list here). Some of the fixes may require a reboot, but you’ll be informed of this when you click the Fix button.

Fixes vary from common irritants, such as the Recycle Bin icon failing to automatically update after emptying, to more advanced fixes like restoring access to the Registry Editor.

The Additional Fixes section contains novel-but-useful tweaks, such as restoring the Sticky Notes delete warning dialog box, while the Troubleshooters section directs you to the relevant Windows 10 troubleshooter tool on your system. The integrated troubleshooters are sometimes the easiest option, at least before delving into the depths of your system.
3. Ultimate Windows Tweaker 4

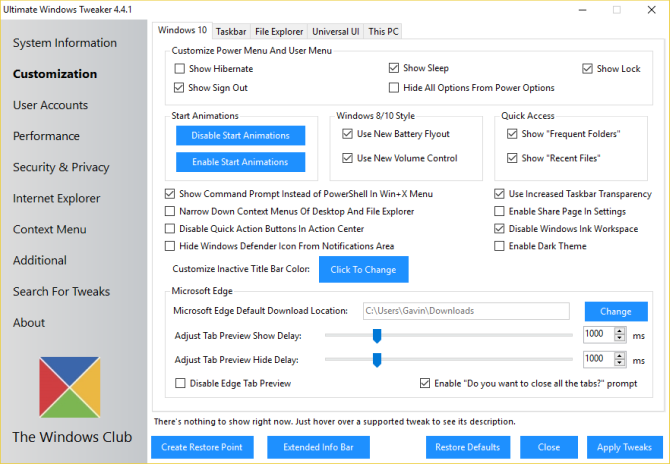
Ultimate Windows Tweaker has the same developer as FixWin10 (The Windows Club). This is immediately evident because both programs share the same easy-to-use interface.

Unlike FixWin 10, which addresses Windows 10 issues and lets you fix them, this program enables you to quickly enable, disable, hide, or remove specific features from Windows.

You can make each change listed in this program using the Windows 10 Settings app, the Registry Editor, or the Group Policy Editor. However, Ultimate Windows Tweaker puts all the options within neat sections that list relevant issues which you can then address quickly.

Click the Create Restore Point button at the bottom left before you start, tick the changes you want to make, then click Apply at the bottom. The Additional section lets you bring back Windows 7’s Windows Photo Viewer with one click.

There are over 200 Windows 10 tweaks that are available at the click of a button. Making changes to your OS has never been easier.
4. Windows Repair

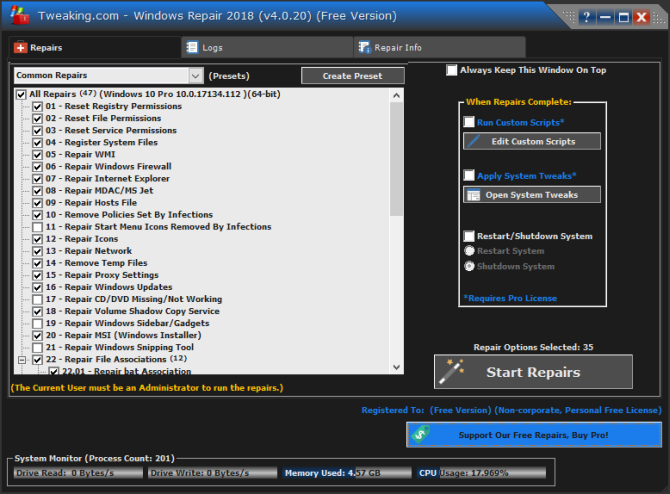
Windows Repair (All in One) is another free and useful Windows 10 repair tool you can use to repair numerous Windows 10 issues. The Windows Repair developer strongly suggests you should run the tool in Safe Mode for maximum effect. (How to boot into Windows 10 Safe Mode?) The Windows Repair tool has its own Reboot to Safe Mode button for a quick reboot.

The repairs cover registry permissions, file permissions, Windows Firewall settings, Winsock and DNS cache fixes, Windows Update issues, and much more. The Windows Repair tool guides you through a fix process that automates the Windows Check Disk (chkdsk) and System File Checker (sfc) utilities.

If the utilities don’t fix your issues—and you know what you’re doing and understand the risks—you can head to the Repairs tab. Here you have six options. The Open Repairs button opens the repair panel containing the numerous fixes available. The other options are preset to fix specific issues, such as malware cleanup, broken file permissions, and Windows Updates.

5. Missed Features Installer

Windows 10 is a great operating system, and despite some well-documented irritations, most users seem to enjoy using it.

However, not everyone was happy when Microsoft made the jump from Windows 8.1 to Windows 10 (or Windows 7 to Windows 8.1, as evidenced by Windows 7 still being used on nearly 40 percent of computers worldwide even one year before Microsoft ends all support for it).

The main gripes? Features that didn’t make the cut for the arrival of Windows 10. Luckily, the Missing Features Installer brings back many of those popular old features in one handy download.
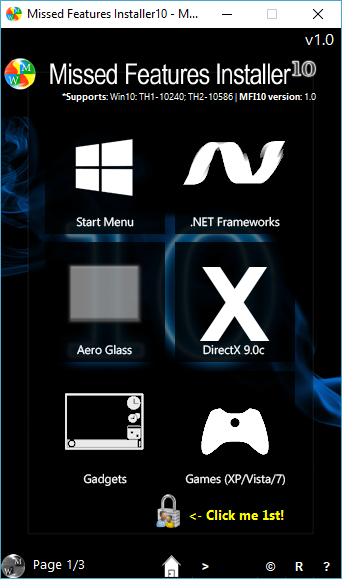
For instance, do you hate the Windows 10 Start menu? You can use the Missed Features Installer to switch to Classic Start Menu. Miss the legendary 3D Pinball for Windows? Who in their right mind doesn’t! Install classic games from Windows XP, Vista, and 7 with this tool.

The utility also has options for disabling Windows Update (though I’m not sure how well that works, and besides, you should keep your system up to date), and removing the Microsoft Edge browser, Cortana, and the integrated Windows Telemetry. However, these features are experimental and could damage your system so make sure to set a system restore point before diving in.
6. O&O ShutUp10

Windows 10 has privacy issues, and Microsoft knows it. Windows 10 privacy control has improved slightly since its 2015 release, but the core issues of tracking, telemetry, and data gathering remain.

While some users believe this is a necessary evil for the operating system development to continue with lashings of user-data, you don’t have to give up your data. Several tools curtail Microsoft and Windows 10 data gathering tendencies and O&O ShutUp10 is one of them.

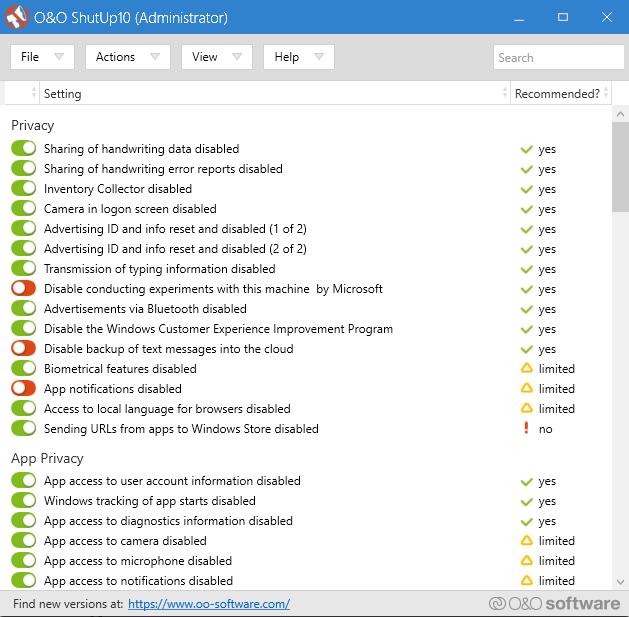
The program has nine sections offering various privacy settings, many of which are not directly available in the operating system. ShutUp10 makes turning off the unseen options as simple as flicking the numerous switches.

Most importantly, each option comes with a short description so you know what you’re turning off and what functionality it might affect. Unfortunately, there are some downsides to turning everything off, so move slowly and check each option out.

O&O ShutUp10 has a handy Apply only recommended settings option, as well as the Recommended and somewhat recommended settings option that goes even further.

How Do You Fix Windows 10 Problems?

These are some of the best and easiest to use programs that will fix (almost) any problem in Windows 10. Of course, there are tons of other awesome free programs out there too. Remember: It often pays to find the right Windows troubleshooting tools for the job, rather than a single tool that claims to do everything.

Read the full article: The 6 Best Free Tools to Fix Any Problem in Windows 10


from MakeUseOf https://ift.tt/2Gdvz7m
via IFTTT
How to Change Gmail Themes, Background, Fonts, and More

While millions of people have enjoyed Gmail since its launch in 2004, its appearance isn’t the most beautiful. Features like inbox tabs, filters, and search look a lot better when they’re not showing on a boring white background.

Thankfully, you can customize Gmail’s look with themes, backgrounds, and more. Here’s how to put a fresh coat of paint on your Google mailbox.

Customize With Gmail Themes and Backgrounds

Many Gmail beginners don’t know that Gmail has a built-in way that makes it easy to customize your inbox. The Themes section lets you apply a variety of new looks that are much improved over the drab default.

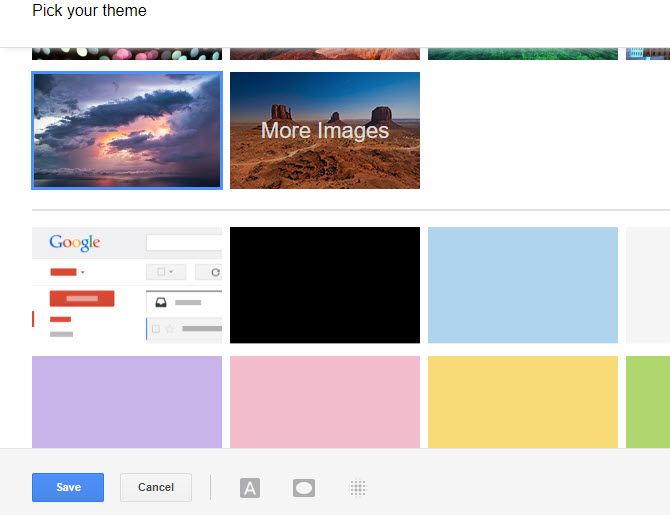
Here’s how to change your Gmail theme: click the Gear icon above your inbox, then choose Themes. You’ll see a new dialog box with several themes to choose from. Each theme includes a new image that will change your Gmail background.

Gmail-Themes-List

The ones at the top are from various photographers and show scenery like beaches, chess boards, and similar. Click the More images entry to see dozens more of the best Gmail themes. Tick one you like and choose Select to add it to your theme list.

At the bottom of the list, you’ll see a few simple themes like Dark and various colors. The list caps off with some classic Gmail themes like Graffiti, Terminal, and High Score. You can also choose the Random theme, which will shuffle a new theme for you every day.

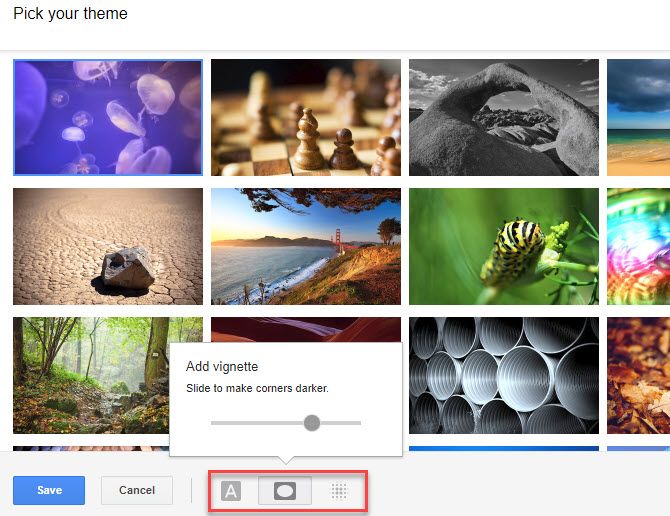
Gmail also offers a bit of customization for the modern themes. Click one, then look for a row of icons at the bottom of the window:

  • The Text background button lets you toggle between a light and dark border for messages and buttons.
  • Use the Vignette slider to darken the corners of the image.
  • The Blur slider will, unsurprisingly, unfocus the image.

Gmail-Theme-Options

These customizations aren’t super deep, but they let you add a fancy touch to your Gmail background.

Custom Gmail Themes With Your Photos

Don’t like any of the themes available? You can create a custom Gmail theme with your own photo. Click the My Photos button on the themes dialog, and Gmail will show your images from Google Photos.

If you haven’t already, open Google Photos and upload the image you’d like to use in your custom Gmail theme. You can search your photos if you have many to sort through. Click the image you want to use as your theme just like any other, and apply the options above if you’d like.

Gmail-Custom-Theme

How to Increase Font Size in Gmail

Gmail doesn’t have a dedicated option for increasing the font size of your inbox or changing the font. But you can use a few tricks to achieve a similar result.

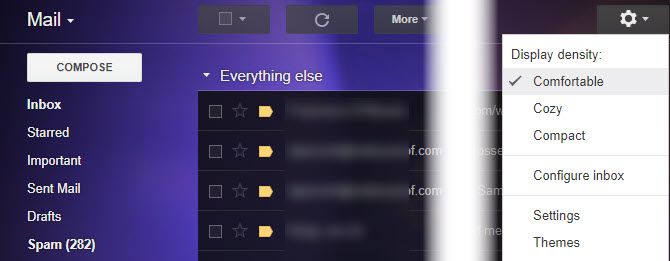
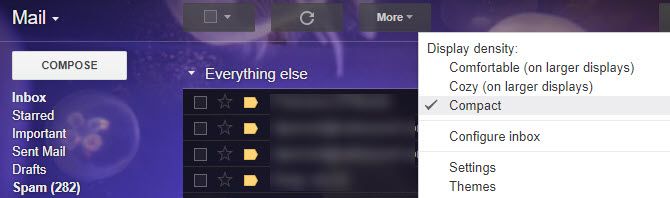
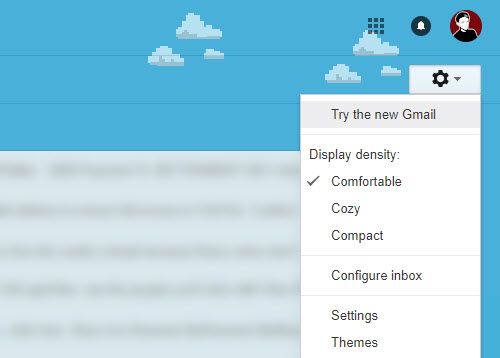
One is Gmail’s Display Density function. This is a basic feature that resizes your inbox based on your screen size, display resolution, and browser window size. It changes Gmail’s view by moving labels, messages, and other elements closer together to save space.

This will change automatically, but you can try another look manually. Just click the Settings gear and choose Comfortable, Cozy, or Compact.

Comfortable takes up the most space:

Gmail-Comfortable

While Compact packs everything together:

Gmail-Compact

Don’t forget that like any other webpage, you can also zoom in while using Gmail. Hold Ctrl and press the Plus key, or scroll your mouse wheel up. Press Ctrl + 0 to reset this.

This is a good workaround for increasing the font size when needed. If it’s not enough for you, try changing your OS font settings or font options in your browser.

How to Change Font in Gmail

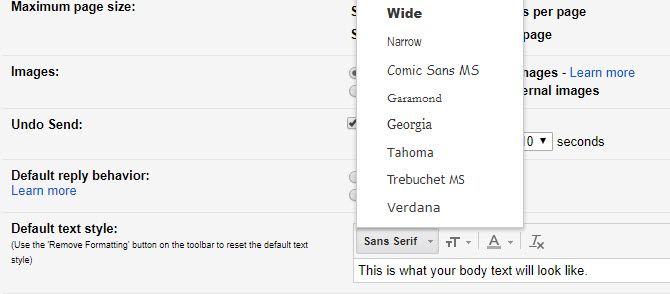
You can’t change the font Gmail uses for your inbox, but you can change the font that you use in new messages. To do so, open Settings. On the General tab, you’ll see a section titled Default text style.

This shows your default body text for new emails. You can click the buttons above it to change the font, size, and color. It only offers a few choices, such as Georgia, Verdana, and the tired Comic Sans MS, but you may find one of these choices more appealing.

Gmail-Change-Body-Font

The Size button lets you pick from four sizes, two of them larger than the default. And you can change the color to a variety of shades here. Feel free to make tweaks here that result in an easier Gmail experience, but beware of changes that could make your emails less professional.

Gmail once had a Labs function for changing your font style, but it’s unfortunately no longer available.

Try the New Gmail Redesign

In April 2018, Google unveiled a new look for Gmail. Along with a refreshed interface, it brings new features like Smart Reply, snoozing emails, and a Confidential Mode. Even if you don’t care about those, it’s worth a try just to see the redesign and change the font in Gmail. You can always go back if you don’t like it.

To swap to the new Gmail, sign in and click the Gear icon in the top-right of your inbox. Click Try the new Gmail and the page will reload with the new version.

Try-New-Gmail

It’s not a radical change, but does introduce some elements of Material Design and a new font. If you decide you don’t like it, just click the Gear again and choose Go back to classic Gmail.

And if you haven’t tried Inbox by Gmail, that’s also worth a look. It takes a more task-focused approach to email, complete with a different look.

Gmail Customization Is Sadly Limited

Unfortunately, some of the deeper Gmail customization has gone away in recent years. Several Chrome and Firefox extensions that offered more Gmail themes are deprecated or no longer available. And Gmail’s Labs library has nothing interesting to offer.

Gmail doesn’t offer too many built-in ways to tweak its appearance other than themes, but at least you have a few. We recommend changing your Gmail theme and trying the new look for an updated look.

If you need more customization, you may want to take a look at desktop mail clients for Gmail that have more options.

Read the full article: How to Change Gmail Themes, Background, Fonts, and More


from MakeUseOf https://ift.tt/2tUr0G0
via IFTTT