Friday, 27 April 2018

How to Merge and Unmerge Cells in Excel: Tips and Tricks to Know

When you want to combine two cells into one in Excel, you have a few options. Merging cells is one of the best ways to do it. But it has a few drawbacks, too. Even so, you might find that it’s useful for working with text in Excel.

We’ll take a look at how to merge cells in Excel, how to unmerge them, and another method for combining two cells into one without losing the data in the cells.

How to Merge Cells in Excel

Before we get into how to merge cells, let’s talk about exactly what happens when you merge in Excel. In this example, we’ll look at two columns, one for first name and one for last name:
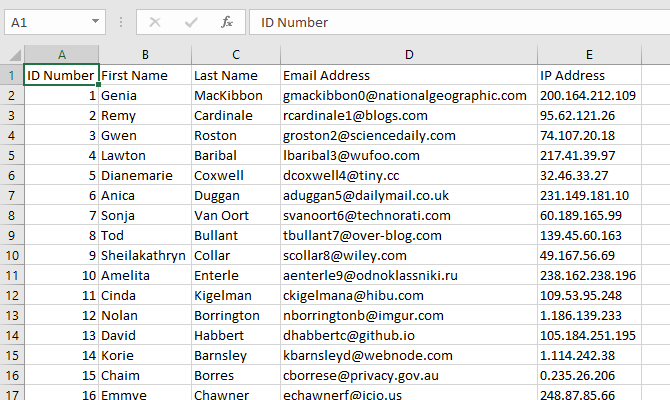
how to merge cells in excel - Two Excel columns before merging

When we merge two of these cells, we end up with the contents of those cells in a single cell, like this:
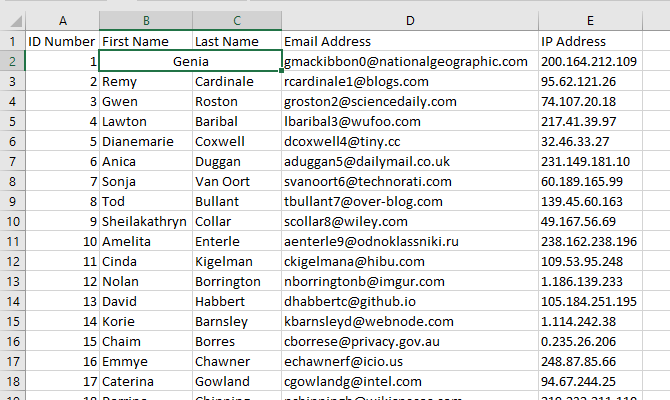
how to merge cells in excel - A single merged cell in Excel

The two cells have been combined, leaving a single cell that’s twice as wide and only contains one value. Excel only keeps the upper-left value of any merged cells. That’s one drawback to merging in Excel. We’ll talk about how to get around that in a moment.

To merge cells in Excel, select the cells you want to merge. You can select any number of cells; in our example, we’ll select just two. Once you’ve selected the cells, head to the Home tab and click Merge & Center in the Alignment section:
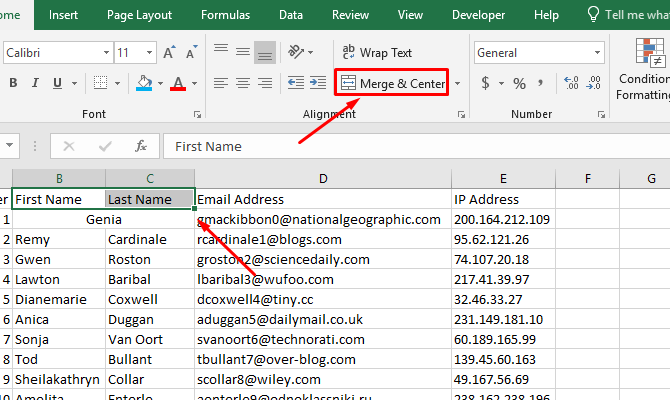
how to merge cells in excel - Excel Merge & Center button

If you’ve selected more than one with text in it, you’ll get a warning:
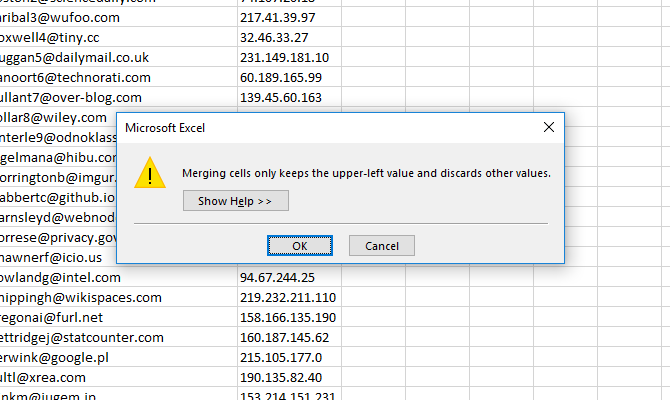
how to merge cells in excel - Excel merge cells warning

If you want to continue, just hit OK. You’ll then have your merged cell as in the screenshot below. That’s all there is to it.
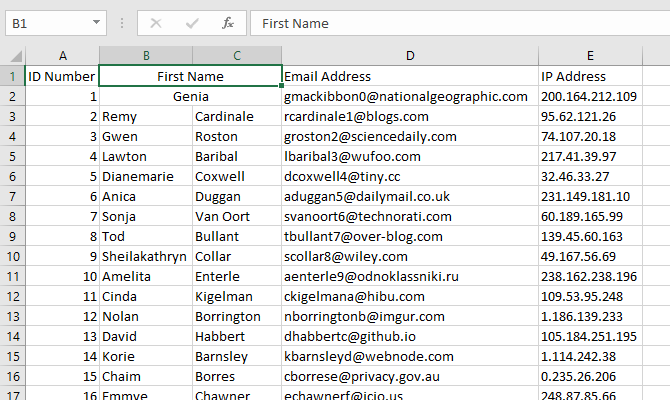
how to merge cells in excel - Excel merged cell

Merging Columns in Excel

In some cases, you’ll want to merge entire columns instead of just a few cells. Merging columns in Excel is easy; just select both columns and use the same steps.

First, highlight the two columns you want to merge:
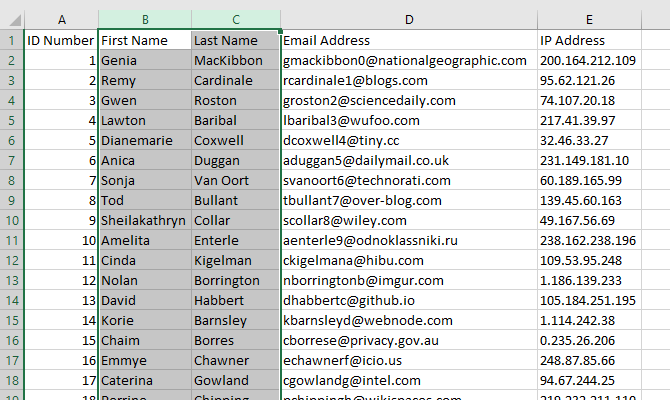
Selecting columns to merge in Excel

If you hit the Merge & Center button right now, you’ll end up with one huge cell that has a single value in it. Instead, click the dropdown arrow next to Merge & Center and select Merge Across:
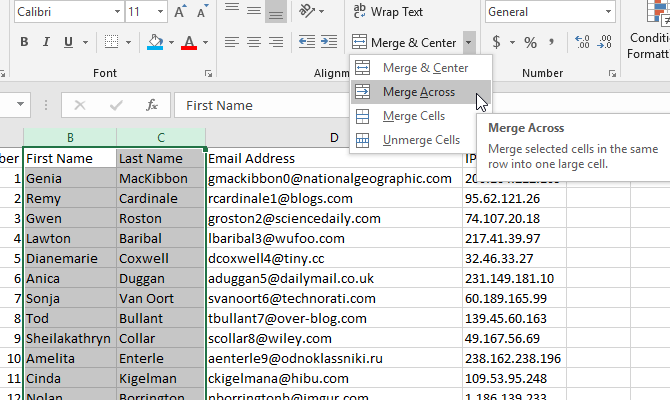
Excel Merge Across button

After clicking Merge Across, you’ll receive another warning from Excel. But instead of a single warning, you’ll get one warning for each row in your selection. Which is a lot. After clicking OK for each row, you’ll have a newly combined column:
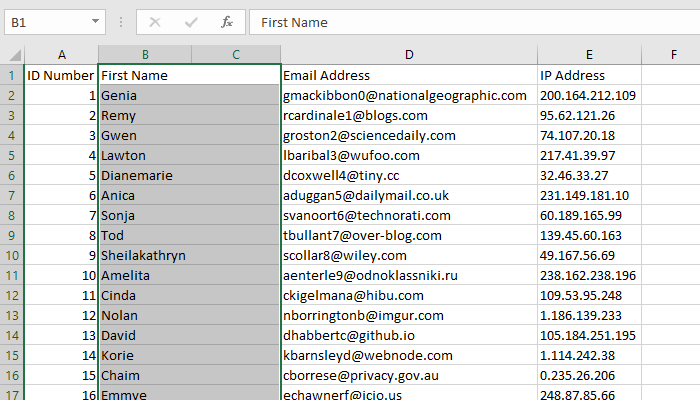
Excel merged columns

You might be wondering why you wouldn’t just delete the second column in this case. Well, you probably would. Merging columns doesn’t do a whole lot for you.

Let’s talk about a better way to merge cells in Excel.

Combining Cells With CONCATENATE

The fact that combining cells makes you lose data is a big disadvantage of using Excel’s merging function. However, you can get around that by using a formula. Here’s the syntax of the CONCATENATE function, one of Excel’s most useful text functions:

=CONCATENATE(text 1, [text 2],...)

The function takes multiple text inputs and creates a new cell that combines all of them. This lets you merge cells without losing any data. Let’s use the same spreadsheet as before, with the list of first and last names. Instead of merging the cells and losing the last names, we’ll create a new column and use CONCATENATE to bring in both the first and last names.

Here’s the formula we’ll use in the new columns:

=CONCATENATE(B2, " ", C2)

Notice that between B2 and C2 we have a space between two quotes. This is important because it inserts a space between the contents of the cells being merged. If you forget it, you’ll get the first and last names mashed together.

Here’s what it looks like in Excel:
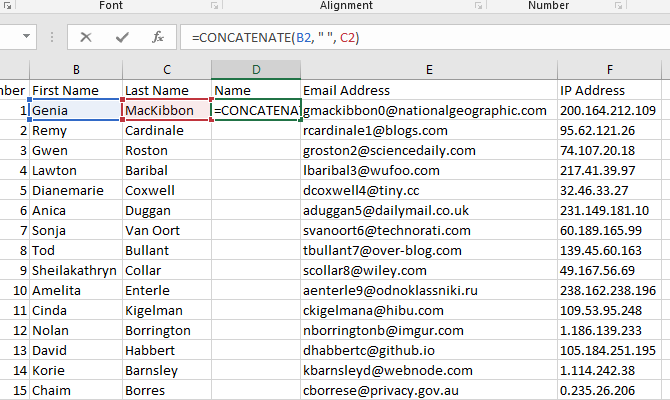
Using CONCATENATE to merge cells in Excel

When I hit Enter, here’s what we get:
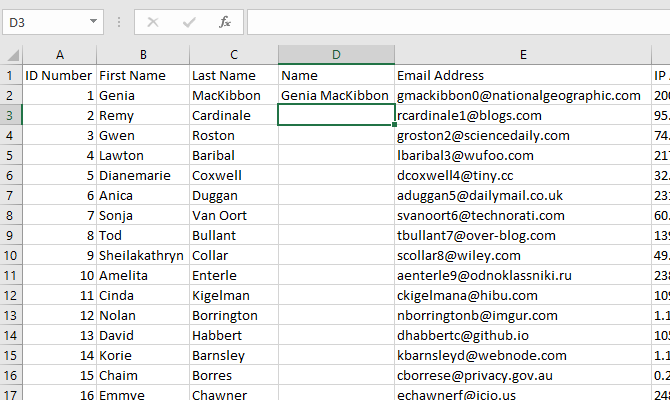
Merged cells using CONCATENATE

Much better than our first attempt, isn’t it?

You also have the advantage of being able to modify the combination later, whereas you cannot do that when you merge cells the regular way.

How to Unmerge Cells in Excel

If you decide to merge cells, you’ll also want to know how to unmerge them.

Unfortunately, unmerging doesn’t bring any of your lost data back. When you merge cells in Excel, you’re going to lose some information, and it’s gone forever. Merged cells can create weird spaces in your spreadsheet, though, and unmerging them solves the problem.

To unmerge cells, just select the merged cell, click the dropdown arrow next to Merge & Center, and click on Unmerge Cells:
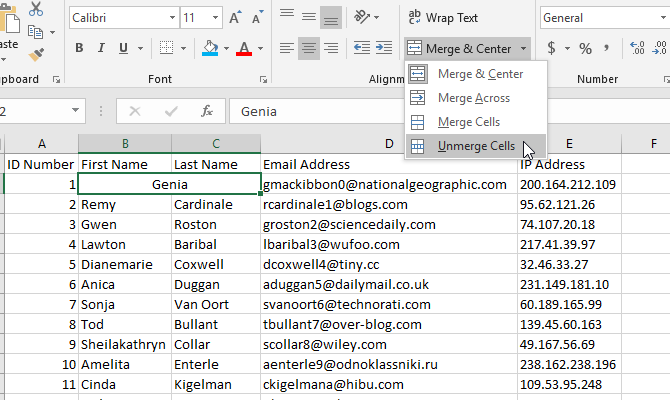
how to unmerge cells in excel - Unmerge Cells button in Excel

The cells will go back to their original count and size. You’ll still only have the data from the upper-left corner of your selection, though. This is one reason why it’s a good idea to work on a copy of your spreadsheet (or use the CONCATENATE function).

Merging Cells Can Still Be Useful

While you’ll need to use CONCATENATE to merge cells without losing data, there are still some uses of merging in Excel. It’s often used for formatting to clean up a table, for example, which may help you get a better print of your spreadsheet:
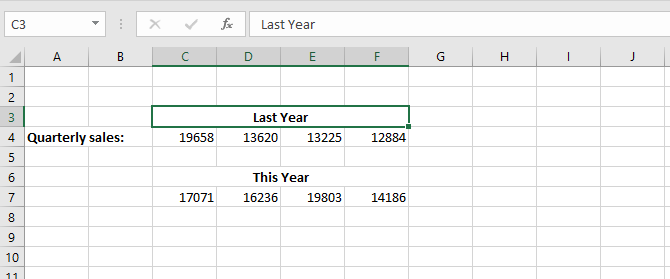
Using Merge in Excel for formatting

In general, though, it’s better to use CONCATENATE if you’re looking to merge cells without losing data.

That being said, you may find that you come across a situation where you need to merge cells in Excel. Even an Excel beginner will need to use them every day. So, when you find one of those situations now, you’ll know exactly how to do it.

And don’t forget that you can merge Excel files and sheets too!


from MakeUseOf https://ift.tt/2r5aXDW
via IFTTT

How to Easily Switch Between Multiple DNS Servers in Windows

If you’ve looked into your boosting your internet speed or getting around blocked content, you’ve probably come across DNS servers, which are used to translate website domain names into IP addresses.

While using your ISP’s default DNS works fine, customizing your DNS has lots of advantages. But digging into your computer settings to change your DNS provider is a hassle, and keeping all those DNS server IP addresses straight isn’t always easy. Thankfully, a small utility can help solve both these issues.

Easily Switching Between Multiple DNS Servers

Public-DNS-Server-Tool

  1. Download the free Public DNS Server Tool (the link is in step 1 under Setting up public DNS servers).
  2. Extract the downloaded ZIP and run the PublicDNS.exe file inside.
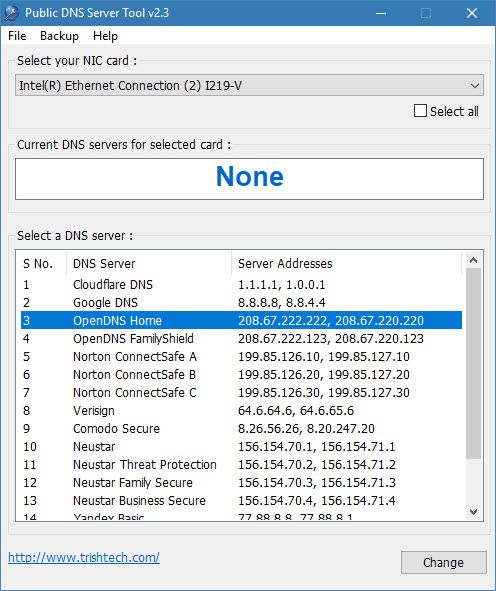
  3. Confirm administrator access for the app. You’ll see the tool’s main interface once it launches.
  4. First, you should create a backup of your current DNS settings for easy restoration. Select Backup > Backup from the menu bar and choose a location to save the backup.
  5. Once that’s done, select your wireless card from the top dropdown menu or choose Select all to apply changes to all of them (if applicable). You might see multiple options if you have both an Ethernet and wireless connection available.
  6. Next, select the DNS server you’d like to use from the list. This tool currently supports 16 options, including Cloudflare’s new DNS, Google’s Public DNS, OpenDNS, and more.
  7. With the server you want to use highlighted, click Change.
  8. You’ve successfully changed your DNS options!

To restore your original settings, just visit Backup > Restore and import your backup file. For further reading, check out why third-party DNS is more secure.


from MakeUseOf https://ift.tt/2r3eQu7
via IFTTT

How to Set Specific Download Folders for File Types in Chrome and Firefox

Keeping your downloads folder organized can be a hassle, but there are a few automated ways to keep the mess under control. You can automatically delete files older than 30 days, and you can save files to specific folders based on file type. We’ll show you how to do the latter in this article.

How to Auto-Save File Types to Specific Folders

The Chrome extension RegExp Download Organizer allows you to create rules for downloaded file types. For example, every time you download a PDF, it will be automatically saved to a folder of your choice in the downloads folder.

You can also filter down to specific file types. For example, you can save all images to one folder, or you can create a separate folder for JPEGs, another for PNGs, etc. The Chrome extension comes with a couple of rules already created: one for images and one for torrents.

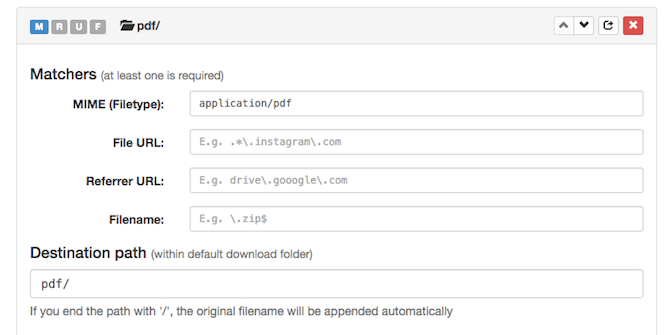
Let’s say you want to create a new rule for PDFs, enter the following:

  1. For MIME (Filetype), enter application/pdf.
  2. For Destination Path, select pdf/ (or the folder name of your choice).

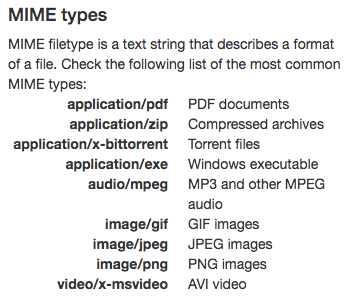
The extension includes a list of rules you can use for various file types, including compressed files (ZIP), Windows executable files (EXE), audio files, and video files.

As you can see from the screenshot above, you can also create rules based on specific URLs and file names.

How to Add “Save In” Folders to the Right-Click Menu

If you would rather add specific locations you can choose from as you save the file, there is an extension available that does that.

The Save In extension (ChromeFirefox) requires extensive permissions when installing, including the ability to read and change all data on websites you visit. By way of contrast, the aforementioned RegExp Download Organizer extension only requires permission to manage your downloads.

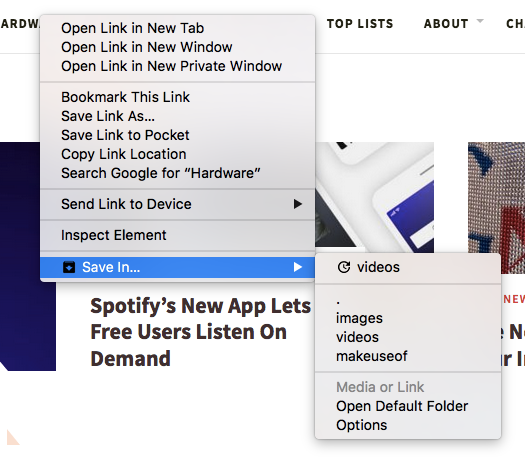
If you decide Save In is right for you, once you’ve installed the extension, when you right-click a link or file in your browser, you’ll now see Save in in your context menu, with two folder options already listed: images and video. If you save a file to these locations, your browser will automatically create those subfolders in your Downloads folder if they don’t exist.

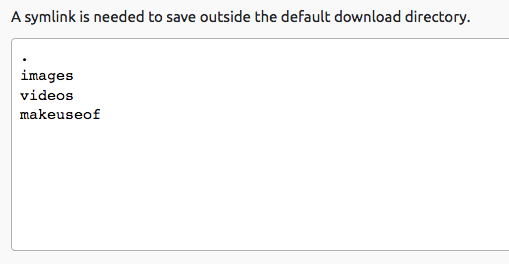
To add or modify the locations on that list, open the extension options in your browser and just add them to the existing list:

When you right-click a file, those locations will now be available in your context menu:

If you want to select a folder that isn’t in the downloads folder, it gets a little more complicated and will require you to create a symbolic link. If that seems too complicated for you and you really want to save your files to folders that aren’t in the downloads folder, there is one more option to consider:

Mac users can automatically move files to and from specific folders using automated rules with Hazel or Mac’s Automator, while Windows users can give QuickMove a try.


from MakeUseOf https://ift.tt/2r3ztpe
via IFTTT

How to Deactivate Facebook Messenger

Most people are aware of the difference between deleting and deactivating a Facebook account. In short, deactivating is akin to a temporary deletion where you can reactivate your account at any time, whereas deleting your account is a permanent removal of data.

But you might not realize that deactivating your Facebook account does NOT deactivate your Facebook Messenger account. People will still see be able to see you and can attempt to contact you. Indeed, the process for deactivating Facebook Messenger is entirely separate.

How to Deactivate Facebook Messenger

Before you can deactivate Facebook Messenger, you need to deactivate your Facebook account. We’ve previously explained how to deactivate your account, so if you’ve not yet deactivated Facebook, you need to go and do it before continuing.

Next, to deactivate Facebook Messenger, just follow the simple instructions below:

  1. Open Messenger on a mobile device.
  2. Tap on your profile picture in the upper right-hand corner.
  3. Scroll down and select Privacy and Terms.
  4. On the next screen, choose Deactivate Messenger.
  5. Enter your password.
  6. Tap on Deactivate.

To reactivate Facebook Messenger, just log back into the Messenger app using your username and password.

Note: Reactivating Messenger will also reactivate your main Facebook account. If you only want to keep the Messenger service, you will need to deactivate your Facebook account for a second time.

Remember, you can still appear invisible on Messenger and Facebook Chat without taking the drastic step of deactivating your account. Lastly, keep in mind that if you delete your Facebook account completely, you will lose access to Messenger as well. There is no way to keep Messenger without maintaining a Facebook profile.


from MakeUseOf https://ift.tt/2I04OmW
via IFTTT

Snap Launches Spectacles 2.0 for Snapchat Addicts

In 2016, Snap Inc. launched Spectacles. These Spectacles from Snap, formerly known as Snapchat, were sunglasses capable of shooting video. Snap hoped Spectacles would take off in a big way, but in the end the company only sold 150,000 pairs.

However, undeterred, Snap Inc. has launched Spectacles 2.0. This new and improved version of Spectacles has a better design, better specs (excuse the pun), and some new features to boot. Unfortunately, Snap has increased the asking price accordingly.

Snap Spectacles Version 2.0

Snap’s new Spectacles are smaller, slimmer, and slightly more aesthetically pleasing. However, they still look like cheap sunglasses, even in Ruby, Onyx, and Sapphire. Unfortunately, they’re not cheap, as Snap has upped the price from $129 to $150.

Addressing one of the biggest complaints about the originals, the new Spectacles feature improved transfer speeds for uploading your photos and videos. That’s right, Spectacles 2.0 can now take photos as well as shoot videos. And both are in high-definition.

Snap Inc. has also made the new and improved Spectacles water-resistant, meaning they can stand trips into swimming pools and the sea. Spectacles 2.0 also feature a second microphone to help pick up conversations between the wearer and those in the shot.

The new Spectacles are available exclusively from Spectacles.com. They’re currently available to customers in the U.S., Canada, and the U.K., with other parts of Europe having to wait until May 3rd to get their hands on them. So please form an orderly queue.

Are They Still Just a Novelty?

Snap’s Spectacles 2.0 are clearly an improvement over the original. However, they still look like a novelty you would only wear occasionally. They’re also more expensive, and don’t offer anything mind blowing over the original. So it’s difficult to see them selling well.

If this is the first you’re hearing about Snap’s hardware—which is entirely possible given the lack of sales—then be sure to check out our overview of the original Spectacles. And if you can pick some up cheap they may even be worth owning.


from MakeUseOf https://ift.tt/2HPssCG
via IFTTT