Linux has long been synonymous with bootable flash drives, whether it’s to fix some sort of problem with your primary operating system, or for trying various distros.
There are a few ways to create an Ubuntu (or other Linux) bootable USB drive for Mac. You can go the freeware route for an easy option, or put a little bit of time into creating the drive yourself using Terminal. Let’s look at both methods.
First: Prepare Your USB Drive
When you’re looking to create a bootable Linux USB drive on a Mac, the first step is to make sure you’ve got the right USB drive for the job, and that it’s formatted correctly to avoid any problems.
Some Linux variants may require larger volumes, so pay attention to the requirements when downloading. Generally speaking, anything above 4GB will do the job. Others don’t have any strict requirements, but formatting to FAT beforehand is a good idea regardless.
Warning: Everything on your drive will be erased when you do this!
- Insert your USB drive into your Mac and launch Disk Utility (under Applications > Utilities, or search for it using Spotlight with Cmd + Space).
- Select your USB device in the menu on the left, then click Erase.
- Give it a name and choose MS-DOS (FAT) under Format and GUID Partition Map under Scheme.
- Hit Erase to apply the changes. If it fails, try again—sometimes the system doesn’t unmount the volume in time and the process will be unable to complete.

If you have persistent problems, try another USB drive. Now download a Linux distro to install on your USB stick, and you’re ready to get started.
Make a Bootable Linux USB Drive With Etcher
balenaEtcher is a free open source tool for burning disc images onto USB and SD drives. It makes creating bootable devices completely foolproof:
- Grab your desired Linux image, then download Etcher and install it.
- Insert your USB stick, then launch Etcher.
- Click Select image and find the Linux image you downloaded—Etcher supports IMG, ISO, and ZIP, among others.
- Ensure the correct USB device is selected—hit Change to see a list of connected devices.
- Finalize the process by clicking Flash and wait for the process to complete.

You’ll likely see an error message warning that your USB drive isn’t compatible with your Mac. That’s normal—simply eject and go. Your bootable Linux USB drive is now ready; you can now skip to the Booting Your USB Drive section below.
Create a Live USB Using the Terminal
If for some reason you don’t want to use Etcher (maybe you’re on an incompatible version of macOS), you can accomplish this task using the command line. It’s possible using Terminal, your Mac’s built-in command line interface.
While this method requires a little more thought and patience, it’s actually pretty straightforward. You might even learn something new, plus you’ll feel smart afterwards. Assuming you’ve formatted your drive per the earlier instructions, here’s how it works:
1. Convert Your ISO
Launch Terminal and take note of where your Linux disc image is stored in Finder. Convert your image (usually an ISO) to an IMG file using the hdiutil convert command:
hdiutil convert [/path/to/downloaded.iso] -format UDRW -o [/path/to/newimage]Replace [/path/to/downloaded.iso] with the location of your own ISO (you can drag and drop directly into the Terminal window if you want) and [/path/to/newimage] to wherever you want the new image file to be created.

Note: Modern versions of macOS will automatically create a .DMG file. If your version doesn’t do this, try appending IMG to the end of your new image file name, such as [/path/to/newimage.img]
2. Write the Image to USB
Next, you’ll need to identify your drive’s mounted location so you can tell the Mac which drive to use. With Terminal open, use the following command to list all connected drives:
diskutil list

You’ll likely be able to identify the drive by its name, format, and size using a process of elimination. Take a note of the listing under the IDENTIFIER column, then unmount the drive using the following command:
diskutil unmountDisk /dev/[diskX]You’ll need to replace [diskX] with the corresponding number, like disk3—if successful, Terminal will report that the disk was unmounted. If you’re having trouble unmounting a drive, you can launch Disk Utility, right-click on a drive, then choose Unmount (don’t eject the drive, though).
![]()
The final step is to write the image to your USB stick, using the dd command:
sudo dd if=[/path/to/newimage.dmg] of=/dev/[diskN] bs=1mReplace [/path/to/newimage.dmg] with the path to the file created in the first step (again, drag and drop works best), and [diskN] with the location identified earlier. You’ll need to authorize with your administrator password immediately afterwards, since you used the sudo command.

You’re now done, and your drive is ready for booting.
Booting Your USB Drive
Assuming all went well, you’ll now have a USB drive that will let you boot into Linux. Plug it into the Mac you want to use it on, then shut down the computer.
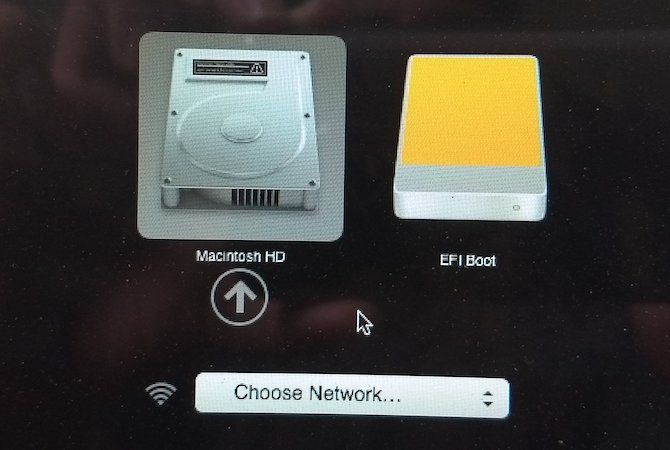
In order to access your Mac’s boot menu, you’ll need to hold the Option (Alt) key while it boots. The best way to do this is to shut down, hold the Option key, start your Mac, and wait. If you did it correctly, you’ll see a few options including your built-in hard drive and the USB device created earlier, titled EFI Boot.

To boot into Linux, select the USB device and click the arrow (or double-click it). Depending on what you’re using, you may get another menu which acts as a bootloader for your particular flavor of Linux.

If you have problems, or your USB drive won’t show up, try running the process again, using an alternative method above, running off a different USB stick or port, or consulting your respective distro’s help documentation.
The Best Way to Try Linux on Your Mac
Assuming all went well, you now have Linux running on your Mac and you can test it out or install it outright if you’re tired of macOS. You still have an Apple recovery partition which is accessible by holding Cmd + R while your machine boots. This can help you reinstall macOS (or apply other fixes) if you decide to go back.

There are other tools that claim to help you do this, but not all of them work, and some cost money. Unetbootin is still a popular choice for Linux and Windows users, but is not as good as Etcher on a Mac (and has some issues on newer versions of macOS).
There’s also our old favorite Mac Linux USB Loader, which is open source and actively maintained. It’ll cost you $5 for a pre-compiled binary, assuming you don’t want to download Xcode and compile it yourself. This low entry fee helps keep the project maintained, but it’s hard to justify paying for something when there are perfectly good free alternatives.
For more, check out how to install macOS from a USB flash drive. And if you’d prefer to install Linux on your internal drive, our guide on how to dual-boot Linux on your Mac is your essential next read.
Read the full article: How to Create and Boot From a Linux USB Drive on Mac
from MakeUseOf https://ift.tt/2JWI8B4
via IFTTT
No comments:
Post a Comment