Learning to code can be daunting, especially for children. The combination of having to learn complicated syntax alongside programming concepts is enough to put many people off. Nevertheless, learning to code is one of the most important things your kids can learn, and tools are available to make it easier for them.
One such tool is Microsoft Small Basic, which is easy to get started with. Here are three projects kids can use to take their first strides into coding.
What Is Microsoft Small Basic?
Microsoft Small Basic (MSB) is a language designed to make it easier to learn the basics of coding. Aimed at children (but perfect for adults too), it provides a stripped-back language and a user-friendly interface. Now in its 10th year, MSB is a forgiving integrated development environment that allows some wiggle room with syntax.
This helps avoid some of the frustrations beginner coders can typically experience.
This project is a walkthrough of coding a personalized clock. The project covers simple programming concepts, and while aimed at children, beginner adults can also benefit from following along. While the IDE can be downloaded to computers running Microsoft Windows, today’s tutorial uses the web based IDE. It can be completed on any computer with a browser and an internet connection.
Getting Started With Microsoft Small Basic
To begin, open a web browser and navigate to smallbasic.com. You should see a website with these two buttons in the middle:

Click on the button Start button, and you will be taken to a screen that looks like this:

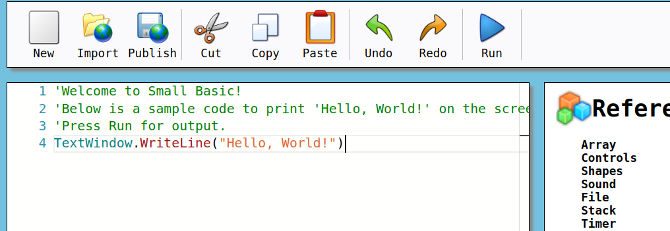
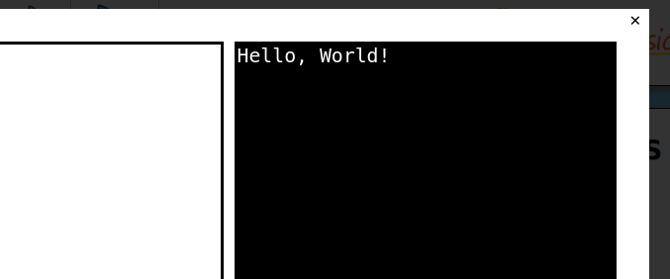
This is an online version of the Microsoft Small Basic IDE. An online IDE is a place where you can write code and test it, all in one place. As you can see, there is already some code in the text window. Press the blue, triangular, Run button to see what the code does.

Press the little x in the top right corner to close the program. Look at the code. You will see that whatever is inside the brackets gets printed when you run the program. Try changing the word World to your name and click run again. If it didn’t work, then make sure that you still have the quotation marks in the brackets (“…text…”) like this:

To understand why this happens, let’s break down the line into pieces. It starts with TextWindow. This tells the computer that whatever comes next should happen to the text window. TextWindow.WriteLine means that we want the TextWindow to write a line. TextWindow.WriteLine(“Hello, Ian!”) means we are telling the TextWindow to write a line, and what is in the brackets is what gets written!
1. Ask for a Name
Now, you are going to change your program to ask for the user’s name when it begins. Start with the obvious question:

To get the user’s input, we need two things. A way to read what they type in, and a place to keep it. This line gives you both:

This line makes a variable called name. A variable is like a box to store data in—in this case, the user’s name.
Next, there is an equals sign (=). This means that whatever comes next will be stored inside name.
Then you tell the TextWindow to Read what the user types in. Don’t forget the brackets—even though they are empty, the computer needs them to know what to do!
Now, when the program runs, the user is asked their name. When they type it and press enter it is stored. All that is left is to tell the computer to print it back to them.

You’ll notice that not everything in the WriteLine brackets has quotation marks. This is because you are combining saying “Hello, “ with whatever is stored in the name variable, using a plus sign. This is called string concatenation. Don’t worry if you don’t understand what that means yet—it’s a good phrase to know later on when you’re more comfortable with programming, or have taken a programming course. Now when you run your program, the user gets a personal response.
2. Telling the Time
So far your program greets each user by name. Now you can make it tell them the time using Clock.Time. Add it to the same line you just made:

Note where there are quotation marks and where there aren’t. Also, make sure you include all of the plus signs in the right place. Getting this right is important! Run your code again—along with your greeting, you’ll see the time.

Great! If you are getting any errors, or you are missing any spaces in the text window, look carefully over your code for any mistakes.
3. Making It Personal
Now that you have your clock let’s make it so that it only works for you. We need a way of checking that the name that’s entered is your name. We do this with an if statement. Change your code to look like this:

By adding the word If to the code, the computer knows that it has to check something. This time, you want to check if the name variable matches your name, using the equals sign.
So far, if the name variable that the user typed in equals your name, it will tell you the time. What happens if someone else uses the program?
That is what the Else statement is for. If any other name is typed in, the program skips over the if statement, and does whatever it says after Else.
Finally, type EndIf so that the computer knows that the if statement is over. Now when you run the program you will get a different response back depending on if you enter your name or not:

You just coded a clock that works for you, and greets anyone else who uses it!
Learning More With Microsoft Small Basic
This project has some essential basic concepts for programming. Using a simplified IDE allows beginners to learn programming concepts and get used to coding syntax. This can help down the line with more complicated languages like Python.
Microsoft Small Basic is not the only way to learn, and if actual code is a little too much at this stage, you have other options.
Scratch is a purely visual language that is perfect for kids. There are also several educational elements to Minecraft designed to teach core concepts. Minecraft’s Hour of Code provides a familiar learning environment for intrepid young builders!
Image Credit: olly18/Depositphotos
Read the full article: 3 Easy Coding Projects for Kids Using Microsoft Small Basic
from MakeUseOf https://ift.tt/2zsCPGv
via IFTTT
No comments:
Post a Comment