Bluehost is one of the world’s leading web hosting providers. With its wide range of plans, the company is an excellent choice regardless of the type of site you own. WordPress even recommends Bluehost as one of the best providers for running self-hosted WordPress content.
Like all web hosting providers, Bluehost offers its users personalized email addresses. Keep reading, and we’ll explain how to create your email address, how to access Bluehost webmail, and how to add your Bluehost email to Gmail.
How to Create an Email Account on Bluehost
The number of email addresses you can create depends on the hosting plan you’ve chosen. The entry-level Basic shared hosting plan lets you create five addresses, while the Starter cloud hosting plan offers 100 addresses. All Bluehost’s other plans allow you to create an unlimited number of email accounts.
When you’re ready to create your account, head to Bluehost.com and log into your account using the button in the top left-hand corner.
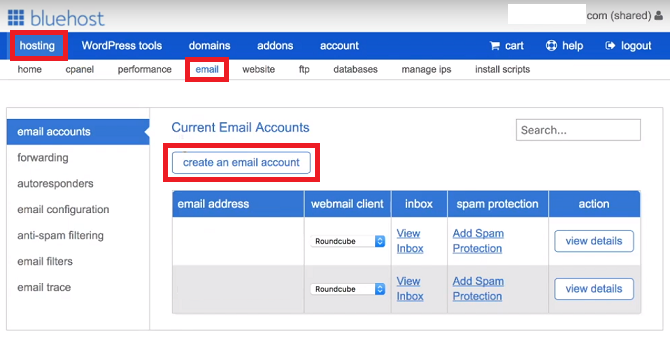
Once your account portal has loaded, locate the blue ribbon at the top of the page and click on Hosting. Then, in the sub-menu directly beneath the blue ribbon, click on Email. On your screen, you should now see all the tools you need to create and manage your email addresses.
To create a new email address, select Email Accounts on the menu in the left-hand panel and click Create an Email Account in the main window.

Choose the prefix you want to use with your new address (the part before the @). Remember, you can also use periods (.) and underscores (_).
If you have multiple Bluehost domains, you also need to use the dropdown menu select the domain to which you want to connect your new email address.
Further down the page, you need to create a password. You can either use a password of your own choosing or ask Bluehost to generate one for you automatically.
Finally, at the bottom of the page, Bluehost asks you to determine the mailbox size and to select your preferred webmail client.
It’s generally advisable to select an unlimited mailbox size. You can leave the default Bluehost webmail client blank. It’s not essential to pick one at this stage; we’ll talk more about the options shortly.
When you’re happy, click on Create to finish the process.
How to Access Bluehost Webmail
Now it’s time to start using your email address. There are two easy ways to access Bluehost webmail and one slightly more complicated method.
The easiest way to access Bluehost webmail is to head to login.bluehost.com/hosting/webmail and enter your credentials.
You can also access your webmail via your main Bluehost portal by going to Hosting > Email > [Email address] > View Inbox.
Lastly, if you have the technical wherewithal, you can create your own email sub-domain and redirect it to the webmail client.
Choosing the Right Webmail Client
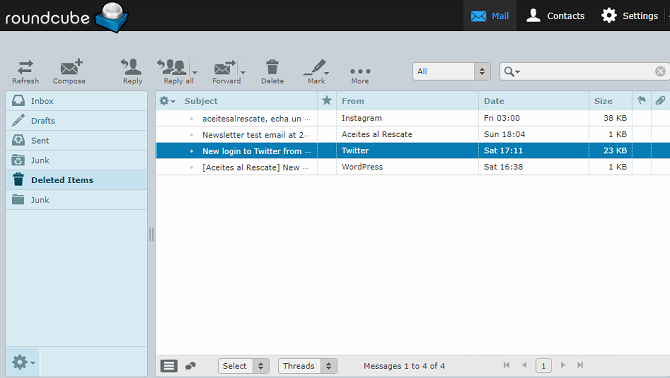
Bluehost offers three individual webmail clients: Roundcube, Horde, and SquirrelMail. They are the same three clients you will see on most mainstream web hosting providers. Bluehost will ask you to choose one of the three when you log into your webmail for the first time.
Each of the three clients has different strengths and weaknesses.
Horde is the most full-featured of the three. In addition to an address book (which all three clients offer), Horde also includes a calendar, task list, event reminders, news feed, and notes page. It also provides a spellchecker and mail filters.
At the other end of the scale, SquirrelMail is the most basic client. There are no productivity tools beyond the address book, there’s no way to filter your mail, and the interface only offers a two-pane view.
Roundcube strikes a middle ground. System administrators can use plugins to add extra productivity tools, the client supports drag-and-drop emails, and there’s a three-pane view with a spellchecker.

Click on one of the client’s logos to make your selection. If you change your mind later, you can alter your webmail client in Hosting > Email > Email Accounts > [Email Address] > Webmail Client.
Use a Third-Party Client With Bluehost Webmail
If you don’t want to use Bluehost’s own webmail interface, you can try using third-party webmail clients instead.
The most popular third-party webmail client is Gmail, but services such as Outlook, Yahoo, and GMX will also work.
To add Bluehost your Gmail portal, you first need to decide whether to use the IMAP or POP3 protocol. Bluehost webmail supports both. Generally, IMAP is the preferred option; it will leave a copy of your email on Bluehost’s servers and lets you access your messages on multiple devices.
To add your Bluehost email address to Gmail, log into your Gmail account and navigate to Gear icon > Settings.
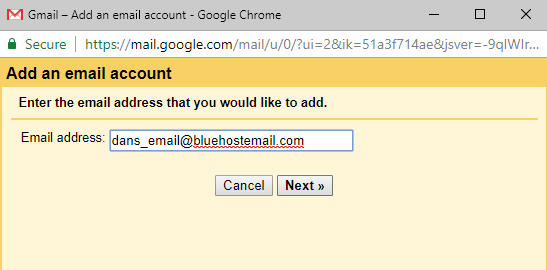
Next, click on the Accounts and Import tab and go to Check email from other accounts > Add an email account.

A new window will open that will guide you through the setup process. Start by entering your email address and clicking Next.
Gmail will prompt you to add your server details. Here’s the information you’ll need:
Secure SSL/TLS Settings
- Username: Your email address
- Password: Your password
- Incoming Server: mail.example.com (replace example.com with your own domain)
- Incoming Port: 993 (IMAP) or 995 (POP3)
- Outgoing Server: mail.example.com (replace example.com with your own domain)
- Outgoing Port: 465 (SMTP)
- Authentication: Your password
Standard Settings
- Username: Your email address
- Password: Your password
- Incoming Server: mail.example.com (replace example.com with your own domain)
- Incoming Port: 143 (IMAP) or 110 (POP3)
- Outgoing Server: mail.example.com (replace example.com with your own domain)
- Outgoing Port: 26 (SMTP)
- Authentication: Your password
Warning: Using the SSL/TLS settings encrypts your messages and ensures no one other than the intended recipient can read them. It is not advisable to use the standard settings; however, sometimes a network’s configuration makes it unavoidable.
The server details will be the same regardless of which third-party webmail client you use, but the setup process will be slightly different.
For more information, check out our guide to combining multiple email accounts into a single inbox.
A More Professional Email Address
Using Bluehost webmail lets you create a personalized and professional email addresses. Your personal brand or small business will instantly gain more credibility from having its own domain rather than using @gmail or @outlook.
Remember, you can even create a personal email without needing to build a website.
Sign up with Bluehost using our special discounted rate for MakeUseOf readers and create your email address today!
Read the full article: How to Set Up Your Bluehost Webmail Email Account
from MakeUseOf https://ift.tt/2MA0kH4
via IFTTT
No comments:
Post a Comment