Chances are you already know how to take a screenshot on your Mac. It’s relatively easy to do, and comes with advantages and disadvantages.
But sharing those screenshots? Not so easy.
Packing up screenshots into a shareable link is an important feature for a lot of users. And CloudApp is one of the best solutions for this. It’s easy to use, reliable, and comes with a generous free plan.
Let’s see how you can use CloudApp to take and exchange screenshots, screen recordings, files, GIFs, annotations, and media through instantly shareable links.
How to Take Screenshots With CloudApp
Head to CloudApp’s signup page to get started. Sign up with your Google account or create a CloudUp account, then you’ll be prompted to download the app for your platform. CloudApp is available for Windows, Mac, and Chrome. We’ll use the Mac version in this overview.
The Mac menu bar component hosts CloudApp, making it accessible all the time. You can take screenshots by selecting the app’s and choosing the Photo button.
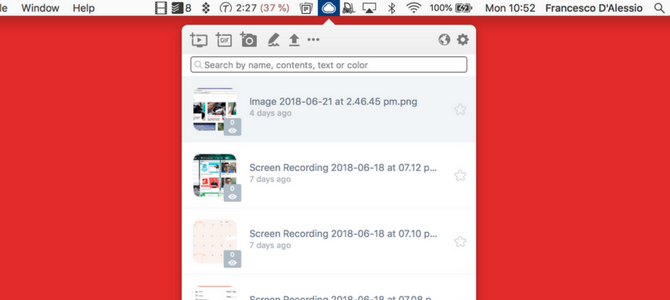
Using a keyboard shortcut, you can access this instantly using Shift + Cmd + 5. Once you’ve opened up the selection tool, snap a screenshot as you would with any other tool.
Once you’ve grabbed a screenshot, CloudApp instantly captures it as a link. What’s more, it immediately places the link on your clipboard. Paste this into a browser, and you’ll see your screenshot on its own page.
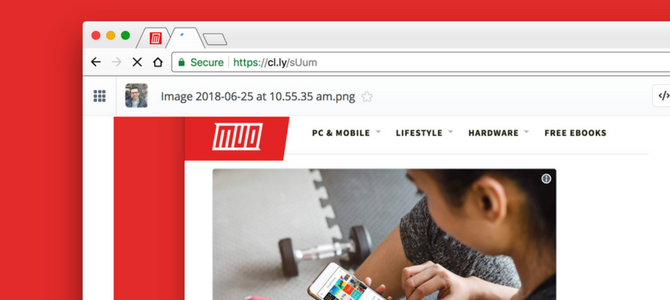
From this webpage, you can go further. Click the Embed button to grab HTML code for embedding on your website, or Annotate to mark it up.
Feel free to share screenshot links anywhere it’s convenient, such as Slack or social media.
How to Record Your Screen With CloudApp
Capturing your screen is a great way to visually demonstrate what’s in front of you. A quick screen recording can explain a problem you’re having, illustrate an idea, or capture something important.
You can do all this via CloudApp’s screen record tool.
Start by opening up CloudApp via the menu bar. Select the first icon, which looks like a screen with a play button inside. Then choose the area you wish to record.
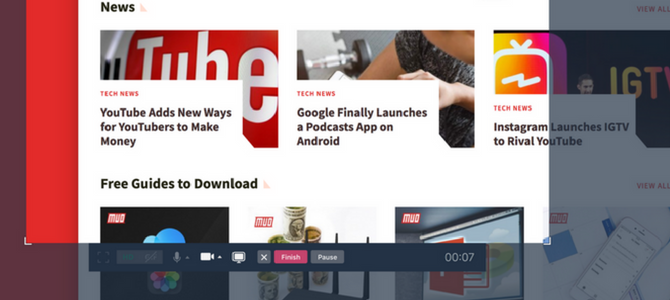
From this screen, you can use a few extra features to enhance your recordings, such as voice recording and webcam bubbles. This is perfect when who want to add context to a recording.
Once everything looks good, hit Record. You can record the screen with your webcam and voice narration running at the same time. After you’ve completed the recording, the shareable link will hop onto your clipboard, ready to share with the world.
Note that screen recording files take longer to upload than screenshots. You should thus wait a few moments before sharing a link with your client or colleagues, simply to avoid confusion.
How to Capture a GIF With CloudApp
Looking to demonstrate a GIF? You can also do this from the toolkit.
This feature comes in handy if you’re looking to explain something without a full-screen recording. GIF files are smaller in size and more portable than videos.

Creating a GIF is similar to screen recording, and it also allows you to add webcam or voice narration. Choose the GIF tool inside the CloudApp menu bar icon.
From here, you can position the screen and hit Record. The GIF recording will capture frame by frame, giving you a shareable link to share anywhere.
By no means is CloudApp a GIF specialist. But it does provide a simple GIF creation service that is perfect for fast capture.
How to Share Your Screenshots With CloudApp
Extended tools in CloudApp allow you to go further.
Open the menu bar icon and you’ll find a library of your past screenshots, recordings, and GIFs (with limited storage in the free plan). From this library, you can copy links, download the original files, and even annotate.
Annotation allows you to modify screenshots with a range of editing tools. This is perfect for adding additional explanation.
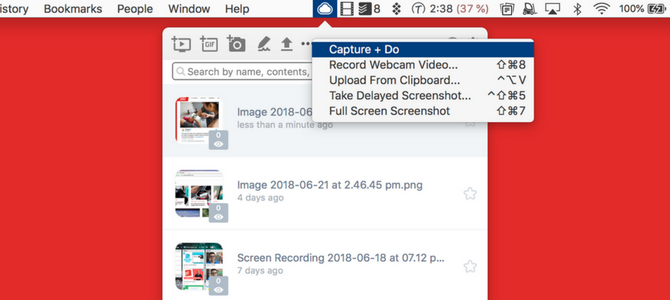
The toolkit also has the ability to take delayed screenshots and fullscreen shots, to avoid using the clipper tool. Sharing files and documents using a secure link is also possible here.
CloudApp also has the option to open downloads and native screenshots inside the CloudApp, ready to share. However, this limits your storage and use of the tool.
How Do Similar Screenshot Tools Compare?
CloudApp isn’t the only quick screen capture tool available. There are a host of alternatives that allow you to capture and share screen recordings with ease.
Loom is one of those close competitors. It’s lightweight thanks to its only offering being a Chrome extension—there’s no need to install a Mac or Windows program.
Taking a screen recording with Loom is easy, and offers a range of options. First, you can choose whether you’d like to record a Screen & Cam or just the Screen or Camera.
From here, you can record either the full desktop or just the current tab.
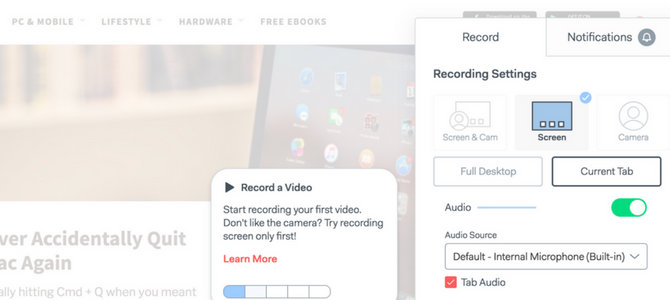
Loom, like CloudApp, lets you explain something via video instead of a long description. Plus, Loom is totally free, though it does plan to add premium features soon.
One big drawback of Loom is that it doesn’t take screenshots. Yet it offers unlimited storage for your screen recordings. This contrasts with CloudApp, which limits you to a time limit per screen recording and finite file storage.
Another competitor, Droplr, allows you to share screenshots and files instantly. This gives it an edge on Loom’s free app, but Droplr locks the screenshot and screen recording technology under a monthly pro subscription.
Is CloudApp the Right Tool for You?
CloudApp offers a free plan with a few limits. This limits you to 25 shares per month, with recordings and GIFs capping out at 15 seconds. The $8/month Pro plan unlocks unlimited shares and removes the time limit on screen recordings. It also lets you upload larger files and increases your maximum storage.
If you only share media occasionally and find quick sharing a pain point with your current implementation, CloudApp’s free plan is definitely worth a look. Serious sharers get a lot for just a few dollars per month too.
To share without a tool like this, check out the best ways to share files with anyone over the web.
Read the full article: How to Capture and Instantly Share Screenshots for Free Using CloudApp
from MakeUseOf https://ift.tt/2IUG38r
via IFTTT
No comments:
Post a Comment