Want to access your Gmail email in Outlook? Maybe you don’t like Gmail’s web interface and prefer a desktop email client, or want to manage your email all in one place.
Whatever the case, it’s easy to add your Gmail to Outlook. We’ll walk you through the process.
Note: These instructions assume you already have at least one email account in Outlook. If you don’t, Outlook will prompt you to set up a new account when you first open it.
Step 1: Enable IMAP in Gmail
First, you’ll need to enable IMAP in your Gmail settings so Outlook can access your mail. Open Gmail in a browser and sign in if needed. From your inbox, click the Gear icon in the upper-right corner and choose Settings.
On the Forwarding and POP/IMAP tab, you’ll find the settings you need. Here you can choose between the POP and IMAP protocols for email syncing. In almost every case, you’ll want to use IMAP, as POP is outdated and doesn’t work with multiple devices. If you do use IMAP, choose Disable POP to avoid duplicate emails later.
Under the IMAP Access section, check the Enable IMAP toggle. If you have a ton of email, you may want to use the Folder Size Limits control. This lets you restrict syncing to folders with fewer than a certain amount of messages.
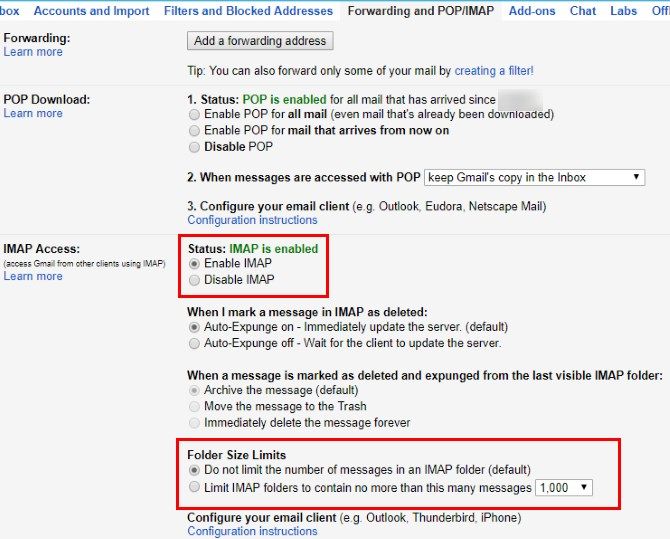
Note that Gmail may lock you out of your account temporarily if you download huge amounts of email (more than 2.5GB) in a day. This is to prevent email abuse.
If You Use Gmail’s Two-Factor Authentication
Those who use two-factor authentication to add another layer of protection to their Google accounts need to take an extra step before continuing. Outlook doesn’t support two-factor codes, so the connection in the next step will fail if you don’t generate a special password in your Gmail settings.
To do so, click your profile picture in the top-right corner of Gmail and choose My Account. Click the Sign-in & Security box, then scroll down and look for the App passwords entry. You may need to confirm your password to continue. On this page, you can create a one-time password to use with apps that don’t support two-factor authentication.
You’ll only need to enter it once, so you don’t have to remember it. Under the Select app dropdown select Mail, then choose Windows Computer for Select device. This is simply to help you remember what the app password is for, so feel free to use the Other field to set a custom name.
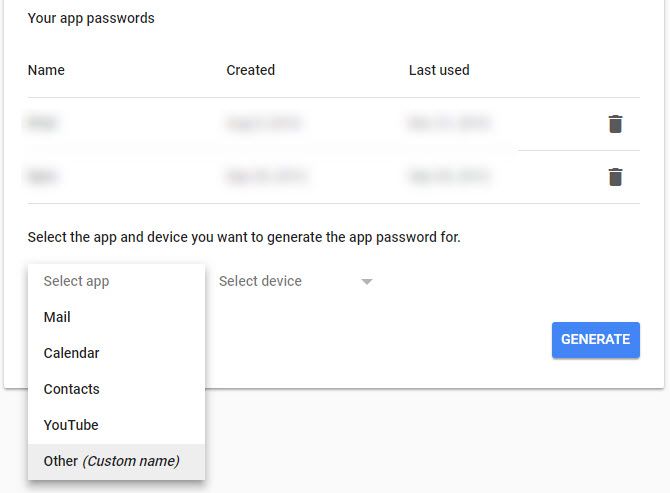
Once you click Generate, you’ll get an app password. Keep it handy for the next step.
Step 2: Add Your Gmail Account to Outlook
Now that other mail clients can access your Gmail, it’s time to add your account to Outlook.
Open Outlook and click File in the top-left corner. In the resulting panel, make sure you’re on the Info tab. Select the Add Account button near the top to begin the process.
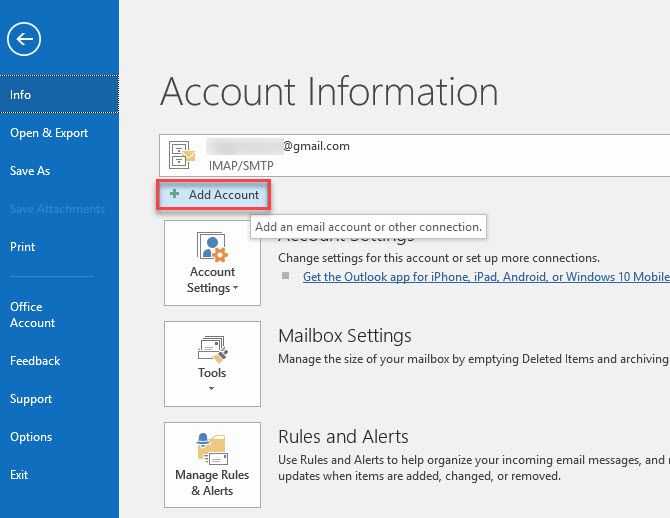
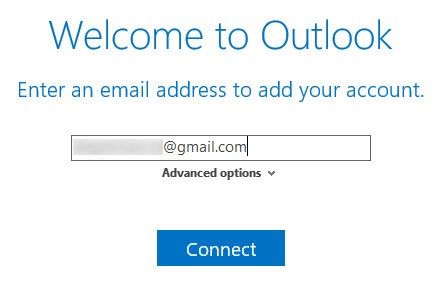
Enter your Gmail address here, then hit Connect.
Next, Outlook will ask for your Gmail password. Enter it, then press Connect again. If you followed the steps to create an app password above, enter that password here instead of your normal Gmail password.
If you get a failure message, make sure that you typed your password correctly. In our testing, we had to click Retry once and setup succeeded after that. If you’re sure you have everything right, you may need to enable access to “less secure” apps on your Google account.
When you see Account setup is complete, click OK. You can uncheck the Set up Outlook Mobile on my phone, too box, as you probably already have the Gmail app on your phone.
Older versions of Outlook required you to enter Gmail’s connection settings manually, but it’s much simpler in newer versions. If Outlook asks you to enter server settings, Google provides an easy reference with all the information you need.
Step 3: Accessing Your Gmail Account in Outlook
Once you’ve done the above, you’re all set to access Gmail in Outlook. If you have other accounts in Outlook, you can switch between them using the tabs on the left sidebar. Click an arrow to expand that account and show all its folders.
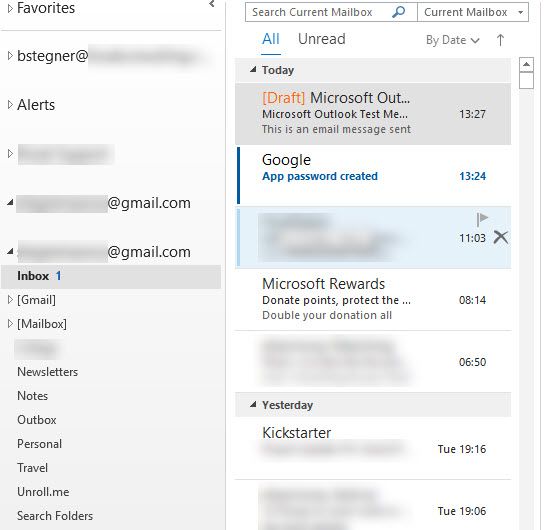
When you’re responding to a message with more than one account in Outlook, you can click the From box to change what email address you use to respond. Be careful with this, as it’s easy to choose the wrong account.
Step 4: Gmail Contacts, Calendar, Settings in Outlook
You’re all set to use Gmail in Outlook now, but you may want to make a few more tweaks first.
The above process only syncs your Gmail mail to Outlook; it doesn’t include contacts or your calendar. If you’d like to move those to Outlook too, follow our guides on exporting and importing your email contacts and how to sync Google Calendar with Outlook.
If you plan on using your Gmail account in Outlook most of the time, it makes sense to set it as the default. In Outlook, go to File > Info > Account Settings and click Account Settings in the dropdown box. On the Email tab, click your Gmail address and choose Set as Default. Outlook will open this by default from now on.
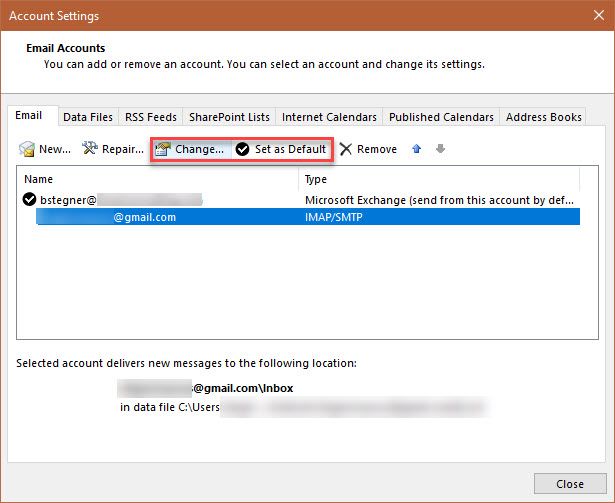
Finally, if you don’t want to sync all of your mail to Outlook, select your account on the same Account Settings dialog and choose Change. You’ll see a Mail to keep offline slider that you can change from All to as little as 1 Month.
Done! Adding Gmail to Outlook Is Easy
That’s all you need to set up Gmail in Outlook. Enable IMAP in Gmail, create a new account in Outlook, and it’s ready for you. This is a great option if you already use Outlook, as keeping everything in one place is easier to manage. If you decide you don’t like it, you can always try using Gmail like a desktop client.
Since you’ll be working in Outlook more often, check out the best tools to supercharge Microsoft Outlook.
from MakeUseOf https://ift.tt/2HCc21o
via IFTTT
No comments:
Post a Comment