Why is the humble checklist such a powerful tool? Well, it helps you keep track of anything—step-by-step or even as a random to-do list. Also, it is so simple to create. If you love checklists, then you will like the news that it is just as easy to insert a checkbox (or a “tick box”) in Google Sheets.
How to Insert a Checkbox in Google Sheets
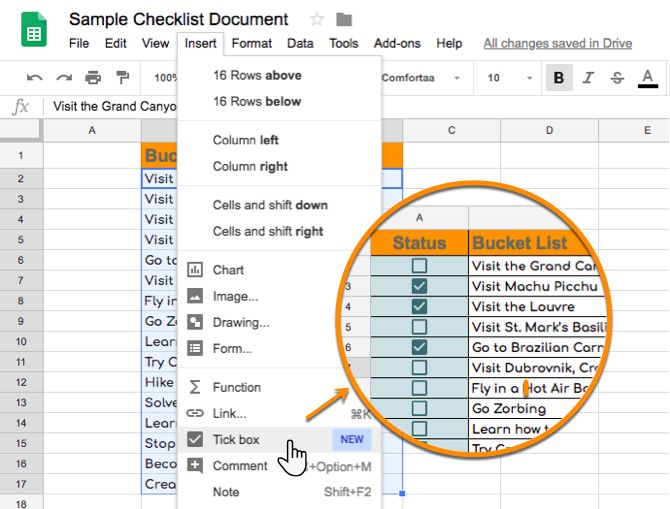
Until now, to insert a checkbox in Google Sheets, you had to use the CHAR function and a number associated with the special character resembling a checkbox. This older process is complicated for something as simple as a checkbox, so it’s good that you can now insert a checkbox from the toolbar.
- Log into Google Drive and open a spreadsheet in Google Sheets.
- Select the cells you want to have checkboxes in. You can also create your list first and then insert the checkbox by selecting the adjoining empty column of cells.
- From the menu, click Insert > Tick box.

- To remove checkboxes, select the checkboxes you want to remove and press Delete.
You can increase or decrease the size of the checkboxes by changing the font size from the toolbar. Google Sheets also allows you to pass custom values with the checkboxes. For instance, a checked box could signal a “TRUE” while an unchecked box could be a “FALSE”. For instance, you could use this with a multiple choice Q&A.
Follow these steps to validate the checkboxes with the custom values you want.
- Select the cells with the checkboxes.
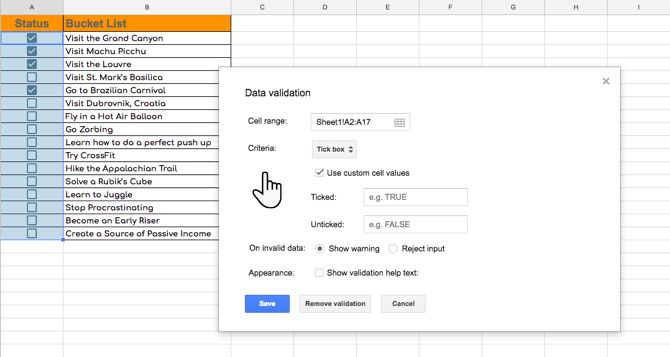
- From the toolbar, go to Data > Data validation.
- In the data validation dialog, choose Tick box as the Criteria.

- Select Use custom cell values. Enter your custom value in the Ticked and Unticked fields.
- Click Save.
A tick box in a spreadsheet can be a simple device to keep track of everyday tasks or it can be turned into a powerful data gathering tool or a filter for charts and pivot tables.
from MakeUseOf https://ift.tt/2vFue4k
via IFTTT


No comments:
Post a Comment