Monday, 3 September 2018

How to Use Smart Objects in Adobe Photoshop

smart-objects-photoshop

Smart objects are an incredibly useful feature in Photoshop. They let you edit images and add filters without any loss of quality. However, they aren’t that well known.

Beginners may not even have heard of smart objects, and casual users might think they’re an advanced option beyond their capabilities In fact, everyone should make use of smart objects.

In this guide, we’ll show you how to get started using smart objects in Adobe Photoshop.

What Are Smart Objects?

A smart object is a special kind of layer that enables true non-destructive editing in Photoshop.

When you convert a normal layer into a smart object, the content of that original source layer gets saved separately—as a file-within-a-file. No matter how much you edit the smart object, the original source content remains untouched.
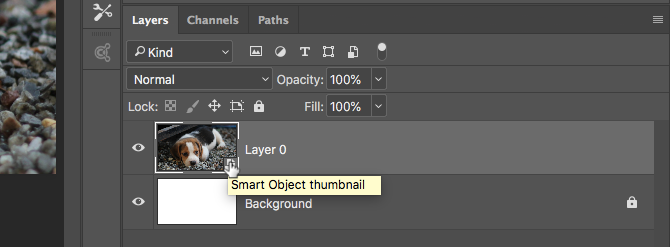
smart object thumbnail

Smart objects can contain both raster and vector content, and work like normal layers. You can resize or transform them, apply filters or add adjustment layers. You’re also able to make selections and use masks.

What makes it even more useful is that you can access and edit the source content at any time, too. Just double-click the thumbnail image for the layer in the Layers panel.

Use Smart Objects for Non-Destructive Editing

Non-destructive editing is the main reason why you should use smart objects. You can scale, resize, and rotate them without any loss of quality.

Here’s how it works.

Open an image on a new layer. Use the Free Transform tool (Ctrl + T on Windows, or Cmd + T on Mac) to make the image smaller, then hit Enter to apply the change.

Now use Free Transform again to enlarge the image back to its original size. Notice how the image is now soft or pixellated.
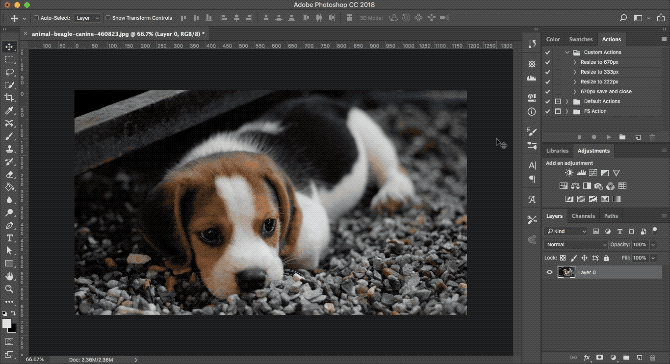
free transform

This happens because when you made the image smaller Photoshop threw away the extra detail that was no longer needed.

Now try this.

Reopen the original image. Right click on the layer in the Layers panel and selecting Convert to Smart Object. Now repeat the above steps, making the image smaller, then bigger again.
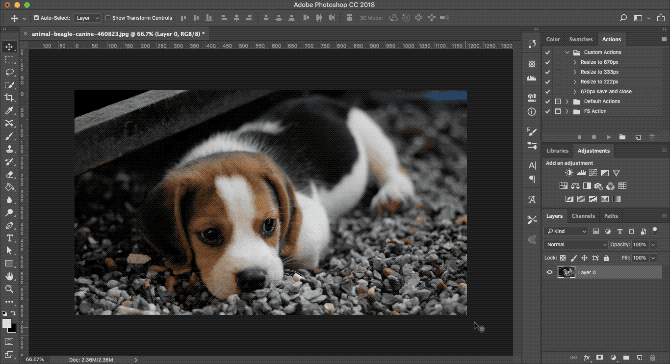
free transform smart object

This time there’s no loss in quality. A smart object saves a copy of the original, unedited content so any changes you make are not permanent. You can even properly resize images fully without losing quality.

Edit Multiple Smart Objects Together

Often you’ll need to reuse the same picture, shape, or other object more than once in the same image. By turning it into a smart object you can edit multiple instances of that element in one go.
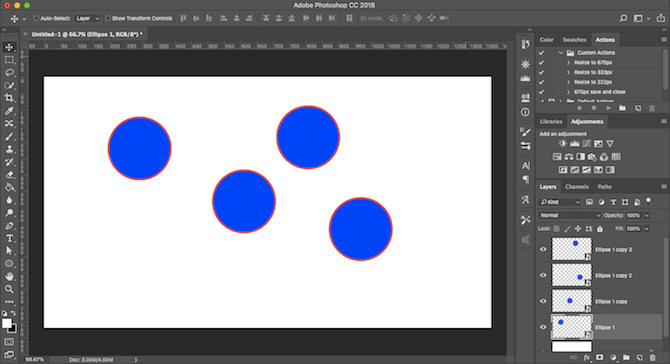
duplicate layer smart objects

Highlight the layer containing the content you want to repeat, right-click, and select Convert to Smart Object.

Next, duplicate the layer several times by hitting Ctrl + J on Windows, or Cmd + J on Mac. This creates multiple copies of the same smart object, all tied to the same source content.

Use the Move tool (V) to reposition all your duplicated layers.
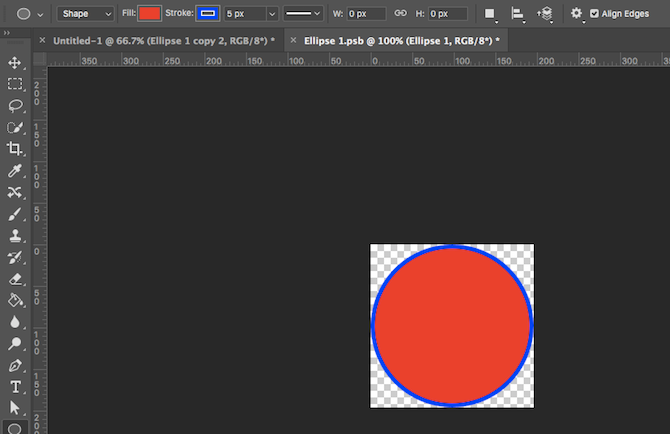
edit smart object source

Now, for any one of the duplicated layers, double-click the thumbnail in the Layers panel. This will open the original source content in a new tab. Edit it, then save, and close the tab.
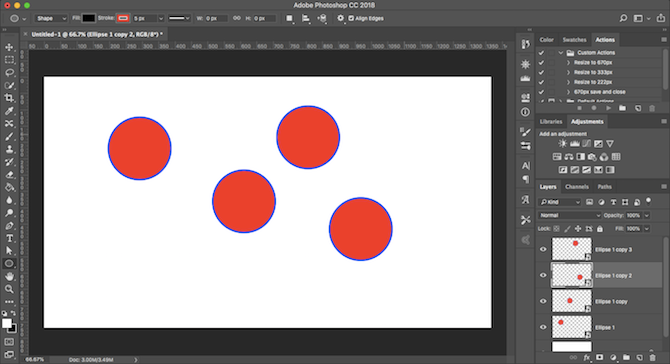
update smart objects

Back in your main file, all instances of the duplicated smart object will have been updated to reflect the changes you just made.

Edit Smart Objects Individually

You can, of course, use smart objects more than once but still edit them individually.
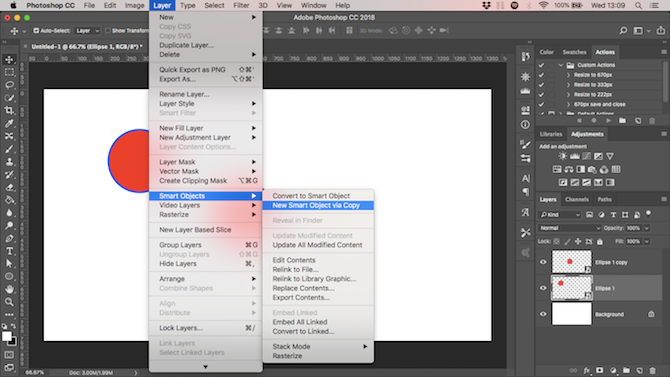
smart object via copy

To do this, don’t duplicate the layer.

Instead, go to Layer > Smart Objects > New Smart Object via Copy. This creates a copy of both the smart object layer and the original source file.
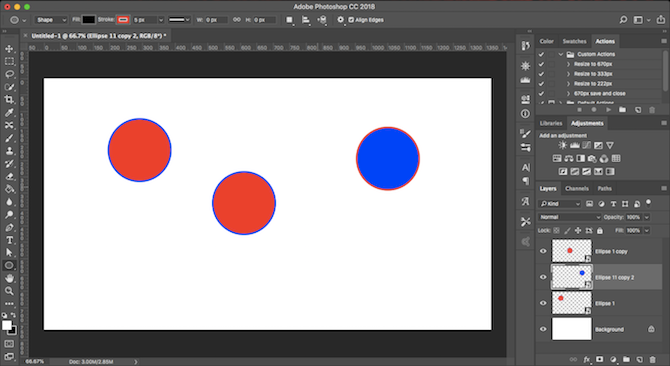
edit single smart object

Use Linked Smart Objects Across Several Files

In most cases, a smart object uses content embedded in your image file. But you can also create smart objects linked to external files.

This allows you to reuse smart objects across several files and projects. Whenever you update the linked source image, all the files that share the smart object will also be updated.

Here’s an example.
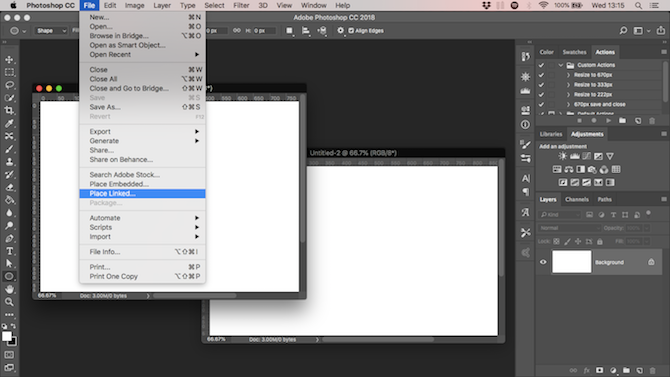
place linked

Go to File > Place Linked and select an image file from your desktop that you want to use as the basis for your smart object. This will open the image on your canvas as a smart object. Hit Enter to confirm.
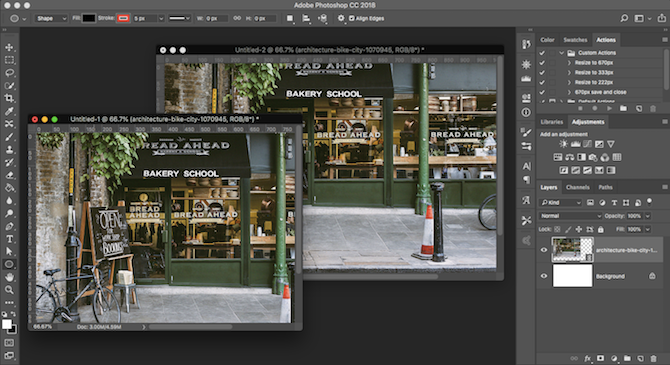
linked smart object

Create another file and do the same again, using the same source image. You should have two documents containing the same image.

Now open the external, linked source image, edit it, then save it. Both the files that link to this image will now be updated with the new changes.

update linked smart object

When you use this option, you need to take an extra step when saving your file. First, save it as normal. Then, go to File > Package then hit Choose to save both your Photoshop file and the linked image together in a folder. If you move or delete the linked image otherwise, your file will break.

Use Smart Filters

Smart objects give you a massive upgrade to Photoshop filters, turning them into smart filters.

Filters are normally quite heavy handed. You apply them, and if you don’t like the effect you have to undo it and try again.

Smart filters on smart objects are non-destructive. You can edit them at any time, and even hide or delete them if you no longer need them.
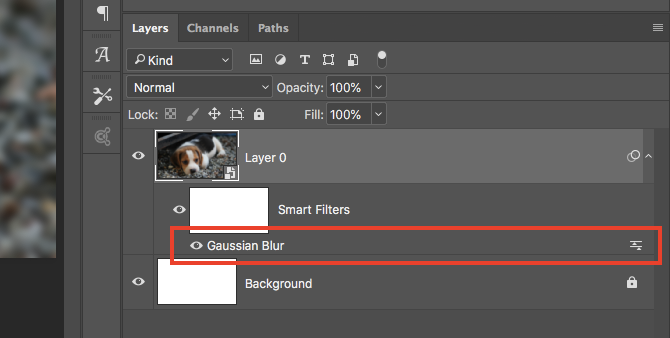
smart filters

It’s simple to use. Turn your layer into a smart object then apply a filter in the normal way. Look in the layers panel, and you’ll see the filter listed below the smart object layer.

Double-click to edit it, or drag it onto the trashcan to remove it.

Mask Filters in Photoshop

Even better, you can mask smart filters to control where on your image they take effect.
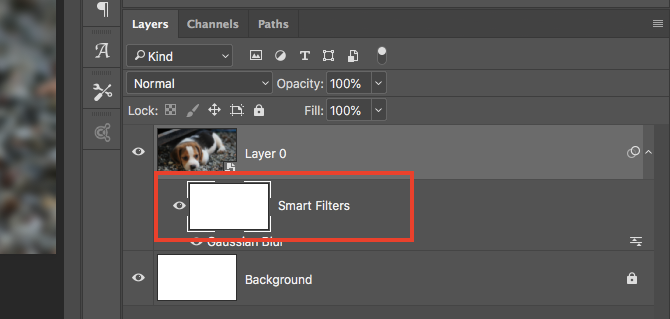
smart filter mask

Smart filters have masks automatically applied to them. It’s the box above the filter in the layers panel. The mask is empty (white) by default. This means the filter effect is applied across the whole layer.

Click the mask thumbnail, select a brush, and set it to black. Now start painting over your image. The filter effect is removed from all of the black areas.

Set the brush to gray to make it partly visible.
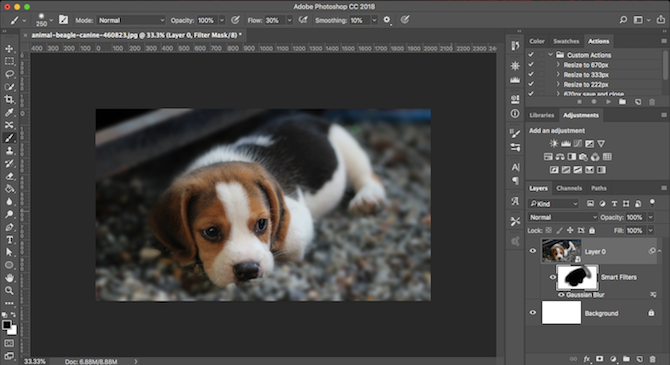
smart filter bokeh effect

Masking filters like this enables you to create bokeh effects in portraits, or to selectively apply sharpening or noise reduction to specific areas of a photo.

Use Smart Objects to Create Templates

A final great reason to use smart objects is that they make it easy to create templates in Photoshop.

Just right-click on the smart object layer and select Replace Contents. Then select the new image that want to use as the source content.
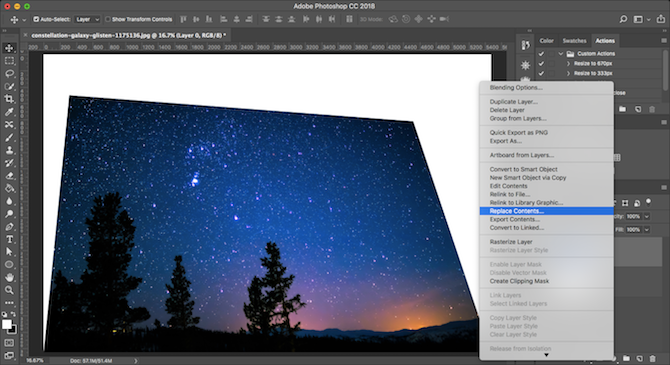
replace smart object contents

Why is this so useful?

Because if you’ve applied filters, or altered the shape of a layer, then the new source image for your smart object will retain these properties. This wouldn’t happen if you simply dropped in a new image onto a separate layer.

Downsides to Using Smart Objects

Smart objects are extremely useful, but they have a few downsides you need to know about.

First, files that contain smart objects are heavier. They’re larger and often require more system resources.

Second, they can also be more complex. If you’re using a lot of smart objects you need to label and group your layers properly to help stay organized.

rasterize smart object

Third, smart objects are not directly editable. You can’t use things like the brush tool or clone stamp on one without converting it back to a raster layer, losing the benefits of smart objects in the process. Do this at Layer > Smart Objects > Rasterize.

Alternatively, you can directly edit the smart object’s source content. In most cases, this can be a better option.

The Next Steps

Smart objects are so useful, whether you use Photoshop for vector graphics or photo editing. And they’re easy enough to use that anyone—from beginners to pros—can benefit from using them.

As we’ve seen, one of their best uses is for adding filters to images. We’ve covered the basics in this article, but there’s a lot more you can do with them. Check out our guide on how to apply a smart filter to multiple layers to discover how you can take things to the next level.

Read the full article: How to Use Smart Objects in Adobe Photoshop


from MakeUseOf https://ift.tt/2CetO8y
via IFTTT

7 Certified Data Science Courses to Upgrade Your Job Skills With Coursera

Looking to start a career path around data science? Why not get started with Coursera?

We’ve previously highlighted some of the best Coursera courses worth paying for. But if those were too broad for you, have a look at these excellent courses in data science.

What Is Data Science?

Just in case you’re not aware, we’ll briefly describe the field of data science so you have an idea of what these courses involve.

Data science, in a sentence, is a field that uses all sorts of methods to pull insights from data. This enables people to make better decisions.

With the explosion of big data and easier ways to collect data in large quantities than ever before, having data science around to process and make meaningful choices based on it is essential. These courses will introduce you to data science and help you branch out to a specific area that you’re interested in.

1. The Data Scientist’s Toolbox by Johns Hopkins University

The first course in the university’s data science specialization. It serves as an overview of what data scientists do and work with. You’ll learn the basics of how to turn data into information you can take action on, as well as technical tools used in other data science courses like R programming, git, and similar.

You won’t get into the nitty-gritty of data science just yet, but this serves as a valuable foundation for the tools of the trade.

2. Getting and Cleaning Data by Johns Hopkins University

As this course’s description says, before you can work with data, you need some data! Thus, this class focuses on ways to obtain some. You’ll learn how to grab data from the internet, databases, various APIs, and more.

Similarly, you’ll learn the essentials of data cleaning, the process of making your data neat so you can work with it more easily. By keeping your data in good shape, it becomes much easier to work with and more useful.

3. Machine Learning by Stanford

Machine learning, the process of making computers act without explicit programming, is huge today. The progress made in self-driving cars, automated web technologies, and similar fields has been fantastic, and machine learning powers them all.

It’s an important part of data science, making it a great Coursera course to take. You’ll get some practice working with machine learning techniques, how to apply them, and some best practices in the field. Interestingly, this course is taught by Andrew Ng, the co-founder of Coursera.

4. Introduction to Data Science in Python by University of Michigan

Python is a popular programming language for all sorts of purposes, so it’s no surprise to see it used in data science. This course, the first in a five-part Applied Data Science with Python Specialization set from the University of Michigan, looks at the basics of Python and data manipulation.

After this course, you’ll know how to clean and manipulate data in Python. It’s an intermediate-level course, so total newcomers to Python or statistics need not apply.

5. Google Cloud Platform Fundamentals: Core Infrastructure by Google Cloud

Google’s cloud technology is one of the front runners of data science, so why not learn from the best? This course is the first part of Google’s cloud platform specialization, and walks you through the basics of working with the various services. You’ll meet Google App Engine and Google Computer Engine, for starters.

It’s a great overview of the powerful services Google has at its disposal and will help you decide if you want to continue learning about them. Notably, this course has just one week of study, so you can complete it in roughly seven hours.

6. Inferential Statistics by University of Amsterdam

If you don’t have any experience with statistics, you might run into trouble understanding data science. In those cases, this course will provide you with some background on the field.

You’ll learn basic principles for testing specifics, then explore common statistical tests and how to interpret them.

7. Data Science Specialization by Johns Hopkins University

If you’re serious about data science, take a look at Coursera’s data science specialization. This is a nine-course introduction to the discipline, capped off by a real-world project.

Some of the above courses were taken from this specialization, so you can take them individually if you only have a passing interest in the subject. But working through the whole package enables you to learn much more, and you’ll have a valuable certificate upon completion.

This specialization takes about nine months to complete, with five hours of work per week. It’s intended for beginners and doesn’t require any background knowledge other than a basic working knowledge of Python.

Ready to Learn About Data Science?

We’ve highlighted six courses that cover different areas of the data scientist’s toolkit for you to explore on Coursera. If you want to go further, look into the Johns Hopkins specialization for much more on this topic.

Data science is an exciting field, and it will only continue to grow as technology becomes more powerful. Take advantage of Coursera‘s excellent (and affordable) courses now to get your career started!

Read the full article: 7 Certified Data Science Courses to Upgrade Your Job Skills With Coursera


from MakeUseOf https://ift.tt/2Ca64lK
via IFTTT

10 of the Best Travel Documentaries on Netflix

travel-documentaries-netflix

Maybe you’ve caught the travel bug. Maybe you have returned home from a big trip abroad and are wondering where to go next. Or maybe you’re an aspirational traveler who partakes in wanderlust, but from the comfort of your own sofa.

No matter what your motivations are, Netflix has you covered. In this article we list the best travel documentaries you can watch on Netflix right now. All of which are guaranteed to make you long for a week experiencing new sights and sounds.

1. Expedition Happiness

What is life’s purpose? To be happy? But how? In Expedition Happiness, a couple tries to find out. What is happiness after all? Is happiness a wedding? A loft overlooking a great view of the city’s chaos? A monotonous routine just to maintain a healthy bank balance?

After all, what is the point of living if you do not break the routine. Sit back and stream the Alaskan mountains to the Mexican beaches with the “Loft on Wheels” created by Mogli and Felix with their dog Rudi. Let your soul travel as these three try to figure out what happiness is.

Get to know the ups and downs of executing a moving residence, to make happiness out of an old school bus.

2. Stephen Fry in America

From genre-defining sketch comedy to drama, Stephen Fry has done it all (including providing the narration for some of the best audiobooks to listen to). In this documentary he packed himself into his trademark London black cab for a drive through America.

Along with the signature sense of humor, you also get to see a new side of Stephen Fry. The genuine curiosity that oozes out of every encounter Stephen has in the United States.

The main question on his mind? How is every American state united and how are they all different from one another? Hop into the black cab and let Stephen explain it all.

3. Somebody Feed Phil

This is hands down the most fun I’ve had watching a food and travel documentary. The way that Phil approaches new food, new places, and new people is a breath of fresh air.

He’ll take you to places you never thought of. Places you’ll end up adding to your bucket list. Here’s a glimpse into what I ended up adding to my list: coffee in Vietnam, vegetarian food in Israel, dragon fruit in Thailand, and hot dogs in Copenhagen, to name a few.

As Phil says, “If you like a dish, go to the source.” Get delighted, get amused, get amazed and definitely get hungry while somebody feeds Phil.

4. Dark Tourist

Not all travel has to be about the beautiful and the serene. If you’re in the market for a slightly twisted travel story, Dark Tourist is for you. David Farrier, a New Zealand based filmmaker and journalist travels around the world looking for unusual and often morbid tourist spots across the world.

This documentary explores a new phenomenon called Dark Tourism. This is where tourists intentionally travel to places associated with death and destruction. A war-torn country? Sure. A dangerous border crossing? Why not. A quick trip around radioactive environments? Don’t mind if I do.

5. National Parks Adventure

The U.S. National Parks Service is more than a 100 years old. That’s more than a century of protecting natural wilderness in the United States.

This breathtaking documentary by filmmaker Greg MacGillivray will make you want to go visit a national park right away. Between the beautiful montages is a story of three artists as they revisit Roosevelt and Muir’s camping trip, where the Parks Service began.

6. Anthony Bourdain: Parts Unknown

Anthony Bourdain revolutionized the food and travel documentary genre. And Parts Unknown is his magnum opus. Living life on the edge can be dangerous and one is not always willing to take that risk, yet some risks are worth taking in the name of food.

Ever had a food bucket list to fulfill? Then get into this ride along with Anthony Bourdain who takes you to the parts unknown just to eat. And maybe fall in love. With the food, the people, or life itself.

Eat hungrily and happily with Bourdain with a seemingly innumerable amount of delicacies that the world has to offer. Experience meal after meal from various countries as well as their political issues, while Bourdain feasts on food of all kinds.

7. Jack Whitehall: Travels With My Father

Father-son bonding is a different experience for everyone. When comedian Jack Whitehall was young, he and his father Michael never really had that.

Now, Whitehall wants to bring that spark back by taking a gap year and traveling with his father. Watch as this comedian trades the stand-up stage (the best stand-up comedy specials on Netflix) for a tuk-tuk in Thailand.

What better way to spend time with your parent than by going on a trip. But what happens when you have a slightly grumpy father and you are the overly energetic one? Quite a blast, actually, Watch as this father-son team gets into accidents, goes to odd places, and attempts to open up to one another.

8. The Moaning of Life

In this poignant series, Karl Pilkington takes on the herculean task of figuring out life itself and if he’s cut out for it, now that he’s turning 40.

Experience the reality of life itself with Karl as he tries to contemplate things he has never really given a second thought. Like the need for love, the secret of happiness, and, at the end, death itself.

There are questions about life itself, like why to get married, why to have children, or why do we need to travel? All with a dash of that infamous British humor.

9. Under an Arctic Sky

Who’s really in charge? Nature or humans? The answer may lay under an arctic sky.

Everyone takes meticulously planned trips, but have you ever felt adventurous enough to venture out into the storm and travel on? In this monumental documentary, photographer Chris Bukard and filmmaker Ben Weiland beautifully capture the wrath and serenity of nature.

With freezing temperatures, brutal storms, and three hours of daylight, Iceland is far from being the perfect surf trip. Set out with a brave crew to explore the unknown islands of the north in the midst of the worst storm the country has experience in the past 25 years.

10. Planet Earth II

Planet Earth II in 4K is a breathtaking look at the world we live in.

Experience our own planet all over again with the epic camerawork and cinematography. Live that experience in high definition, as we encounter the wildlife, flora, and fauna with which we coexist.

This documentary series reveals a different perspective of Earth, not only through marvelous cinematography but also with the understanding of nature.

Keep Going With Food Documentaries on Netflix

Travel and food go hand in hand. But what if you’re more of a foodie than a traveler? Now that you know what travel documentaries you should be watching on Netflix why not check out the best documentaries about food. The stories covered come from a pastry chef in New York and a Sushi chef in Japan, amongst others.

Read the full article: 10 of the Best Travel Documentaries on Netflix


from MakeUseOf https://ift.tt/2MIAm41
via IFTTT

5 macOS Folders You Should Never Touch (And Why)

mac-folders-not-touch

macOS has a deep and nested folder structure, and a default macOS installation has many unfamiliar-sounding directories. The majority of users don’t ever need to touch these files.

Apple keeps certain folders hidden for a reason. Messing with these directories could result in an unstable system, loss of data, or worse—prevent your Mac from booting up. We’ll show you the places that most users shouldn’t touch in the macOS file system.

1. Language Files and Folders

Mac apps come with language files for every language they support. When you switch your Mac’s system language, the app will change to that language immediately.

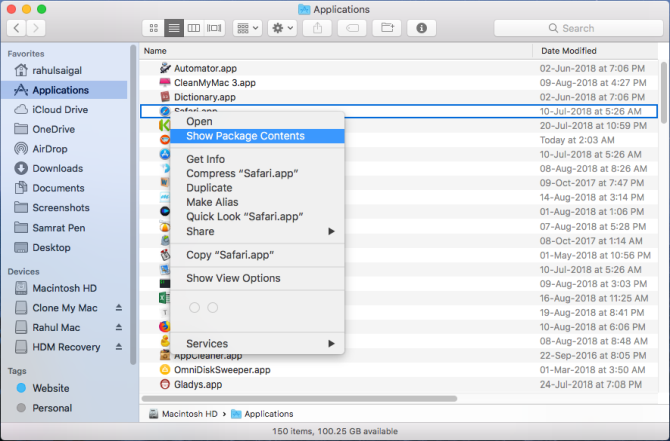
To see the language files of an app, right-click it and choose Show Package Contents from the context menu. The path will look like this:

AppName.app/Contents/Resources/Lang.lproj

show package contents of an app

Removing the language files for third-party apps is easy through Terminal. But for the default macOS apps, you need to disable System Integrity Protection which we don’t recommend at all. Although there is a lot of advice on the internet recommending that you delete language files to gain disk space, the amount of space you earn is not significant enough for the risks involved.

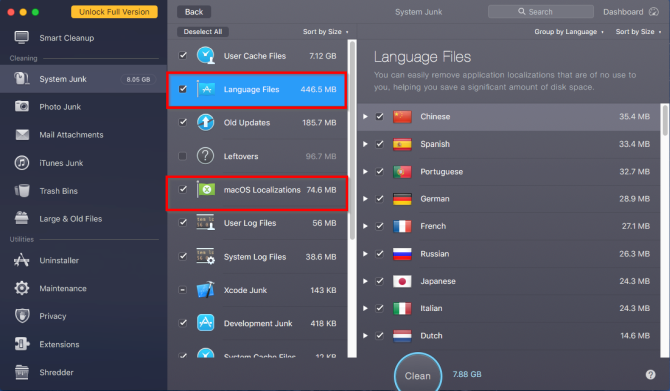
A quick scan with CleanMyMac shows that my Mac will gain about 520MB of disk space by deleting these files. The result might be different in your case, but it’s highly unlikely that you’ll gain more than a few gigabytes. Also, you must redo these steps after every major macOS upgrade.

quick scan with cleanmymac app

When you remove language files, you can’t predict which apps will crash or freeze. In the worst case, you’ll have to reinstall the app. Plus, old versions of programs like Microsoft Office and Adobe apps may not work properly or update. Therefore, it’s best to ignore the language files and folders.

Check out our tips for freeing up space on your Mac for better ways to do this.

2. Hidden /private/var Folder

macOS creates several user and system-related cache files to speed up the system. The cache and temporary data located in /Library/Caches is under your control. You can manually delete this cache without any third-party tools.

But the ones in the system folder are entirely managed by macOS. They’re not even visible to you. Sometimes items in these directories can take up vast amounts of disk space. Thus, you might wonder whether it’s safe to delete the contents of /private/var/folders or not.

Location of /private/var/folders

The simplest way to find the /private/var folder is through the Finder Go to Folder menu. Press Cmd + Shift + G to bring up the Go to Folder box and enter /private/var/folders. A new Finder tab will open immediately.

To open the location of system cached and temporary files, launch a Terminal window and type the following:

open $TMPDIR

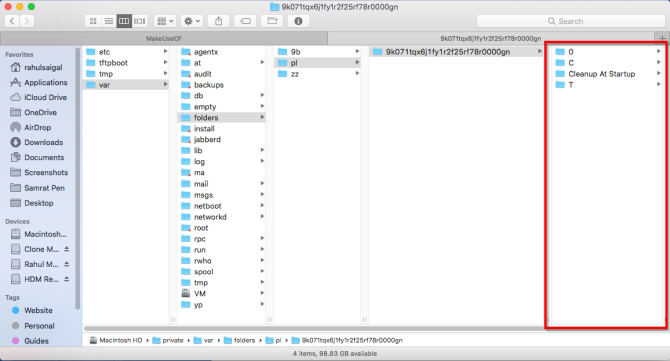
You’ll see a two-character folder name with long, seemingly random subfolders. As you navigate the folder tree, explore these three folders. The C folder represents Cache, while T is for Temporary files. User files live in the 0 folder.

location of private var folder

Issues With /private/var/folders

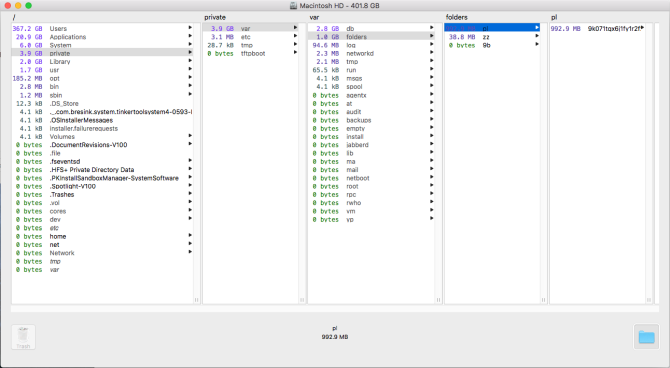
A quick scan with OmniDiskSweeper shows that the size of /private/var/folders is 1GB and that of /private/var is about 4GB. The size of these folders can vary between system, but shouldn’t be too large. If these directories take up more than 10GB, then they’re a concern.

results from omnidisksweeper app

You should not attempt to manually delete files from any of the /private/var directories even if they’re large. Doing so might damage core macOS files, corrupt document data, and prevent your Mac from booting or behaving as expected. You’d then be stuck reinstalling macOS from scratch.

To safely remove these files, quit all apps, and choose Apple Menu > Shut Down. When you reboot your Mac, you trigger the built-in cache clearing mechanisms. This deletes the unnecessary contents, caches, and temporary items in /tmp, /private/var, and /private/var/folders.

If for some reasons these files don’t clear, then reboot your Mac in Safe Mode. macOS deploys additional built-in mechanisms to get rid of caches and temporary files in this mode. Then reboot into normal mode as usual and recheck your available disk space.

Other Important Folders in /private/var

Concerning disk space, there are few more folders which you should not touch:

  • /private/var/db: Includes a bunch of macOS configuration and data files. They include Spotlight database, network configuration files, and more.
  • /private/var/VM: Contains swap and sleep image files. If you hibernate your Mac, this directory will occupy more than 5GB of disk space.
  • /private/var/tmp: Another temporary file directory.

3. System Library Folder

The macOS filesystem contains multiple Library folders. This is by design, and while many similarities exist between the contents of the Library folders, each folder has a different role to play in the macOS filesystem. You’ll find three Library folders:

  • /Library
  • /System/Library
  • ~/Library

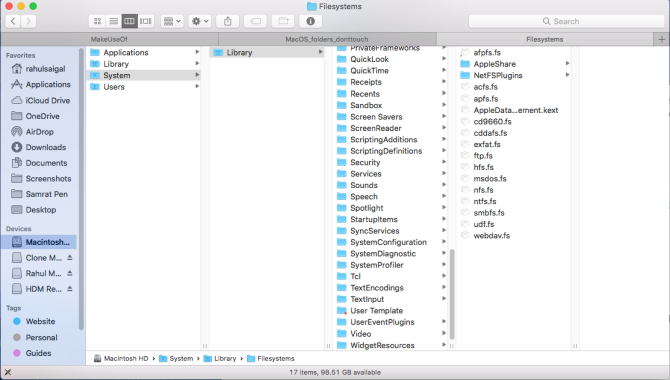
The main and System Library folder have a global scope. Their contents support every aspect of the system. The System Library folder contains the files that macOS needs to operate. Only the OS has the right to modify its data, and only system-level events should affect them. There’s no reason for you to touch anything in this folder.

system library folder

4. User Library Folder

The Library folder inside the home directory is your account’s personal Library. Here, macOS stores system, third-party support files, and preferences. It also includes Mail settings, Safari bookmarks, history, calendar data, and much more. The Library folder also include folders that need occasional cleaning. However, not all folders are safe to touch.

~/Library/Application Support

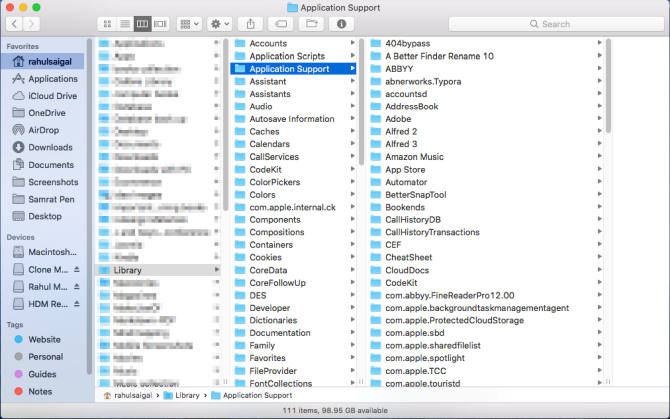
In this folder, both system and third-party apps store support files, usually in a subfolder named after the application. They contain registration data and even store saved app data used in a particular session. Do not delete contents of the Application Support files directly. Instead, use an app called AppCleaner to delete support files along with the app.

library application support folder

~/Library/Preferences

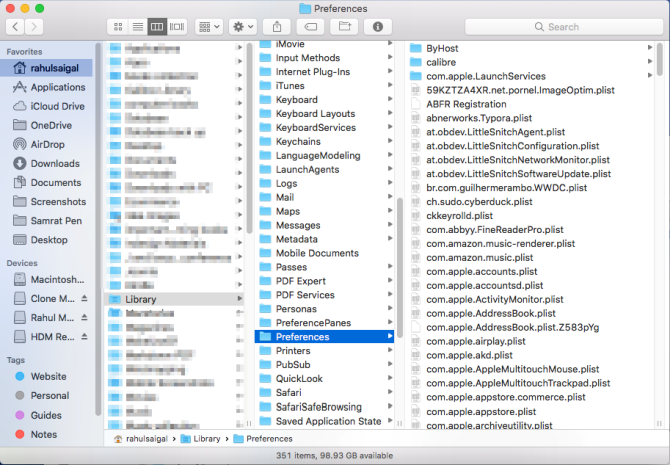
This folder contains all the preference data for default and third-party apps. Again, don’t delete the contents of the Preferences folder; otherwise an app will revert to its default state or might crash. AppCleaner will take care of preferences while uninstalling an app.

library preferences folder

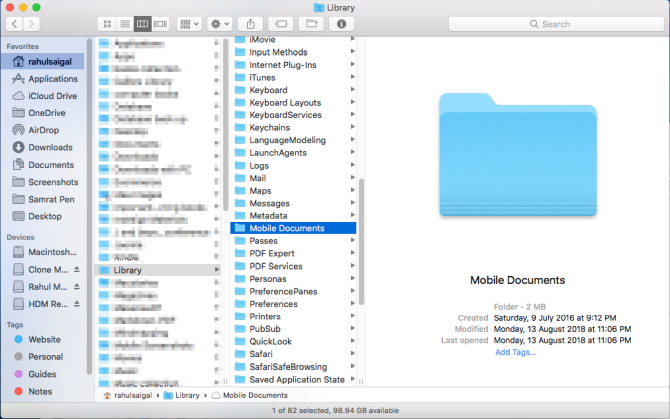
~/Library/Mobile Documents

This is the actual location of the iCloud folder. Documents, application preference files, iOS app data, and more lives in this folder. You should not move, rename, or delete it. It’s also a folder that takes up lot of disk space if you use iCloud. Delete the files you don’t need from iCloud Drive to reduce its size.

library mobile documents folder

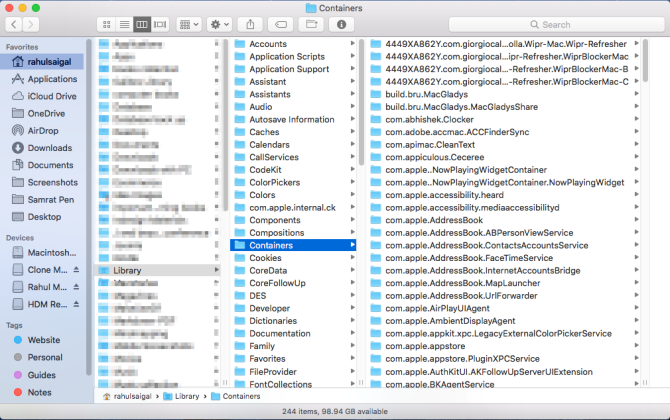
~/Library/Containers

This contains support files, cached data, and temporary files for apps you’ve download from the Mac App Store. Since apps on the App Store are sandboxed, they cannot write data anywhere on the system. Again, don’t delete the contents of this folder. If the Containers folder takes up lot of disk space, reinstall the affected app.

library containers folder

5. Hidden Folders in the Home Folder

hidden folders in the home directory

When you press the Cmd + Shift + Period keys in the Finder, you’ll see plenty of files and folders in the Home directory which are typically hidden from view. Different macOS technologies and apps store their data in these folders for the smooth working of your Mac. You should not modify or delete any of these folders:

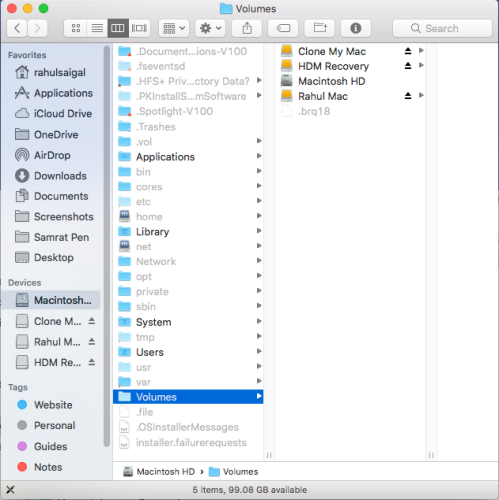
  • .Spotlight-V100: Spotlight metadata for each mounted volume. The mdworker processes use this metadata to update Spotlight search.
  • .fseventsd: A log file of FSEvents logged by the fseventsd launchdaemon process. It monitors file system events, such as file creation, modification, deletion, and more. Time Machine uses this data to process backup in the background.
  • .DocumentRevisions-V100: macOS versioning database used by apps to save and retrieve different versions of a document.
  • .PKInstallSandboxManager: Used for software updates and sandboxing.
  • .PKInstallSandboxManager-SystemSoftware: Used for system software updates.
  • .Trashes: Trash folder in each mounted volume.

You Must Take a Backup

Messing with these folders is risky, as doing so might corrupt your apps, documents, and macOS. While most Mac users don’t have to worry about these folders, you might be tempted to start exploring these folders when disk space becomes an issue.

Having a backup is essential. If you lose any data, you can recover it relatively easily. If you don’t know how to back up, learn how to use Time Machine or check out some great alternatives to Time Machine.

Read the full article: 5 macOS Folders You Should Never Touch (And Why)


from MakeUseOf https://ift.tt/2ozOSwv
via IFTTT

Sunday, 2 September 2018

Gaming at IFA 2018: What’s New and What’s Hot?

There were few new announcements in Gaming at IFA 2018. a few notable exceptions , most companies used their space to showcase their already existing product lines.

Here is a run down of the best things on show for gamers at IFA 2018.

Note: This article will be updated as the conference goes on.

Acer

Thronos

The announcement with the most buzz at IFA 2018 was Acer’s new gaming chair. The “Thronos” was only unveiled to press in the days leading up to IFA and was absent for the rest of the conference. Here is what we know:

Standing at over 1.5 meters tall and capable of sustaining 3 27” gaming monitors, the Thronos is imposing. Black steel, accented in blue or white, cage the user in a n adjustable chair capable of leaning back to 140 degrees. The bottom of the mount contains space for a Predator PC case, and also dynamic response to in game sounds. In short, you will feel every in game impact.

The concept of all-in-one gaming chairs is nothing new. The Thronos seems to have struck a chord and the idea of a self contained “gaming cave” has arrived to stay.

There are no details as to release date or retail price at present. Rumors put the cost at up to $5000 dollars, making this already niche product even more exclusive. That said – serious gamers are unlikely to let price get in the way of what seems to be the ultimate gaming experience.

Predator XB273K Gaming Monitor

Acer also showcased their new Predator XB273K monitor. Aimed specifically at gamers and their needs, it comes with all the features you would expect of a high end monitor. With a resolution of 3840 x 2160 and a refresh rate of 144Hz it promises great image quality.

A budget conscious alternative to the Predator monitor comes in the form of the Nitro XV273K. Aimed at giving a high budget feel at a better price (yet to be announced), it comes in several forms. The 3 announced variations are the XV273K, XV273U (both 27” IPS^3 displays, and XF272U (WQHD).

With each model featuring Acer’s VisionCare(TM) tech, even the lower range models seem a pretty good prospect for the budget minded gamer. The XB273K with be available at EU 1299 during the fourth quarter of 2018.

RAZER

Razer were promoting a trio of peripherals under the slogan “Raise the Level Cap”. What this meant in practice was a hands on experience of their new gaming mouse, keyboard and headset. Each was newly presented at IFA 2018.

Kraken Headset

The new Kraken headset was designed with both quality and comfort in mind. An inline controller on the USB cable controls not only volume, but bass level – something they were keen to point out is unique at this price point.

Sound is taken care of through 2 balanced drivers per ear designed to give equal response across all volumes for accurate positioning. The Kraken headset is also the first to make use of THX spatial audio. The virtual positional audio system gives a far greater depth to directional audio, and from the small demo provided is a marked improvement to other budget headsets.

Retailing at $99, the headset certainly had the feel of something more expensive, and the design around the eyes is designed to keep the user cool. Notched ear padding for glasses wearers and a 3.5mm jack input into the USB adapter show that this headset has been thoroughly thought out with user comfort and practicality in mind.

Black Widow Elite Keyboard

The Black Widow Elite keyboard brings a new programmable system to the table. A mod key gives the user a second keyboard layer which can be assigned to any key combination or macro. Media keys have also been added to the top right of the keyboard along with a notched radial dial and button. While they are designed as media and volume keys, they are fully programmable from Razer’s Synapse softtare controller. On board keyboard memory can store these macros making up to 5 custom keysets plug and play regardless of what computer you plug into.

Razer have also modified their switches, adding walls to them stopping any key wobble or false hits. The effect this had was impressive, as running your finger across the keyboard caused no sideways movement at all.

Again the thought and comfort are apparent here, with an easy to adjust magnetically attached full leather wrist pad, and a cable channel to route the cable out from either side of the keyboard. The previous Black Widow Elite retailed at $179.99, and while the new edition is cheaper, $169.99 is still a high price for many. This keyboard is feature packed, and while it’s impossible to tell from a few hands on minutes, seems worth it.

Razer Mamba Wireless Mouse

Initially released in 2010, the Razer Mamba Mouse was originally touted as indistinguishable from wired mice. The 2018 update ups the ante again, with an improved battery life and a new 5G optical sensor (requested by pro-gaming Razer users allegedly). Much like the Black Widow, the mouse has onboard memory, and programmable buttons. The same mod system is in place allowing a mod button to give each other button multiple functions.

Battery life is claimed to reach over 50 hours, and a micro USB cable takes care of charging while allowing the mouse to function as a standard wired mouse. It will retail at $99, putting it squarely in the middle of the field in terms of premium wireless mice.

Razer were very keen to impress upon us the differences these new peripherals have, and from what we have seen these are well thought out changes designed to give more functionality at a similar or lower price point.

Dell

Dell showcased the recently released G3 line of gaming laptops, which function as a cheaper alternative to the G5 and G7 range. Starting at $799 with an Intel i5-8300H and topping out at $999 for an i7 they claim solid performance on a budget. While clearly less powerful than their Alienware counterparts, the G3 played well. The main difference outside of processing power and minor aesthetics is the display. The G5 is available with an ultra high definition (UHD) display much like it’s predecessor (The Inspiron 15 7000). The G3 IPS comes with a perfectly capable IPS, but no option for upgrade.

Also showcased was the new S2719DGF 27” Gaming Monitor. With resolutions up to 1440p, and a reported refresh rate of over 150Hz it is designed with high end gaming in mind. The monitor in action looks fantastic, but even more impressive is the price. According to a Dell representative, the 27” edition will retail at around 420 Euros (around $487) with 24” model available for around 250 Euros (around $290). If these prices are true, this is a lot of gaming monitor for your money.

Alienware

Alienware were showcasing their revamp of the Elite Gaming Mouse. Designed to adapt to any user, it is incredibly customizable. The sizes connect magnetically to the mouse allowing users to change mouse widths on the fly. Another advantage to this feature is that the thin mouse has two thumb buttons while the wider mouse has 4 (not pictured here). The chassis is capable of taking two sets of weights for optimum control over the feel and balance of the mouse, and the top of the shell is retractable for different hand lengths.

Alienware also were showcasing the new AW988 headset , described as the “gaming headset for the most dedicated audiophile.” While the display model was not able for testing, it was surprisingly light and above all – comfortable.

Of course, this is Alienware, so everything had RGB LEDs, which are fully customizable from the Alienware Command Centre software. The recent range of Alienware laptops boast the high end gaming specs we have become accustomed to, and strike a nice balance aesthetically between the larger than life previous models and standard laptop cases.

Samsung

Samsung launched the CJ79 34” curved widescreen monitor. While not touted specifically as a gaming monitor, it is the first of it’s kind to support a Thunderbolt 3 connector. Users of Razer external graphics cars will be ale to chain their gaming laptops to the monitor. laptops The 3440 x 1440 screen is capable of supporting dual display sources, and a larger CJ89 monitor has also been announced. Currently neither monitor has a retail price.

AverMedia Capture Cards

A smaller booth at IFA this year was home to AverMedia, showing their latest line in capture cards.

With streaming more popular than ever, AverMedia’s latest capture cards are aimed both at dual PC streaming and PS4 Pro players. The GC573 is an internal capture card capable of 4Kp60 High Dynamic Range (HDR) recording – something they claim is unique. Meanwhile their GC553 Live Gamer ULTRA external capture card provides pass-through 4Kp60 HDR, and recording at 4Kp30. Both cards claim ultra low latency – under 60ms was the figure claimed by a representative.

If these cards can do what they say they are a new standard in capture cards, and we hope to review them in future.

Gaming at IFA 2018

Gaming was somewhat underrepresented at IFA, but given it’s proximity to Gamescom this wasn’t too much of a surprise. What was on show was still impressive, and whether you need a gaming throne or a cheap but high quality monitor you’re well set with what IFA 2018 had to offer.

Read the full article: Gaming at IFA 2018: What’s New and What’s Hot?


from MakeUseOf https://ift.tt/2wvPxUg
via IFTTT